
94 F2 fork seal replacement quickie.....


lol Anyway......... From the top of the fork with the fork cap and springs removed, forks fully compressed. I made a syringe/sucker tool that rested on the top, extending into the fork the recommended depth. Over fill a little then suck out the extra.
Last edited by coalminer frank; Jul 23, 2013 at 09:16 PM. Reason: I'm sorry I was wrong, I shouldve looked in the manual
Member
Joined: Apr 2013
Posts: 85
Likes: 3
From: Vegas
I edited out my previous post since ive been up all night at work and im a bit tired.
So more like this then, correct?
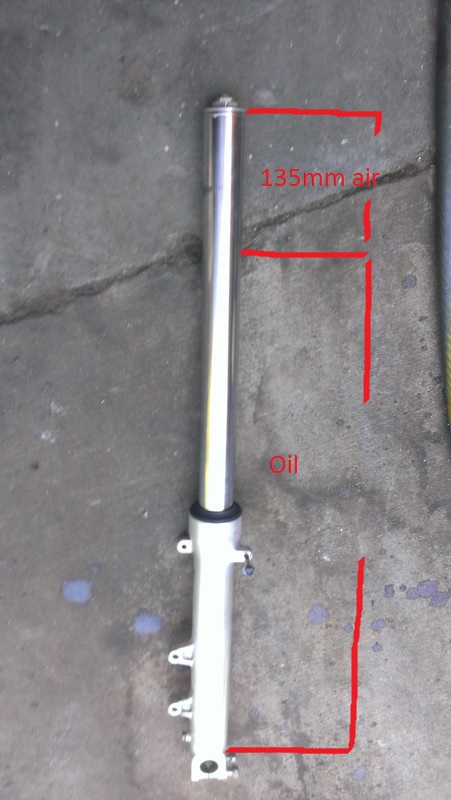
Yes, thats correct. When you first put in the fork oil, pump in up and down a few times to purge air from the system, maybe even extend the fork, place the palm of your hand over the top to seal it, then push down, that will help purge the air. Dont go too crazy, if you do, the oil will over flow out the top and make a mess. I used my steering damper fork clamp mount to my work bench to help hold the fork, kind of like having an extra hand.
Last edited by coalminer frank; Jul 23, 2013 at 09:17 PM.


Welcome Crew and ROTY 2014
Joined: Dec 2010
Posts: 2,059
Likes: 6
From: Kansas
Nice job, Gary!

+1 here... that oil lock/damper rod retaining bolt is only torqued to 17 ft. lb., but Loctite, or some other thread locking compound, should have been used on that bolt, so though some folks might get lucky, others might end up having to put the forks back in the triples, and stop the rotating internal assembly by having load (weight) back on the front end.
If you do already have them off, and turning this bolt just rotates the internals, you could try to turn in the preload adjusters all the way in, to add some load, but if the springs are OEM, they are really soft, and that might not help... having an impact wrench could help too, in this case.
On the crush washer, Gary didn't mention it, but it is implied, that you use a proper copper ( ) washer to replace it, as this washer will deform to the shape of the bolt head and lowers, to form a seal... if you are unsure about what to grab, just get one from the dealer, as they are only a buck and a half or so anyway. Part # 90544-283-000.
When you do re-torque this bolt, be sure you do it when you know you're done, and use a medium strength thread-locking compound, to ensure it stays... use anything higher than medium, and you'll be sorry later! (Or whoever you sell the bike to!)
The fork cap uses the same torque spec as this bolt, 17 ft. lb., and if you don't have a torque wrench, be sure not to "gorilla" that thing, also, they are easy to cross thread, so be certain that it's spinning down with little resistance - those threads are very delicate, and if you damage them, best/worse case scenario is you've got some shavings in your fork oil, which is not good, but worst case, you've got to replace the upper!
...I'll add one more helpful tip I've found. The easiest way to hold a fork leg is in the triple clamp. So I always cracking the the top cap and bottom bolt loose before pulling the fork leg out of the bike. I've had both stick before and it's a mega pain when the fork is off the bike.
+1 here... that oil lock/damper rod retaining bolt is only torqued to 17 ft. lb., but Loctite, or some other thread locking compound, should have been used on that bolt, so though some folks might get lucky, others might end up having to put the forks back in the triples, and stop the rotating internal assembly by having load (weight) back on the front end.
If you do already have them off, and turning this bolt just rotates the internals, you could try to turn in the preload adjusters all the way in, to add some load, but if the springs are OEM, they are really soft, and that might not help... having an impact wrench could help too, in this case.
On the crush washer, Gary didn't mention it, but it is implied, that you use a proper copper (
) washer to replace it, as this washer will deform to the shape of the bolt head and lowers, to form a seal... if you are unsure about what to grab, just get one from the dealer, as they are only a buck and a half or so anyway. Part # 90544-283-000.When you do re-torque this bolt, be sure you do it when you know you're done, and use a medium strength thread-locking compound, to ensure it stays... use anything higher than medium, and you'll be sorry later! (Or whoever you sell the bike to!)
The fork cap uses the same torque spec as this bolt, 17 ft. lb., and if you don't have a torque wrench, be sure not to "gorilla" that thing, also, they are easy to cross thread, so be certain that it's spinning down with little resistance - those threads are very delicate, and if you damage them, best/worse case scenario is you've got some shavings in your fork oil, which is not good, but worst case, you've got to replace the upper!
compressed. Im sorry, I was wrong, I shouldve looked in the manual before I tried to help someone. Ive actually redid my forks twice and followed the instructions in the Clymer manual. I dont know why I thought the measurement was with extended forks. Fork level measurement is with compressed forks. I apoligize, I feel so stupid. I'm sorry. Please forgive me
Last edited by coalminer frank; Jul 23, 2013 at 09:22 PM. Reason: add stuff