
1987 Hurricane to 2003 CBR600RR Conversion

Senior Member
Joined: Apr 2012
Posts: 229
Likes: 0
From: Sheffield, England
Wow, your bike is looking fantastic bud, wish I had your painting skills and your bike  the only input I could give would be: how about putting a gold chevron on the main fairing (where you might see an inspection panel on other bike) to mirror the one on the tank. I guess the sponsor decals would go there really though. Great work man!
the only input I could give would be: how about putting a gold chevron on the main fairing (where you might see an inspection panel on other bike) to mirror the one on the tank. I guess the sponsor decals would go there really though. Great work man!


Retired Super Moderator, Tin Star Man & Hurricane Saloon Prospect, ROTM Feb 2015
Joined: Sep 2011
Posts: 2,382
Likes: 5
From: V��ksy, Finland
Awesome work, gotta subscribe! Might be I just have a weird sense of humor but I would actually change the tail decal to say 600f1 
I've been juggling with the idea to put Daytona decals on my tail but add a red KED after it so it would say DaytonaKED
I've been juggling with the idea to put Daytona decals on my tail but add a red KED after it so it would say DaytonaKED
Thread Starter
|
Senior Member
Joined: Dec 2012
Posts: 873
Likes: 8
Wow, your bike is looking fantastic bud, wish I had your painting skills and your bike the only input I could give would be: how about putting a gold chevron on the main fairing (where you might see an inspection panel on other bike) to mirror the one on the tank. I guess the sponsor decals would go there really though. Great work man!
the only input I could give would be: how about putting a gold chevron on the main fairing (where you might see an inspection panel on other bike) to mirror the one on the tank. I guess the sponsor decals would go there really though. Great work man!
The one issue I have with this is that I have the complete Playboy Moto GP decal set with all of the sponsor logos. I was thinking that if I sold the bike the next owner could put them on...actually I am still thinking I might put them all on the bike. It would look something like this if I did.

I really can't decide whether to go the full Moto GP look or not...comments welcome.
Thread Starter
|
Senior Member
Joined: Dec 2012
Posts: 873
Likes: 8
To answer Mattson and YorkieJeff, I totally get where your coming from here. It's really not an RR. I played with different versions of the tail logo. I was just going to put 600 F1 on there. Then I thought about 600 F RR. The problem was finding decals that would work and getting the layout to look right. Balancing the decals so it looks factory was important to me, I like things to look as close to factory as possible. In the end I just gave up and went with the 600 RR because it looks good and I wanted to move on with the project...sometimes it just takes too long to find a solution and you take the best one available. I'm sure I'll take some crap for putting the RR on a fake RR, but what can you do? I've taken a lot of time to try and make the bike as close to an RR as I can. I've added suspension changes that will rake the bike more like an RR and have even been looking at moving the exhaust under the tail to be more like an RR. It falls short because the smaller tires, etc. but it will be close and should look pretty good when done.
Thread Starter
|
Senior Member
Joined: Dec 2012
Posts: 873
Likes: 8
Surface prep and then proper application of paint is important to get good surface finish with rattle cans. I don't like the small spray pattern with cans, but on smaller areas you can get it to look very good. On larger surfaces you really need a gun to avoid lines and overlap problems. The main trick with any paint is to get a good bond coat down first. I spray from a distance and fog the surface. Let it tack up and then lay down good solid coats of paint. This helps to "glue" the finish coats so they don't run or bleed. Don't agree with the light coat strategy many discuss on the web. You end up with very thin layers on the edges and too much overspray dust. Even sanding between doesn't really help. In order to get high gloss shine you need thicker coats that are applied wet. The big trick is to know when to move the spray to avoid runs and keeping the surfaces wet to avoid overspray. Just the right amount of paint is critical...too much and you have runs too little and it looks "blotchy".
All of these parts will be clear coated with 2 part epoxy once they are all done. That will be sanded and buffed and will give the protection and high gloss. I know your struggling with doing that, but even with bad undercoat the clear will bring it back to smooth as long as it's not too blotchy...and you get the fuel and UV protection. You might consider taking the parts to a body shop and have them shoot the clear for you. It will cost a bit but not as much as you might think.

Member
Joined: Mar 2011
Posts: 51
Likes: 0
WWWWOOOOOWWWWWW, awesome!!! Great paint job you did, congratulations
My opinion about sponsor logos, don't put. Is so beautiful without them. May be you need put one on front fender because you create a square for that..
Great work, I can't wait to see the complete Hurricane, all together
My opinion about sponsor logos, don't put. Is so beautiful without them. May be you need put one on front fender because you create a square for that..
Great work, I can't wait to see the complete Hurricane, all together
Last edited by PSonic; Jan 31, 2014 at 08:59 AM.
Thread Starter
|
Senior Member
Joined: Dec 2012
Posts: 873
Likes: 8
I thought I would post some background info since it's been so long since I started to update this thread and some may not have read through the whole thing to see where I started and where the bike has gone and is going.
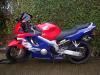
The bike was a 1987 Hurricane that I bought for another project. I was only looking for an engine at the time, but once I got it home and got it running it was a shame to tear it down. Here is a picture of how it looked when I got it although there are some parts on it in this picture that I added...biggest thing was it had no plastics at all.

Last winter (2013) I worked on the conversion of the plastics to 2003-4 CBR600RR. That is what this thread outlines in detail on how to change a Hurricane into an RR...sort of.
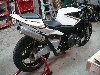
Here is what it looked like when I finished the mounting of all the plastics and just before I tore it down to start the rebuild. When I tore it down I really didn't think I would rebuild the bike...but then as some things looked better other stuff looked bad so...

I got sidelined with moving and health issues and another project bike, so the CBR went on the back burner. As I have been stuck here recovering from surgery I got back on the CBR.
I have accumulated mostly new or very good used parts for the bike. I honestly don't have a total list of everything, but essentially once it is put back together it will be very clean and set up for performance as well as looks...I think I originally had a budget of $1500 which I am pretty sure I have exceeded, but not by a lot since I do all my own work and I have bought parts when I find a good deal.
Recent work I did was to get the wheels and tires taken care of. I got new tires, a very clean set of wheels, replaced the bearings, new sprocket, cush rubbers, etc. and cleaned eveything up. They are ready to mount.
As you can see from these pictures, they will look as nice as the rest of the bike...I may put some gold striping on them...haven't decided about that yet.


I'm really not sure what will happen to this bike once I'm done. I have a lot of time and heart into it so I may just keep it, but I have 2 more Hurricanes that I have all the original plastics for that I would like to put back on the road. I only have so much money, so may sell this bike to fund the next one...or I may not want to once it's done...hard to decide right now.
Here is one of the other Hurricanes that is waiting for me.

Some of these pictures were posted way back when, but thought I would update so people understand that the bike is still in process.
I wanted to post some of the painting because I feared that people wouldn't believe that I was doing it myself, because I'm pretty good at this stuff. I have spent many years restoring cars and motorcycles and doing custom paint...mostly as a hobby, but years ago professionally.
I really enjoy fixing up and restoring motorcycles...and riding too, but there is only so much time and money.
The bike was a 1987 Hurricane that I bought for another project. I was only looking for an engine at the time, but once I got it home and got it running it was a shame to tear it down. Here is a picture of how it looked when I got it although there are some parts on it in this picture that I added...biggest thing was it had no plastics at all.

Last winter (2013) I worked on the conversion of the plastics to 2003-4 CBR600RR. That is what this thread outlines in detail on how to change a Hurricane into an RR...sort of.
Here is what it looked like when I finished the mounting of all the plastics and just before I tore it down to start the rebuild. When I tore it down I really didn't think I would rebuild the bike...but then as some things looked better other stuff looked bad so...

I got sidelined with moving and health issues and another project bike, so the CBR went on the back burner. As I have been stuck here recovering from surgery I got back on the CBR.
I have accumulated mostly new or very good used parts for the bike. I honestly don't have a total list of everything, but essentially once it is put back together it will be very clean and set up for performance as well as looks...I think I originally had a budget of $1500 which I am pretty sure I have exceeded, but not by a lot since I do all my own work and I have bought parts when I find a good deal.
Recent work I did was to get the wheels and tires taken care of. I got new tires, a very clean set of wheels, replaced the bearings, new sprocket, cush rubbers, etc. and cleaned eveything up. They are ready to mount.
As you can see from these pictures, they will look as nice as the rest of the bike...I may put some gold striping on them...haven't decided about that yet.


I'm really not sure what will happen to this bike once I'm done. I have a lot of time and heart into it so I may just keep it, but I have 2 more Hurricanes that I have all the original plastics for that I would like to put back on the road. I only have so much money, so may sell this bike to fund the next one...or I may not want to once it's done...hard to decide right now.
Here is one of the other Hurricanes that is waiting for me.

Some of these pictures were posted way back when, but thought I would update so people understand that the bike is still in process.
I wanted to post some of the painting because I feared that people wouldn't believe that I was doing it myself, because I'm pretty good at this stuff. I have spent many years restoring cars and motorcycles and doing custom paint...mostly as a hobby, but years ago professionally.
I really enjoy fixing up and restoring motorcycles...and riding too, but there is only so much time and money.
Last edited by dennisgb; Jan 31, 2014 at 10:00 AM.
Thread Starter
|
Senior Member
Joined: Dec 2012
Posts: 873
Likes: 8
Here's a bit about some of the parts I have that will go on the bike. I have a bunch of new parts in storage right now that I can't take pictures of, but basically anything that needs to be replaced will be replaced with new or very good used parts.
As most of the early CBR people know, a lot of parts are no longer available or are very expensive if they are. The switch gear on the bike was really bad. Old and faded. The switches still work but it looked terrible.
I found some really nice switches that I paid $30 for...one thing I've learned is to always be searching for parts...


I have new gold anodized grips with rubber and levers that will go on the bike with these.
I have three different exhausts systems. This is one I picked up for $80 on Ebay that will likely go on this bike.

I bought this Progressive shock a while back that is like new and made for the Hurricane. It is adjustable to get a higher rear height.

I also have a Fox clicker shock that might go on this bike...I will try them both and decide.
Since I'm still in process I wanted to show the quality of the parts I will use and give an idea of where this is heading. I want it to look like and ride like a new bike when I'm done