
? Vaccum line under #1 intake ?


Thread Starter
|
Junior Member
Joined: Aug 2013
Posts: 10
Likes: 0
From: Half Moon Bay ca.
A previous owner installed a 1993 engine in my 1990 Cbr 1000f. Recently I noticed that a vaccum line coming from a nipple under the # 1 intake ( on the block) is plugged with a screw. I cannot find any info telling me what this goes to. Can anyone tell me what it goes to or what it is? thank you for your help.

Super Moderator
Joined: May 2012
Posts: 4,647
Likes: 35
I don't have a Mark 3 but here's my best guess. The vacuum port is not needed unless you are setting the carbies for air flow. So the rubber tube has been sealed with a screw.
You can see from the above picture, the vacuum lines come off the bottom of the 93 carbs.
Sprock would be the man to give the definitive answer but I think he's just about to - or even may be - winging his way to Europe.
Cheers, SB
You can see from the above picture, the vacuum lines come off the bottom of the 93 carbs.
Sprock would be the man to give the definitive answer but I think he's just about to - or even may be - winging his way to Europe.
Cheers, SB
Last edited by Sebastionbear1; Aug 6, 2013 at 05:50 PM. Reason: add diagram
Super Moderator
Joined: May 2012
Posts: 4,647
Likes: 35
Ok, just did a bit more of a search this is what I found.
Information from a post by Naga_Thai in a much earlier thread.
Carburetors� Synchronization:
Different method for different models (as stated in detailed "How-to's" and Honda Manuals).
There are 2 different sets of carbs on the CBR1000F series. Accordingly;
For detailed links to "HOW TO with pictures"...
You can see from the highlighted text above, carb 1 - closest to the fuel petcock, the vacuum line GOES to the petcock. Carbs 2 and 3 have rubber covers, and Carb 4 has a screw and washer.
Cheers, SB
Information from a post by Naga_Thai in a much earlier thread.
Carburetors� Synchronization:
Different method for different models (as stated in detailed "How-to's" and Honda Manuals).
There are 2 different sets of carbs on the CBR1000F series. Accordingly;
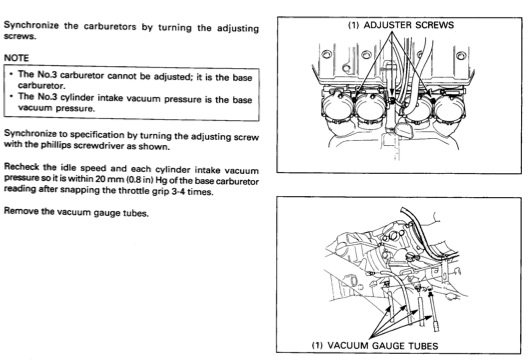
- On 1000 H, J, K, L, M, N models, remove the rubber plug from the vacuum take-off point on the top of each carburetor and connect the vacuum gauge hoses to the take-off points.
- On 1000 P models onward, release the fuel tap vacuum hose from No. 1 cylinder take-off point, the rubber plugs from Nos. 2 and 3 cylinder takeoff points, and the screw and washer from No. 4 cylinder take-off point. Screw an adapter into No.4 take-off point and connect the vacuum gauge hoses.
For detailed links to "HOW TO with pictures"...
- 1000 H, J, K, L, M, N models - see my links below or HOW TO - CARB SYNC / BALANCE - MANY PICTURES - CBR Forum - Enthusiast forums for Honda CBR Owners & YouTube - ‪CBR1000F - L (1990) CARB SYNC BALANCE 2‬‏
- 1000 P models onwards - Farkles
You can see from the highlighted text above, carb 1 - closest to the fuel petcock, the vacuum line GOES to the petcock. Carbs 2 and 3 have rubber covers, and Carb 4 has a screw and washer.
Cheers, SB

Senior Member
Joined: Jun 2006
Posts: 4,237
Likes: 15
From: Bir Tawil
Exactly! Unless you plan on opening a vacuum operated fuel petcock, its not needed and should be sealed.


Thread
Thread Starter
Forum
Replies
Last Post