
Carb Replacement


Thread Starter
|
Member
Joined: May 2013
Posts: 37
Likes: 0
From: Scotland
Hi guys,
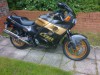
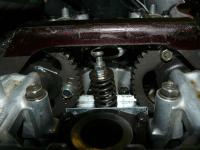
Just purchased a 1999 Honda CBR1000f. The carb assembly was off the bike and I am trying to put it together. I know from reading on here that they can be a pig to get back on. The rubbers connected to the engine are pretty hard (don't know if that normal) but at �43 each i don't really want to get new ones. Also 2 vent pipes at the top of the carbs don't know the proper route for them. I would love to post a picture to explain but cant seem to. Dont know if thats because I am newbie
Thanks
Welcome Crew
Joined: Dec 2012
Posts: 1,830
Likes: 1
From: newbury u.k
welcome 
warm the rubbers up with a hair dryer to soften them up a very small amount of washing up liquid can help as lubrication
not sure on your vent pipe route, but someone will be along to help.
warm the rubbers up with a hair dryer to soften them up a very small amount of washing up liquid can help as lubrication
not sure on your vent pipe route, but someone will be along to help.

Junior Member
Joined: Mar 2013
Posts: 17
Likes: 0
From: New Hampshire, US
As far as getting the carburetors back on the bike try getting them attached to the airbox side first and tighten the clamps, then mount onto the engine side. Push onto the airbox towards the engine to get the carbs seated. This probably isn't the proper way to do it but the only way I have been able to. Download the service manual here https://cbrforum.com/forum/workshop-...f-format-4952/ open up the PDF to page 37 maybe that will help you with the routing of the vents.
Last edited by jordonsk; May 12, 2013 at 12:28 PM.

September 2009 ROTM Winner - Faster than a Speeding ..........
Joined: Nov 2008
Posts: 3,808
Likes: 3
From: UK
As far as getting the carburetors back on the bike try getting them attached to the airbox side first and tighten the clamps, then mount onto the engine side. Push onto the airbox towards the engine to get the carbs seated. This probably isn't the proper way to do it but the only way I have been able to. Download the service manual here https://cbrforum.com/forum/workshop-...f-format-4952/ open up the PDF to page 37 maybe that will help you with the routing of the vents.
Once you've done it a few times, you'll have 'em on and off in double quick time


Administrator, MVN / ROTM NOV 2012
Joined: Aug 2008
Posts: 11,003
Likes: 3
From: Republic of Boon Island
Hawks on the money as usual - and me too I never attach the airbox - it's always
last with me- a handy lube for this job is "hand sanitizer" gel lightly coated inside the
boots - makes them slicker than hell .... also get the right most carb lined up first
them wiggle them up / down and push them in, in a right to left manner - they'll
go in push hard
my 2 cents - I'm always chasing the Hawk - man
Thread Starter
|
Member
Joined: May 2013
Posts: 37
Likes: 0
From: Scotland
Thanks for all the advice guys. Made this newbie most welcome.
I eventually went for the wife's hairdryer and plenty lube. Right hand carb in first as suggested then wiggled the rest in.
I am also a bit further forward with my 2 vent pipes from the top of the carbs. As they are on pivots they were turned up and came out over the top of the airbox. Looking at the service manual they head down the way (under the carbs). After that, the 'natural' route is round the SIDE of the airbox and then into a channel in front of the battery box? Is that set-up familiar to anyone?
Honda CBR 1000 FK 89 Carburettor to Engine Inlet Rubbers Parts at Wemoto - The UK's No.1 On-Line Motorcycle Parts Retailer
You won't regret buying these.
You won't regret buying these.
Administrator, MVN / ROTM NOV 2012
Joined: Aug 2008
Posts: 11,003
Likes: 3
From: Republic of Boon Island
Is that set-up familiar to anyone?
It is. You can run without the lines and simply aim the T's back and down at a 70 degree
angle - my 93 & 87 - I left them off , only gets to be an issue in super wet weather & even
then it would be an achievement to get water infiltration in them
It is. You can run without the lines and simply aim the T's back and down at a 70 degree
angle - my 93 & 87 - I left them off , only gets to be an issue in super wet weather & even
then it would be an achievement to get water infiltration in them
Thread Starter
|
Member
Joined: May 2013
Posts: 37
Likes: 0
From: Scotland
Honda CBR 1000 FK 89 Carburettor to Engine Inlet Rubbers Parts at Wemoto - The UK's No.1 On-Line Motorcycle Parts Retailer
You won't regret buying these.
You won't regret buying these.
Worth considering at that price!!