
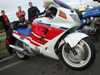
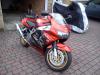
1990 SC24 Colour Match


Thread Starter
|
Member
Joined: Nov 2012
Posts: 85
Likes: 0
OK.. time for a small update....
the work is still in progress, the front cowl was made welding two into one, now I have a decent cowl compared to the crap I got with the bike ->


In fact, all of the cowls must be exchanged or repaired because some douche bag treated them with resin or whatever - can't be got rid of....
So.. as I said, the cowl was redone


And it was all mounted.... the bikes awaits the side cowls now..


As for the colours.... I couldn't match any honda ones, for the gold stripes I used some Toyota palette, and as for the blue... VW palette... I can give you the symbols later on but.. it doesn't make a difference since I chose them to my taste...
PS.
If you don't get full size pictures, check them here
http://imageshack.us/a/img829/3987/s5003164.jpg
http://imageshack.us/a/img705/60/s5003163f.jpg
http://imageshack.us/a/img203/3848/s5003160.jpg
http://imageshack.us/a/img822/1889/s5003161.jpg
http://imageshack.us/a/img577/2016/dsc0089qk.jpg
http://imageshack.us/a/img703/8957/s5003180.jpg
http://imageshack.us/a/img713/6669/s5003179j.jpg
http://imageshack.us/a/img14/215/s5003178.jpg
http://imageshack.us/a/img687/7647/s5003177.jpg
http://imageshack.us/a/img132/1944/s5003176.jpg
http://imageshack.us/a/img826/3203/s5003175.jpg
http://imageshack.us/a/img543/7466/s5003174.jpg
http://imageshack.us/a/img194/3503/s5003173.jpg
Last edited by bc30se; Mar 30, 2013 at 12:36 PM.


Senior Member
Joined: Apr 2008
Posts: 562
Likes: 11
Sensational job there! I'm so jealous! Glad you kept it near original.
A few questions.
A few questions.
- What happened to your fill plates from tank to front fairing?
- What did you do to restore the mirror surrounds and boots. Can you paint those or were yours in great condition already?
- Is that the MRA spoiler screen or different version?


Thread Starter
|
Member
Joined: Nov 2012
Posts: 85
Likes: 0
Thank you guys.... the panels under the bars are just drying
Rubber boots, they were OK, I just cleaned them with what we call an active foam for truck cleaning (truck cleaning solution??), as for the mirrors themselves, I painted them...
the shield is MRA....
the luggage rack is original HONDA... came with the bike..
Rubber boots, they were OK, I just cleaned them with what we call an active foam for truck cleaning (truck cleaning solution??), as for the mirrors themselves, I painted them...
the shield is MRA....
the luggage rack is original HONDA... came with the bike..
Last edited by bc30se; Apr 26, 2013 at 08:24 AM.

After many investigations I ended up with what I think is the best and easiest fix. Soldering iron, cable ties and copper rod.
Change the soldering iron tip for a flat screwdriver tip. Clean the c**p of the fairing including any epoxy. Melt a bit of cable tie on a couple of spots along the split like spot welds. heat the fairing plastic so they go soft but not melt then add the cable tie plastic to the mix by melting that in to the fairing.
Once you have a solid join lay a copper rod over the joint and melt cable tie over the rod into the fairing.
Will come out stronger than new. DO NOT do this indoors due to fumes. Look up Del Boys garage on youtube for a video on the above.
Thread Starter
|
Member
Joined: Nov 2012
Posts: 85
Likes: 0
Hi Slow poke,
After many investigations I ended up with what I think is the best and easiest fix. Soldering iron, cable ties and copper rod.
Change the soldering iron tip for a flat screwdriver tip. Clean the c**p of the fairing including any epoxy. Melt a bit of cable tie on a couple of spots along the split like spot welds. heat the fairing plastic so they go soft but not melt then add the cable tie plastic to the mix by melting that in to the fairing.
Once you have a solid join lay a copper rod over the joint and melt cable tie over the rod into the fairing.
Will come out stronger than new. DO NOT do this indoors due to fumes. Look up Del Boys garage on youtube for a video on the above.
Guys I told you but you don't seem to listen.... you don't have to mess with copper wires. Just buy some abs welding rods and melt them into the crack, you can strengthen the piece by using a special metal mesh, like the one here...
Plastic Welding High Quality Stainless Steel Reinforcing Mesh Plastic Repairs | eBay
Last edited by bc30se; Nov 29, 2013 at 08:47 AM.