Ern's take on the digital F4i upgrade
#1
 07-30-2011, 11:15 AM


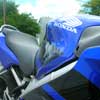
Finally got the guages mounted, after 2 weeks of sweltering in the
garage for 1-2 hours at a time. Here's my version of a mount-up.
Gotcbr (i believe) turned me on to a site for buying the 9x connectors,
so I didn't have to connect each one individually. So that part worked
real well, too.
Here's the final result....

Ern
garage for 1-2 hours at a time. Here's my version of a mount-up.
Gotcbr (i believe) turned me on to a site for buying the 9x connectors,
so I didn't have to connect each one individually. So that part worked
real well, too.
Here's the final result....
Ern


#4
10-26-2011, 11:15 AM
would you mind explaining how you made the mount for the gauges? I just bought my first bike (97 CBR f3) and am really considering this swap. I bought it at the END of the season, so I have to find some projects or else im going to try and hop on the bike with 3 feet of snow on the ground haha.
#5
10-26-2011, 07:00 PM
I don't like the open look, through the tripple trees, on a bike with a
fairing, so I wanted to keep the surround that the guages are mounted
into intact. That kept the smooth flow of the guages into the rest of
the fairing.
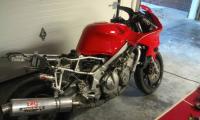
It destroys the old guages. I took the cowl from the old one and cut the bezel/bump
off to make the face flat. Took a plate of 1/4 aluminum and duplicated the F3 mount
position/spacing. Epoxied the plate to the back of the cowl, then used bondo
w/fiberglass to build a bead at the joining all the way around. then mounted the F4
guages in the position you see, on the plate. The mesh was just something I had
laying around, to dress it up.
OEM-Type Bullet & Spade Electrical Connectors for 1960's through 1970's Japanese Vehicles... Bridgestone, Datsun, Hodaka, Honda, Kawasaki, Landcruiser, Suzuki, Tohatsu, VW, & Yamaha
That's where I got the matching connectors for the F4 guages. I soldered all the pins
to the F3 harness, plugged the empty connector to the guages, and then using a
diagram, plugged the harness pins into the corresponding place in the empty
connector. For the clean factory look, I slipped a piece of heat-shrink around each of
the 2 bundles and then cooked it down after all the pins were inserted properly.
Ern
fairing, so I wanted to keep the surround that the guages are mounted
into intact. That kept the smooth flow of the guages into the rest of
the fairing.
It destroys the old guages. I took the cowl from the old one and cut the bezel/bump
off to make the face flat. Took a plate of 1/4 aluminum and duplicated the F3 mount
position/spacing. Epoxied the plate to the back of the cowl, then used bondo
w/fiberglass to build a bead at the joining all the way around. then mounted the F4
guages in the position you see, on the plate. The mesh was just something I had
laying around, to dress it up.
OEM-Type Bullet & Spade Electrical Connectors for 1960's through 1970's Japanese Vehicles... Bridgestone, Datsun, Hodaka, Honda, Kawasaki, Landcruiser, Suzuki, Tohatsu, VW, & Yamaha
That's where I got the matching connectors for the F4 guages. I soldered all the pins
to the F3 harness, plugged the empty connector to the guages, and then using a
diagram, plugged the harness pins into the corresponding place in the empty
connector. For the clean factory look, I slipped a piece of heat-shrink around each of
the 2 bundles and then cooked it down after all the pins were inserted properly.
Ern
Last edited by MadHattr059; 10-26-2011 at 07:09 PM.
#6
10-30-2011, 04:22 PM

#7
10-31-2011, 05:31 AM
#8
11-03-2011, 04:54 PM
Official Welcome Crew Spicy Cat

Thread
Thread Starter
Forum
Replies
Last Post