The story of one neglected Triumph...
#71
 11-03-2013, 04:31 PM


Super Moderator
#72
11-04-2013, 12:08 PM

Mrs. Mattson packed the baby and the dog and took off to visit her parents overnight, a perfect opportunity to pack all my stuff in peace with proper thought after work for the move, so as soon as I got off I headed straight to the garage 
I`m expecting the new front light unit to arrive this week so I was in a bit of a hurry to get the Koso gauge fitted before that to avoid any clearance issues.

The gauge`s original leg is just fine, only a wee bit short and the bolt holes are a smidgen too wide apart so I kicked the heap... krhm, scoured my stock of raw material and found a sheet of 2mm aluminum whereof I started fabricating a new longer leg.

Don`t have a...bend bench? so a piece of angle iron and a rubber malllet will have to do...

...lucky aluminum is such a soft metal it obeys the hammer pretty well.


test fitting and some fine tuning...

Made a few little bends to strengthen the structure. The end bits are a little unfinished yet...


...because the leg is still a bit long but I didn`t want to cut it too short before I can test it with the headlight so nothing will hit or rub, you can always cut it but stretching it is a bit harder...
I`m expecting the new front light unit to arrive this week so I was in a bit of a hurry to get the Koso gauge fitted before that to avoid any clearance issues.
The gauge`s original leg is just fine, only a wee bit short and the bolt holes are a smidgen too wide apart so I kicked the heap... krhm, scoured my stock of raw material and found a sheet of 2mm aluminum whereof I started fabricating a new longer leg.
Don`t have a...bend bench? so a piece of angle iron and a rubber malllet will have to do...
...lucky aluminum is such a soft metal it obeys the hammer pretty well.
test fitting and some fine tuning...
Made a few little bends to strengthen the structure. The end bits are a little unfinished yet...
...because the leg is still a bit long but I didn`t want to cut it too short before I can test it with the headlight so nothing will hit or rub, you can always cut it but stretching it is a bit harder...
Last edited by Mattson; 10-29-2014 at 02:27 PM.
#73
11-04-2013, 02:17 PM

#74
11-04-2013, 02:39 PM
 yea well you know how it goes, every once in a while we guys just have to get some..........................tool time
 Besides, I`m merely making sure the parts I`ve ordered go together

Got a reply on a Triumph forum that whatever I do, under no circumstances I must NOT fix the steering damper to the valve cover bolts as there supposeldy are pressure seals under the wide flanged bolt heads AND the bolts themselves are very, very soft and will NOT be able to hold the jolts directed at them sideways so I have to remove the damper, lift the tank and try to figure out a place to fix a bracket for it...
#75
11-04-2013, 03:36 PM
I'll give you that, you gotta make sure all the new items are keepers!
Got a reply on a Triumph forum that whatever I do, under no circumstances I must NOT fix the steering damper to the valve cover bolts as there supposeldy are pressure seals under the wide flanged bolt heads AND the bolts themselves are very, very soft and will NOT be able to hold the jolts directed at them sideways so I have to remove the damper, lift the tank and try to figure out a place to fix a bracket for it...
#76
11-04-2013, 11:07 PM
Wasn't my first choice either and thought that wouldn't be ideal place to put it on since the thread parts of the bolts are pretty tiny, m6 max, when I get the headlight/gauge area in some kind of order I'll try to come up with a better game plan for it...
#77
11-05-2013, 01:16 PM
Now THAT was fast! I ordered this last friday noon from the brits, cannot fathom how it possibly can already be here! I was pretty stoked to see it has already arrived as this is one of the key factors that defines the whole outlook of the entire bike. I didn`t have time to test fit it today so I just unboxed it, quickly slapped it together and strapped it on with a few zipties so by no means it is NOT on it`s final place nor position.


Have a few little problems with it, first of all the fixing points are made for the maximum width of 200mm, my stanchions are 210mm apart so I gotta try to bend the brackets a bit and file the slots a little to "cheat" the extra 5mm per side from somewhere, the next one is that it needs to come up but as expected the ignition lock is seriously messing with my zen thing! Gotta try to figure that out somehow too cause it can`t come forward enough or it would look stupid...

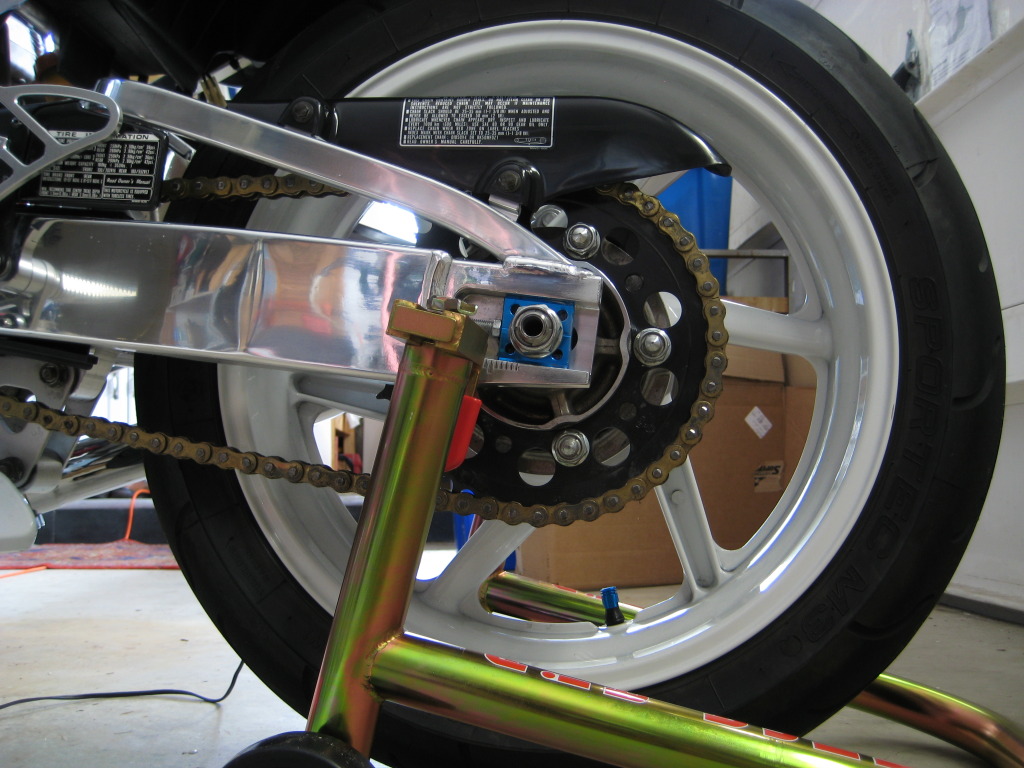
My chain order came today too, got JT sprockets, anyone have any info on those? seem solid but haven`t ever heard of them before, for the chain I got the RK 530Gwx "superlink", cost me 280EUR but should be able to cope with whatever the bike has... The only problem is that instead of 108- it`s 120 links long...

...so I got a good excuse to buy a "pro" chain rivet tool kit
Have a few little problems with it, first of all the fixing points are made for the maximum width of 200mm, my stanchions are 210mm apart so I gotta try to bend the brackets a bit and file the slots a little to "cheat" the extra 5mm per side from somewhere, the next one is that it needs to come up but as expected the ignition lock is seriously messing with my zen thing! Gotta try to figure that out somehow too cause it can`t come forward enough or it would look stupid...
My chain order came today too, got JT sprockets, anyone have any info on those? seem solid but haven`t ever heard of them before, for the chain I got the RK 530Gwx "superlink", cost me 280EUR but should be able to cope with whatever the bike has... The only problem is that instead of 108- it`s 120 links long...
...so I got a good excuse to buy a "pro" chain rivet tool kit
Last edited by Mattson; 10-29-2014 at 03:27 PM.
#78
11-05-2013, 02:33 PM
...I didn`t have time to test fit it today so I just unboxed it, quickly slapped it together and strapped it on with a few zipties so by no means it is NOT on it`s final place nor position.
Have a few little problems with it, first of all the fixing points are made for the maximum width of 200mm, my stanchions are 210mm apart so I gotta try to bend the brackets a bit and file the slots a little to "cheat" the extra 5mm per side from somewhere, the next one is that it needs to come up but as expected the ignition lock is seriously messing with my zen thing! Gotta try to figure that out somehow too cause it can`t come forward enough or it would look stupid...
Have a few little problems with it, first of all the fixing points are made for the maximum width of 200mm, my stanchions are 210mm apart so I gotta try to bend the brackets a bit and file the slots a little to "cheat" the extra 5mm per side from somewhere, the next one is that it needs to come up but as expected the ignition lock is seriously messing with my zen thing! Gotta try to figure that out somehow too cause it can`t come forward enough or it would look stupid...
Word! It is SO much better having a "proper" kit for chain work!
#79
11-06-2013, 02:41 PM
Right, anyone ever noticed when you receive a shipment, and there`s this little white piece of paper inside, it says something like FITTING INSTRUCTIONS. Anyone ever actually read it? Me neither... Instructions...who needs them...
The front end looks still a bit messy because all the wires and cables have to be bundled and/or re-routed but it`ll get better eventually when I assemble everything after painting. Thought I might leave the front shock sliders aluminum color cause I`m using the black and silver as effect colors on the front end as most of the parts (clip ons, lights, mirrors etc) are already black/silver. The triples are going to get "oranged".
So, I took a look at the little note today after work and turns out when I assembled the light yesterday in haste, I managed to do it upside down


Me gusta! This is how it looks when assembled right thought that lower light stuck out a bit too far... I did manage to bend the side brackets a little bit outwards to get a few mm:s out of them, didn`t get them quite as nice as I had hoped cause the corner of the table where my vice is fixed is cracked and flexed when I tried bending them so I ended up having to use a big rubber mallet and hitting with the exact same force many times in a row is slightly tricky... The legs fixing the whole thing to the stanchions are still a bit crooked inwards but you have to know it to see it, might try to get the brackets prettier later when I get my new workshop built as they need new paint anyway but I`ll worry about that then.
Earlier I wrote about worrying if the upper light clears the ignition. Well:

There`s precisely 0mm of free play between them The light does point ever so slightly upwards ATM but when I relocate the steering damper I am able to drop the whole light structure about 8-10mm lower which will take care of that. Also measured that the gauge cluster has space to come backwards another 15mm but had to leave the modifying of the bracket till the next time...
The front end looks still a bit messy because all the wires and cables have to be bundled and/or re-routed but it`ll get better eventually when I assemble everything after painting. Thought I might leave the front shock sliders aluminum color cause I`m using the black and silver as effect colors on the front end as most of the parts (clip ons, lights, mirrors etc) are already black/silver. The triples are going to get "oranged".
So, I took a look at the little note today after work
Me gusta! This is how it looks when assembled right
thought that lower light stuck out a bit too far... I did manage to bend the side brackets a little bit outwards to get a few mm:s out of them, didn`t get them quite as nice as I had hoped cause the corner of the table where my vice is fixed is cracked and flexed when I tried bending them so I ended up having to use a big rubber mallet and hitting with the exact same force many times in a row is slightly tricky... The legs fixing the whole thing to the stanchions are still a bit crooked inwards but you have to know it to see it, might try to get the brackets prettier later when I get my new workshop built as they need new paint anyway but I`ll worry about that then.Earlier I wrote about worrying if the upper light clears the ignition. Well:
There`s precisely 0mm of free play between them
The light does point ever so slightly upwards ATM but when I relocate the steering damper I am able to drop the whole light structure about 8-10mm lower which will take care of that. Also measured that the gauge cluster has space to come backwards another 15mm but had to leave the modifying of the bracket till the next time...
Last edited by Mattson; 10-29-2014 at 03:27 PM.
#80
11-06-2013, 03:43 PM

I'm running RK / JT 520 steel. no complaints here.
as for color themes, I like the way these turned out.


Last edited by Mattson; 10-29-2014 at 03:28 PM.