
Look At This Friggin' Thing!


Thread Starter
|
Senior Member
Joined: Oct 2017
Posts: 193
Likes: 4
Thanks Hamlin, I think that's what I have or close to it. Never used it, been sitting on a shelf for a while but now is the time I guess!! I have rubber gloves and plastic scrapers. Time to try it out...
Yup Yup!!
Yup Yup!!
Super Moderator
Joined: Oct 2016
Posts: 2,519
Likes: 8
From: Lancs ,UK
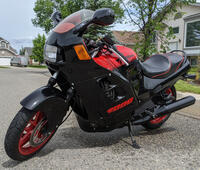
Ok, my float bowl gaskets are in so I can stop messing around and get it fired up. Last thing other than change the oil is dealing with the tank. It is clean inside, or clean enough I think. The beige color is some kind of rubber coating. The outside is dent free, but has paint that is peeling off in thick flakes. Should I spray paint stripper and scrape, or is there a better way - I'm not going to bolt that natty 'ol thing back on without doing something! And what would be recommended to just keep the rust off it - Maybe a primer paint?
Pretty cool, other than buying a brand new sealed battery all I have in this thing is a couple hundred bucks and time. Hope it starts lol!
Pretty cool, other than buying a brand new sealed battery all I have in this thing is a couple hundred bucks and time. Hope it starts lol!

Super Moderator
Joined: Mar 2013
Posts: 7,177
Likes: 404
From: Alabama
IMO both methods have their plusses and minuses.
Time - Stripping is faster by far.
Handling - Sanding is much easier to deal with. If done outside or in a shed, the dust kind of takes care of itself. Like I mentioned before, if you get strong stripper on your skin, it needs to be flushed off immediately. Also, you need to insure you clean up the leavings from the stripper.
Cost - If $$ is a concern, whatever you have on hand is major factor.
If done properly, both methods will give you the desired results.
Either way you go, I would wear a mask at a minimum while performing either technique.
P.S. - I had to look up mouse sander too. Turns out I've had one all along and didn't know it.
Time - Stripping is faster by far.
Handling - Sanding is much easier to deal with. If done outside or in a shed, the dust kind of takes care of itself. Like I mentioned before, if you get strong stripper on your skin, it needs to be flushed off immediately. Also, you need to insure you clean up the leavings from the stripper.
Cost - If $$ is a concern, whatever you have on hand is major factor.
If done properly, both methods will give you the desired results.
Either way you go, I would wear a mask at a minimum while performing either technique.
P.S. - I had to look up mouse sander too.
Turns out I've had one all along and didn't know it.

Thread Starter
|
Senior Member
Joined: Oct 2017
Posts: 193
Likes: 4
Good points Hamlin, my work area is a daylight basement with office space upstairs (I do my puttering around after work lol) and need to be concerned about fumes and dust. I've already had the place wreaking of janitor's buttcrack from forgetting to cover the Pine Sol containers So the tank will have to be temporarily brought outside to perform the work. I have all the safety gear, face shield, gloves, respirator etc, so we'll see where this goes!
I already found a small leak last night, really should just get all the paint off it and make sure there aren't any more problems. Then I can repaint it "Rusty crusty black" again
So the tank will have to be temporarily brought outside to perform the work. I have all the safety gear, face shield, gloves, respirator etc, so we'll see where this goes!I already found a small leak last night, really should just get all the paint off it and make sure there aren't any more problems. Then I can repaint it "Rusty crusty black" again
Super Moderator
Joined: Oct 2013
Posts: 596
Likes: 21
From: Calgary, Canada
+1 for stripper. If the paint's already failing, it'll wipe the rest away really quickly. Just brush or spray it on and let it sit for 10-15 mins. Try not to agitate it until it's done (ie., don't scrub it until it's done working)
2-in-1 primer/paint is never my first choice. It won't help the rust, and adhesion is always a problem with those products. At a minimum, I would start with an etch primer on the bare metal to keep the rust down. At that point you can go straight to a topcoat if you like
If you want a nice paint job, you'll want to etch, then go to a primer/surfacer, block sand with P320, stage to P600, then topcoat. Go heavy with the primer/surfacer and it'll cover up most flaws. If not, there's always putty. Nothing wrong with spraybomb and if you prep the surface you'll get a good result 95% of the time.
If you want a really nice result, go to a proper body supply shop and get a nice 2k system in rattlecans - basecoat/clearcoat for an (almost) OEM quality job. Doesn't cost much more money, but it is a bit more work. An added benefit is that clearcoat can be polished so if you get dust/runs you can fix them without having to redo the whole job. These things can make even the dirtiest backyard greaseball paintjobs look professional, and they're surprisingly beginner-friendly too
Get good quality sandpaper and a matching primer for best adhesion/compatibility

Thread Starter
|
Senior Member
Joined: Oct 2017
Posts: 193
Likes: 4
Thanks tentacleslap - Great info, the paint is so bad I'm going with stripper. Will just have to do it on a good day so I can leave the door open a little. Still getting the mouse sander, looks like a cool little tool to sand a motorcycle tank with. This POR15 repair kit is expensive but I think I'm sold on it:
http://qr.por15.com/QR-assets/downlo...kRepairKit.pdf
Supposedly it will remove the old rubbery sealer, etch the inside of the tank and then seal it. If there are just pinholes they will be filled. Larger holes can be repaired with the included patch cloth but it's an extra four day process. I didn't want to spend so much time on this whim but it's my therapy so F it! I also wanted some warm up time before I even touch my CBR.
This is my plan of action with the tank so I can finally get the old buzzard fired up (Everything else I needed to do is pretty much done):
1. Strip the exterior and sand the loose rust off
2. Do the POR15 thing - I only have a couple little paint bubbles so the "extra repair" shouldn't be necessary hopefully
3. Primer sealer
4. Take the tank to my buddies house to paint because I suck at that stuff - Hawkwind, he will most likely suggest some kind of rat bike job but I'm going to try and resist!