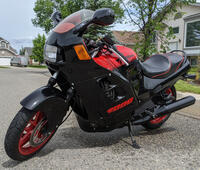
Look At This Friggin' Thing!
#31
 12-05-2017, 08:50 PM


That's a good point, I'm going to be concerned with the outside of the tank mostly. Hopefully I can air dry it and then immediately spray with primer after, so it's just what I'll have do "redo" after I've repaired the tank.
I've used the standard pail of POR15 (Paint Over Rust) and rust is actually the stuff's friend - The cross members of an old lowbed I brushed it on is still rust free after three years. I'm hoping nobody cries "snake oil" because it is $69 and I plan to order the kit tonight.
I hate rust, and dirty little carburetors!
#32
12-05-2017, 08:52 PM
Super Moderator
Have you priced out a used tank? If you're willing to accept a dent or two, they go for pretty cheap
When I wrote my post I didn't realize you were dealing with a leaky tank. I've got a collision background but we never touched rust. Restoration guys would know better
Sounds like the previous owner filled it with some kind of plastic in order to fight the leaks, so I'm guessing she'll look like swiss cheese at all the seams. If you're gonna put the work in, you'd probably save money starting with a cleaner tank. You'd definitely save time
Alternately, before spending the time/money on the tank, it might make more sense to use a temporary container to see if it'll run. That way you know the fuel's clean so you'll give those carbs a fightin' chance
Learning to paint is worthwhile though. If ever there was a tank that you could practice your skills on, this'd be it. Don't worry too much, just point and shoot, preferably at a clean and prepped surface, from a distance between 8-10 inches. If it's a round nozzle, move quickly. Try to buy the spraypaint that covers in a fan shape (much easier to avoid runs, better coverage, easier to overlap passes)
Looks like a fun little project though. Keep the updates coming
#33
12-05-2017, 09:08 PM
Super Moderator
$69 isn't bad for three quarts of product plus patches. I forget what I paid for a quart of their rust sealant coating but it didn't feel cheap at the time. You'll be fine
Also those 3M fibre wheels are great for external rust, as well as paint removal from the nooks and crannies. Just put one in the end of a drill and go to town
Also those 3M fibre wheels are great for external rust, as well as paint removal from the nooks and crannies. Just put one in the end of a drill and go to town
#34
12-06-2017, 11:17 AM
Have you priced out a used tank? If you're willing to accept a dent or two, they go for pretty cheap
When I wrote my post I didn't realize you were dealing with a leaky tank. I've got a collision background but we never touched rust. Restoration guys would know better
Sounds like the previous owner filled it with some kind of plastic in order to fight the leaks, so I'm guessing she'll look like swiss cheese at all the seams. If you're gonna put the work in, you'd probably save money starting with a cleaner tank. You'd definitely save time
Maybe I will paint my own tank, we'll see!
#36
12-06-2017, 12:21 PM
Not to hold your ear for too long Tentacleslap, but I did go on the Eastwood site to look at the 2K rattle can products. It's not that expensive, about 20 something bucks per can, and I'm not beholden to any particular brand, but it was difficult to figure out what was two stage compatible. For that matter, it's not even clear what is single stage paint. Aside from prep/cleaning etc. all I would need is a can of primer, a can of base and a can of clear from what I'm gathering. Two stage rattle can painting looks to be badass!! (Like Ichiban Moto lol)
#37
12-06-2017, 06:14 PM
Super Moderator
Ichiban moto is the real deal! The eggbeater sander lolol
The fibre wheels you pulled up are okay, but they're a little small and wear out quickly and I don't like the solid backing discs they come with. Personal preference, these ones are better:
https://www.3m.com/3M/en_US/company-...3241073&rt=rud
Single stage paint just means colorcoat with no clear applied on top. Think tremclad or rustoleum. High-end singlestage paint is sometimes used on hotrods since they can wetsand/paint/wetsand/paint/wetsand/paint several times to get the flattest possible surface, but resto guys are pretty fn crazy if you ask me. I use single stage for small parts. Scuff, spray, done
Basecoat/clearcoat is yer good stuff as far as I'm concerned. The color coat is protected by the clear, and you can put the clear on nice and thick for a very tough surface. Polishes well, good solvent resistance, looks great
As for the rest: you're right. The three products you'll need are primer, base, and clear. Light coats at first, follow the directions, and if it goes badly remember you can just let it cure, scuff it with P600-800 and spray it again
Also those plastic handles that snap onto the top of the rattlecan making it feel like a paint gun - those things are great
#38
12-06-2017, 08:37 PM
Awesome thanks, you're putting me on the right path! I did a little more research and it seems that if I want to practice first I can use 2K clear over pretty much any urethane primer and base paint - Laquer and enamel causes problems I guess. It will save me 50 bucks and I can still have fun with it all.
It might be after Christmas now before I get ta paintin' - GF and I are going to FL. Will probably get the tank cleaned off though. I'm going to have the battery, airboxes and carbs back on tomorrow or next day - The "first start with a temp tank" needs to happen!
I did get better at polishing aluminum - Three different grits of sandpaper and two types of buffing rouge to get a "not quite mirror finish" . The last panel holds oil so I'll probably take off and redo one on the other side and might actually get it right this time. The representative flagship cover before and after:
It might be after Christmas now before I get ta paintin' - GF and I are going to FL. Will probably get the tank cleaned off though. I'm going to have the battery, airboxes and carbs back on tomorrow or next day - The "first start with a temp tank" needs to happen!
I did get better at polishing aluminum - Three different grits of sandpaper and two types of buffing rouge to get a "not quite mirror finish"
. The last panel holds oil so I'll probably take off and redo one on the other side and might actually get it right this time. The representative flagship cover before and after:
#39
12-06-2017, 09:27 PM
Super Moderator
That's a nice polish!
Lacquer hasn't been used since the 50's afaik, and I've never seen it. Enamel will be for specialty use, and the only place I'd expect to find it on a bike will be the exhaust and maybe the brake calipers where they get hot. The majority of 'mainstream' products will coexist peacefully
Probably possible to affix a petcock and some 1/4 hose to an old jerrycan. Just don't burn down the place
You owe us a video of that thing running
#40
12-06-2017, 09:35 PM

if you have the $, motion pro makes a great auxiliary tank. I hated shelling out the cash but am honestly glad I did. Now i can leave the bike tank in the bench and not worry about it. The aux tank can hang like an IV bottle, so i just hook ut to a step ladder beside the bike and I am all set.