
How To: Stick Coil Modification for the Honda CBR1000F - Picture Intensive
#51
 11-17-2015, 05:01 AM

Senior Member
Well, thanks to the long dark evenings, work a tad thin when wet, in went the black and red jobby, as it wasnt running as good as it could.
Off with the rocker cover to do cam chain, guides and tensioner.
That now done, it was an evening on ebay, sourcing some stick coils, and loom.
So some hours later, soldering iron out , I did a trial run, without mullering the existing wiring too much.
Ultimately, the whole unit runs a treat, no rattles, and seems to purr, cat like.
Result.
I will add to the stick coil set up. I actually dismantled the white plugs that go over the stick coils, so I could solder directly on to the terminal. Probably less problematic than having 'extra' joints.
Using a Stanley blade, other blades are available, lift out yellow plug, then you can push the white tab down in the plug, best to put it in a vice gentlly. Try not to pull the (plug from behind), before pushing on the tab, or it wont come out.
Cut the wire to the metal terminal leaving about 3 or 4mm stub. Unbend the grommet clamp. Pull the coloured insulation off leaving the clamped copper within the terminal. The small purple rubber grommet over the wire by the terminal, you need this.
Get your new bit of wire, tin the end of this and the terminal stub, and bend this stub up, away from the termial clamp. Slide the rubber grommet on your new wire, plain end towards terminal, and heat shrink. Solder both ends together, slide heat shrink over, heat it a tad to shrink, then slide grommet over, then clasp the outer terminal clamp over grommet.
Clip it back in to plug. Replace yellow clip once you have done both.
Youll get good at this after a while, as there are 8 in total.Good luck.
#52
01-06-2016, 03:04 AM

Member
Join Date: Nov 2010
Location: Toowoomba Queensland Aus
Posts: 68
Likes: 0
Received 0 Likes
on
0 Posts
So I bought some stick coils with a loom, PCV Grommets and braid to cover wiring. I am going to pull the connectors apart so I have no joins and if that turns to custard I will simply buy 4 new connectors.
I have a couple of questions.
1. Is the only reason everyone points the tops of the sticks to the rear of the bike to stop them getting fouled?
2. How do I identify the wire gauge on the loom i have as i want to replace the lot with new wire with colours to math existing 1KF wiring.
I will post pics when I am done. Still waiting on some slow boats from china.
Thanks all
BTW I ended up with sticks from an 07 1000rr and they are the taller ones. I will keep an eye out for the shorter sticks. GSXR600??
Grommets
http://www.ebay.com.au/itm/181965713...%3AMEBIDX%3AIT
Braid
http://www.ebay.com.au/itm/161849442...%3AMEBIDX%3AIT
Last edited by Damo77; 01-06-2016 at 03:07 AM. Reason: xtra info
#53
01-06-2016, 10:23 PM


#56
01-09-2016, 12:25 AM
Member
Join Date: Nov 2010
Location: Toowoomba Queensland Aus
Posts: 68
Likes: 0
Received 0 Likes
on
0 Posts
Done and dusted. Runs beautifully. Smoother acceleration.
Very happy with the mod. I did mine facing forward and made a direct connection from the standard factory 3 pin plug. I figured the fewer connections the better. Can always unplug it and plug the old stuff back in however i believe that my old coils or leads were beginning to break down as the difference is quite noticeable. Thanks to all who paved the way and tried and tested this mod.
Very happy with the mod. I did mine facing forward and made a direct connection from the standard factory 3 pin plug. I figured the fewer connections the better. Can always unplug it and plug the old stuff back in however i believe that my old coils or leads were beginning to break down as the difference is quite noticeable. Thanks to all who paved the way and tried and tested this mod.
#57
01-09-2016, 10:27 AM


#60
09-06-2016, 12:27 PM

Thought I'd update this thread with my info following my conversion, in case it may assist anyone further.
I purchased 4 x 127mm long coils from the 2012-2015 Fireblade CBR1000RR off eBay, posted from BNR_Cycles bike breakers in the US for �35 inc post to the UK and a 08 - 15 Honda CBR1000RR Coil Wire Harness B from Re-Cycles2013 breaker also from US eBay for �19 inc post.
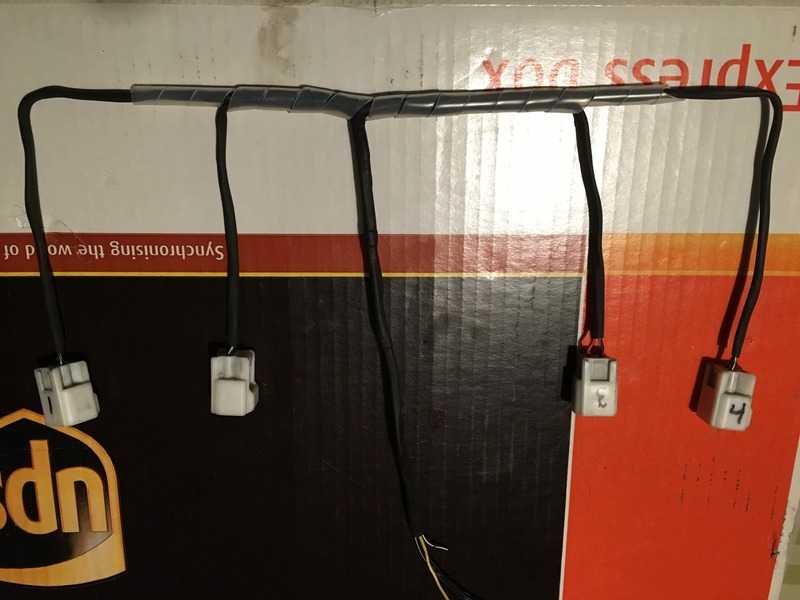
I modified my loom a few nights back and was awaiting my grommits and electrical connectors arriving. I followed the How To on here and set the coil plugs apart by 80mm/150mm/80mm and left the length of wire before the bend around 140mm long so the plugs can face the back of the bike and allow a nice length of cable and look tidy. I also tried to follow the BL/WH colours back to the original loom so I knew the colours will follow through and maintain the -ive colour at the coil sticks, the +ive colours I wasn't too bothered about.
I purchased 4 x Ford PCV rubber grommits from Burton Power Products at just over �10 for 4 inc delivery.
PCV valve grommet - Ford X/Flow OHV Kent, SOHC Pinto, Cologne V4/V6, Essex V4/V6 & DOHC 8v
They are a perfect (tight) fit on the CBR sticks and are a tight fit in the head so will deffo be water and oil tight.
I purchased 2 x pairs of 2 way Tyco AMP econoseal water proof electrical connectors and cut off the coil connections. These are marked with the terminal number so it's quite a straightforward job. I never had the proper crimper so after tinning the wires with solder then after fitting the waterproof seals I used a pliers to crimp them, heated up the crimp after and dabbed the solder to ensure a perfect connection.
Genuine AMP Tyco TE 2 Way Superseal Electrical Waterproof Connector Kit | eBay

Then I fitted the coils and attached the loom,
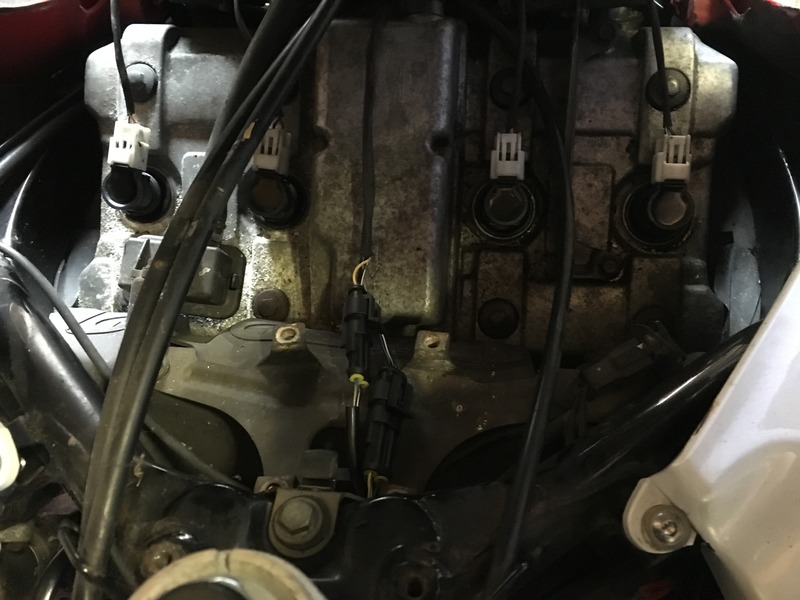
Tried the bike and it runs sweet enough. It seemed to settle down to a smooth idle and came off the choke sooner than it used to but that may be my imagination.
EDIT>
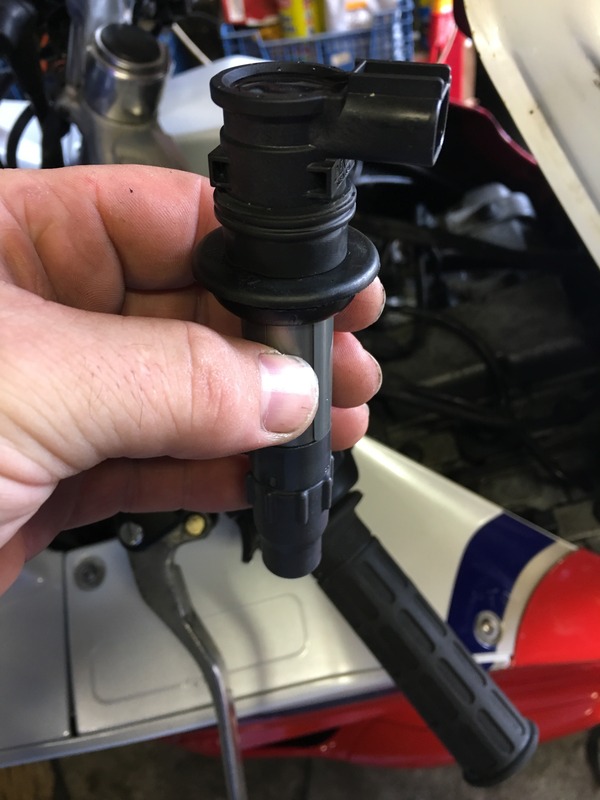
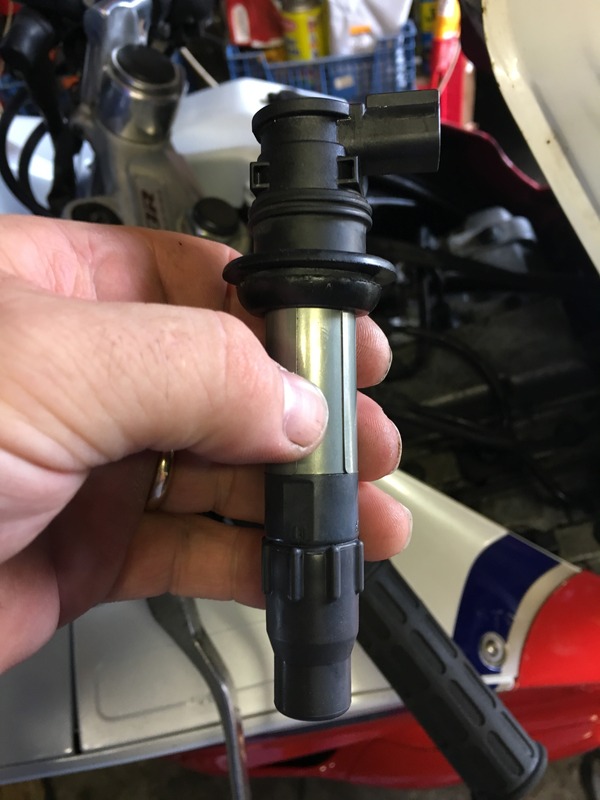
In pic 1 you can see the original Fireblade grommet above the tapered Ford PCV grommet, I ended up having to remove this as it was causing the coils to rise off the plugs and give a strange misfire. Removing this and seating the coils and grommets correctly cured the misfire.
I purchased 4 x 127mm long coils from the 2012-2015 Fireblade CBR1000RR off eBay, posted from BNR_Cycles bike breakers in the US for �35 inc post to the UK and a 08 - 15 Honda CBR1000RR Coil Wire Harness B from Re-Cycles2013 breaker also from US eBay for �19 inc post.
I modified my loom a few nights back and was awaiting my grommits and electrical connectors arriving. I followed the How To on here and set the coil plugs apart by 80mm/150mm/80mm and left the length of wire before the bend around 140mm long so the plugs can face the back of the bike and allow a nice length of cable and look tidy. I also tried to follow the BL/WH colours back to the original loom so I knew the colours will follow through and maintain the -ive colour at the coil sticks, the +ive colours I wasn't too bothered about.
I purchased 4 x Ford PCV rubber grommits from Burton Power Products at just over �10 for 4 inc delivery.
PCV valve grommet - Ford X/Flow OHV Kent, SOHC Pinto, Cologne V4/V6, Essex V4/V6 & DOHC 8v
They are a perfect (tight) fit on the CBR sticks and are a tight fit in the head so will deffo be water and oil tight.
I purchased 2 x pairs of 2 way Tyco AMP econoseal water proof electrical connectors and cut off the coil connections. These are marked with the terminal number so it's quite a straightforward job. I never had the proper crimper so after tinning the wires with solder then after fitting the waterproof seals I used a pliers to crimp them, heated up the crimp after and dabbed the solder to ensure a perfect connection.
Genuine AMP Tyco TE 2 Way Superseal Electrical Waterproof Connector Kit | eBay
Then I fitted the coils and attached the loom,
Tried the bike and it runs sweet enough. It seemed to settle down to a smooth idle and came off the choke sooner than it used to but that may be my imagination.
EDIT>
In pic 1 you can see the original Fireblade grommet above the tapered Ford PCV grommet, I ended up having to remove this as it was causing the coils to rise off the plugs and give a strange misfire. Removing this and seating the coils and grommets correctly cured the misfire.
Last edited by exuptoy; 09-09-2016 at 12:52 PM.