
Balancer Adjustment


Excessive noise/vibration is a common complaint on any bike, and adjusting the balancer backlash can sometimes make a noticeable difference.
It's a simple procedure, but it isn't commonly discussed, so I figured tonight I would take a few minutes and show you how it's done.
Time: maybe 30mins max
Difficulty: If you can't do it, sell your bike and find another hobby.
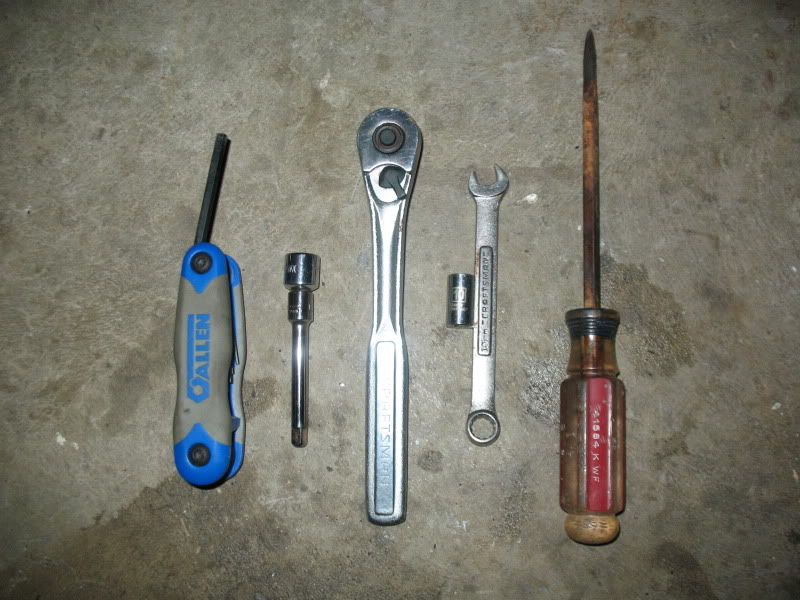
Tools: Flathead screwdriver, 10mm wrench, 1/4 or 3/8" drive ratchet and extension, 10mm socket, 5mm hex head wrench. (don't make fun of my ugly screwdriver... )
)
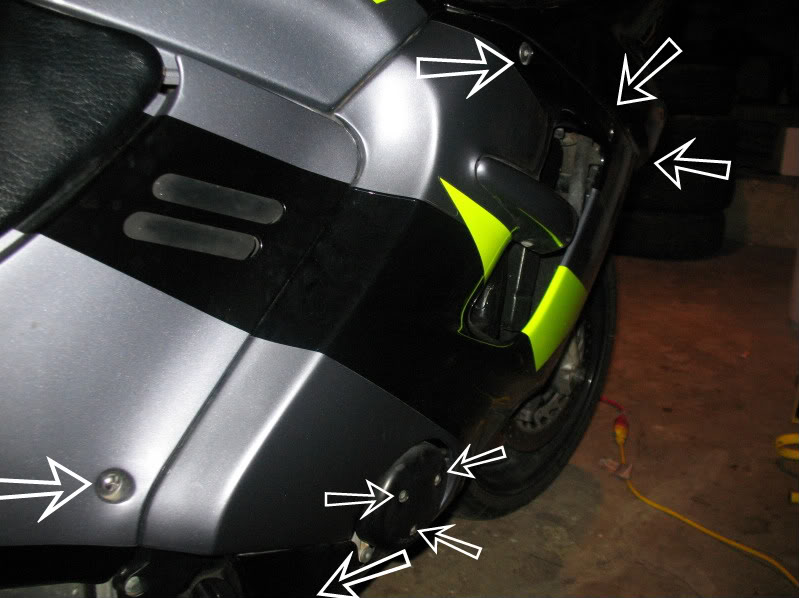
FIRST: Peel back the right side fairing.
Remove the RIGHT side cover (1 screw head) and all the bolts in the following picture. Removing the side cover will also expose 2 more 10mm fairing bolts (not pictured)
One of the bottom arrows is pointing to a hex fairing bolt that is also out of sight. Lastly, you will have to remove the bottom center clip that holds the two fairing halves together. (don't make fun of my dirty bike...)
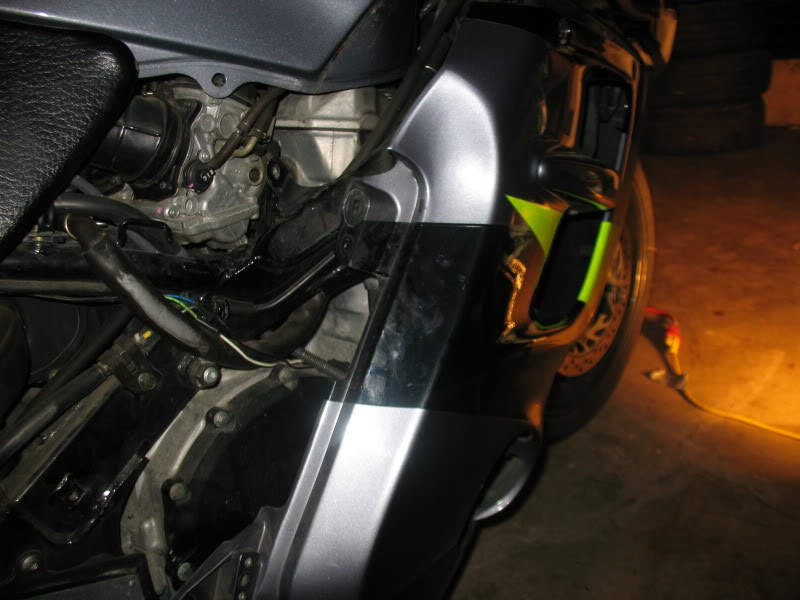
This will allow the right side fairing to hang enough to get underneath it.
It will look like this:
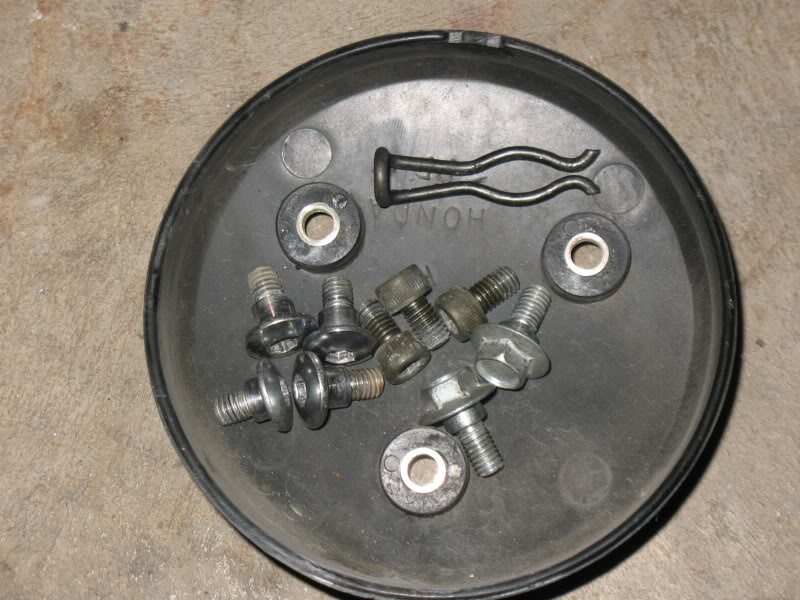
And these are all the bolts you should need to take out:
You will gain access to the balancer adjuster through this hole:
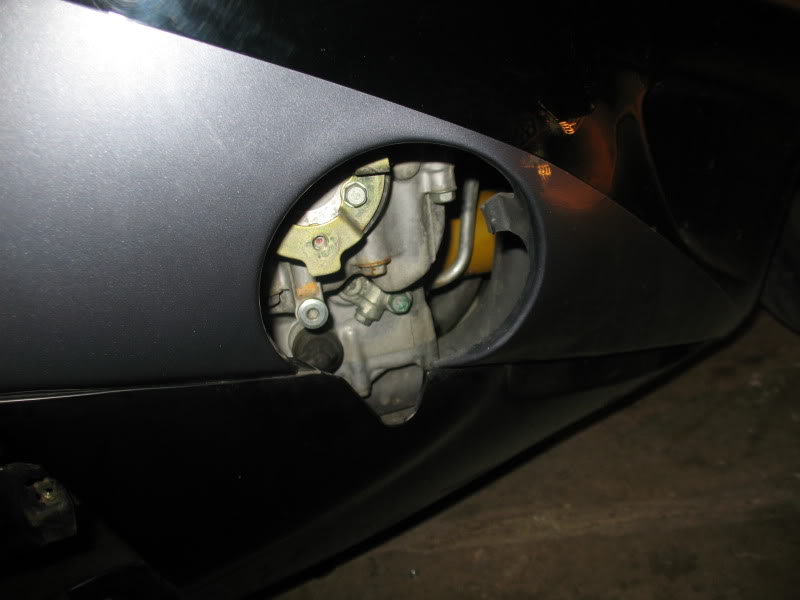
The balancer adjuster will look like this:
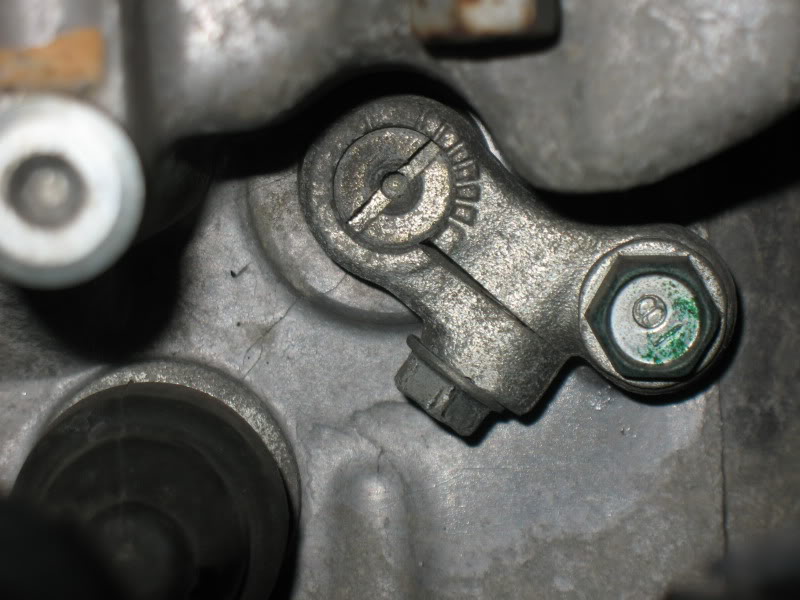
Now you need to loosen the pinch bolt on the adjuster (pointing down in the pic.... 10mm head)
Next, slowly turn the adjuster counterclockwise (left) with a flathead screwdriver, then back to it's original position. There should be a little bit of drag like the pinch bolt still has a hold on it, but not enough that you can't turn the adjuster.
Now start the engine.
SLOWLY turn the adjuster counterclockwise (left) until you start to hear a "whine" from the motor. Then turn it back until you no longer hear the whining noise.
Turn off the motor and re-tighten the pinch bolt. Fairing replacement is the reverse of removal.
All done!!
Easy, eh??
This should take some of the vibration and/or noise out of your engine. (especially on higher mileage bikes)
**NOTE**
The manual tells you to do all of this with the motor OFF. According to the manual, you should turn the adjuster counterclockwise until it stops, and then back one index mark.
I've found this much less effective than my method. If you want to do it by the book, that's fine. Other bikes have you do it while the engine is running just like I do it. It's up to you...
It's a simple procedure, but it isn't commonly discussed, so I figured tonight I would take a few minutes and show you how it's done.
Time: maybe 30mins max
Difficulty: If you can't do it, sell your bike and find another hobby.
Tools: Flathead screwdriver, 10mm wrench, 1/4 or 3/8" drive ratchet and extension, 10mm socket, 5mm hex head wrench. (don't make fun of my ugly screwdriver...
)FIRST: Peel back the right side fairing.
Remove the RIGHT side cover (1 screw head) and all the bolts in the following picture. Removing the side cover will also expose 2 more 10mm fairing bolts (not pictured)
One of the bottom arrows is pointing to a hex fairing bolt that is also out of sight. Lastly, you will have to remove the bottom center clip that holds the two fairing halves together. (don't make fun of my dirty bike...
)This will allow the right side fairing to hang enough to get underneath it.
It will look like this:
And these are all the bolts you should need to take out:
You will gain access to the balancer adjuster through this hole:
The balancer adjuster will look like this:
Now you need to loosen the pinch bolt on the adjuster (pointing down in the pic.... 10mm head)
Next, slowly turn the adjuster counterclockwise (left) with a flathead screwdriver, then back to it's original position. There should be a little bit of drag like the pinch bolt still has a hold on it, but not enough that you can't turn the adjuster.
Now start the engine.
SLOWLY turn the adjuster counterclockwise (left) until you start to hear a "whine" from the motor. Then turn it back until you no longer hear the whining noise.
Turn off the motor and re-tighten the pinch bolt. Fairing replacement is the reverse of removal.
All done!!
Easy, eh??
This should take some of the vibration and/or noise out of your engine. (especially on higher mileage bikes)
**NOTE**
The manual tells you to do all of this with the motor OFF. According to the manual, you should turn the adjuster counterclockwise until it stops, and then back one index mark.
I've found this much less effective than my method. If you want to do it by the book, that's fine. Other bikes have you do it while the engine is running just like I do it. It's up to you...

Administrator, MVN / ROTM NOV 2012
Joined: Aug 2008
Posts: 11,003
Likes: 3
From: Republic of Boon Island
Real Nice write up Trout. Ya must be all out of WD for that rusty screw driver.
Last edited by Sprock; Mar 30, 2010 at 10:13 PM. Reason: clean up...nice write up
Thanks Dean0! Yep, that poor screwdriver has been through some chit. In fact, I think I've even hit it with my lawnmower a couple times....lol...
And thanks to you, too, sprock, but I'm never out of WD. I have 3 cans atm... (and they're the new style to with the flip-up straw...)
I'm much more high class and sophisticated than you think. That screwdriver is a craftsman, so when the time comes I'll just clamp it in my vise, snap the tip off, and return it to sears for a bright shiny new one!!
I'm so "upper class" that I won't even shop at wally world during the daytime. I went last night at midnight. Yep, picked up 6GALS of Rotella and a 50lb bag of Ol Roy... LMAO!! (I'm not joking, either..... dam, I'm ghetto! )
)
And thanks to you, too, sprock, but I'm never out of WD. I have 3 cans atm... (and they're the new style to with the flip-up straw...)
I'm much more high class and sophisticated than you think. That screwdriver is a craftsman, so when the time comes I'll just clamp it in my vise, snap the tip off, and return it to sears for a bright shiny new one!!
I'm so "upper class" that I won't even shop at wally world during the daytime. I went last night at midnight. Yep, picked up 6GALS of Rotella and a 50lb bag of Ol Roy... LMAO!! (I'm not joking, either..... dam, I'm ghetto!

I do it cold, and the reason for that is because some people report that the "whining" noise will go away when warm, even if it's adjusted a little "tight".
My thought is that I don't want it whining at all, even if it does go away when it's warm.
By doing it cold, you will still hear the whine when you get it a little too tight, so you just have to back it off a tad till the whine stops and you know you're good to go. You will hear it over the cold CC rattle....


Senior Member
Joined: Sep 2006
Posts: 649
Likes: 0
From: Preston, UK
Will have to do my balencers on the blackbird this month. Two balancers and an idler that all need adjusting as per your method - oh what fun
Nice work DYLAN !
I couldn't let the camera beat me, and it only took a grand total of about 40mins to do the whole thing twice.
I also did a how-to a few months ago on wet-sanding a stock windscreen to get rid of the haze/yellowing. Lost all those pics, too....
Oh well... my screen looked good afterwards.. lol..
Will have to do my balencers on the blackbird this month. Two balancers and an idler that all need adjusting as per your method - oh what fun

Senior Member
Joined: Oct 2006
Posts: 1,513
Likes: 1
From: Queensland, Australia
Good one Dylan, nice sharp pics too. I've got to do mine again soon but I will have to do the 'engine not running' method 'cos I'd hear fark all over the V&H.
Have you adjusted yours with both methods and which way do you find the engine running method leaves the bolt turned towards compared to the not running? My thoughts are that I could adjust with not running, then turn a fraction (maybe half a mark?) in one direction.
.Have you adjusted yours with both methods and which way do you find the engine running method leaves the bolt turned towards compared to the not running? My thoughts are that I could adjust with not running, then turn a fraction (maybe half a mark?) in one direction.