


"RACCOON MASK" Write Up


Thread Starter
|
Retired Moderator
Joined: Jul 2006
Posts: 4,697
Likes: 1
From: Las Cruces, NM
 "RACCOON MASK" Write Up
There has been a recent rise in interest of how I did the front of my bike dubbed the "Raccoon Mask". I get at least 1-2 PM's a day about it.........so I decided to do a simple write-up of how I did it.
I also get a LOT of PM's about people wanting to purchase a "kit" from me.....which I "might" be able to pull off, but it'll take me some time to figure out the exact dimentions of the vinyl needed to be cut....etc. etc. I'll update this thread if I do end up selling it as a kit.
First.....some of you are asking "WTF is this "raccoon mask". Well.....it started off with this photoshop image........

But this ORIGINAL design was extremely hard to pull off with vinyl. It took 3 of my own failed attempts and a professional shop's 1 failed attempt. This lead me to believe the design was too complicated for vinyl (which would require it to be painted on).......and the fact that the opinion on the "look" of it was half and half.
.....So I revised that design with another one..........

This photoshop design is MUCH easier to pull off with vinyl......in fact.....it turned out great! Just requires a lot of patience and attention to detail.
Here is how the design looks today (the following is an actual picture....NOT a photoshop.)........
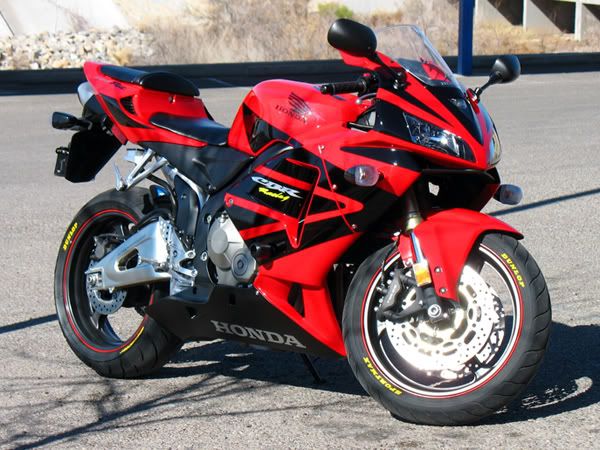
So......it turned out almost IDENTICAL to what the photoshop concept showed.......so now......here is how you can do it yourself.
__________________________________________________ _________
RACCOON MASK WRITEUP:
__________________________________________________ _________
First....the only thing I ask in return for applying this design on your own bike is credit for the design. If someone asks about the mask, just let them know where you got the idea and design from. You can give them a link to this thread or my PM....or even just my logon name. Any of those would suffice. NOW FOR THE WRITEUP:
I used Vinyl that comes in 2 foot wide rolls that you usually get at vinyl graphics shop. Find a place that does window tinting and vinyl graphics. They should sell you some vinyl for cheap. I got it from a local shop and they only charged me $5-$10 for a 2x4 foot piece. Trust me, you'll make MANY mistakes, so get AT LEAST a 2x4 foot piece.
Vinyl comes in any color you can imagine.......so you can do the mask in any color you choose.
The way I did my design was pretty simple. Every piece with the exception of the center buldge was pre-cut and applied..........
Use electrical tape, clear tape, masking tape, etc. to mask off and "create" the design onto the bike. Mask the shape of the graphic you want to put there. Overlap the tape, and when completed, pull the tape off in one piece. Then transfer that onto the vinyl backing (remember that the vinyl is stick-backed....kind of like a regular sticker, BUT it goes on different, I'll explain that later on.)
Stick the "taped shape" onto the back of the vinyl, trace the rough design onto it, and cut it out. Doing this will "mirror" the graphic, so test it on the opposite side of the bike you originally designed it from. Meaning: If you masked the design on the left, it's now mirrored to go on the right and vice versa. You'll know what I mean when you get to this point.
Hold the rough piece up to the area you want to apply it to........and trim it if nessesary. Get the shape perfect. Once you get that done, trace the finished piece onto another piece of vinyl. Now that image is mirrored to fit on the other side. Cool how that works, huh? Anyway.....make a few traces in case you screw up the orignal shape when applying it.
To apply your shape to the bike, pull the paper backing off, revealing the sticky backed sid
I also get a LOT of PM's about people wanting to purchase a "kit" from me.....which I "might" be able to pull off, but it'll take me some time to figure out the exact dimentions of the vinyl needed to be cut....etc. etc. I'll update this thread if I do end up selling it as a kit.
First.....some of you are asking "WTF is this "raccoon mask". Well.....it started off with this photoshop image........
But this ORIGINAL design was extremely hard to pull off with vinyl. It took 3 of my own failed attempts and a professional shop's 1 failed attempt. This lead me to believe the design was too complicated for vinyl (which would require it to be painted on).......and the fact that the opinion on the "look" of it was half and half.
.....So I revised that design with another one..........
This photoshop design is MUCH easier to pull off with vinyl......in fact.....it turned out great! Just requires a lot of patience and attention to detail.
Here is how the design looks today (the following is an actual picture....NOT a photoshop.)........
So......it turned out almost IDENTICAL to what the photoshop concept showed.......so now......here is how you can do it yourself.
__________________________________________________ _________
RACCOON MASK WRITEUP:
__________________________________________________ _________
First....the only thing I ask in return for applying this design on your own bike is credit for the design. If someone asks about the mask, just let them know where you got the idea and design from. You can give them a link to this thread or my PM....or even just my logon name. Any of those would suffice. NOW FOR THE WRITEUP:
I used Vinyl that comes in 2 foot wide rolls that you usually get at vinyl graphics shop. Find a place that does window tinting and vinyl graphics. They should sell you some vinyl for cheap. I got it from a local shop and they only charged me $5-$10 for a 2x4 foot piece. Trust me, you'll make MANY mistakes, so get AT LEAST a 2x4 foot piece.
Vinyl comes in any color you can imagine.......so you can do the mask in any color you choose.
The way I did my design was pretty simple. Every piece with the exception of the center buldge was pre-cut and applied..........
Use electrical tape, clear tape, masking tape, etc. to mask off and "create" the design onto the bike. Mask the shape of the graphic you want to put there. Overlap the tape, and when completed, pull the tape off in one piece. Then transfer that onto the vinyl backing (remember that the vinyl is stick-backed....kind of like a regular sticker, BUT it goes on different, I'll explain that later on.)
Stick the "taped shape" onto the back of the vinyl, trace the rough design onto it, and cut it out. Doing this will "mirror" the graphic, so test it on the opposite side of the bike you originally designed it from. Meaning: If you masked the design on the left, it's now mirrored to go on the right and vice versa. You'll know what I mean when you get to this point.
Hold the rough piece up to the area you want to apply it to........and trim it if nessesary. Get the shape perfect. Once you get that done, trace the finished piece onto another piece of vinyl. Now that image is mirrored to fit on the other side. Cool how that works, huh? Anyway.....make a few traces in case you screw up the orignal shape when applying it.
To apply your shape to the bike, pull the paper backing off, revealing the sticky backed sid


Senior Member
Joined: Jul 2006
Posts: 100
Likes: 0
From:
RE: "RACCOON MASK" Write Up
Hey BlueFox another great write up(after reading and doing your HID install). This one though seems a little to hard for me since im not that good of a handy man but you did a good job

Thread Starter
|
Retired Moderator
Joined: Jul 2006
Posts: 4,697
Likes: 1
From: Las Cruces, NM
RE: "RACCOON MASK" Write Up
ORIGINAL: dragonium25
Man Blue, you got a lot of time on yer hands with all these write-ups, do you ever go riding? Hey what'd you use to colour the yellow in your tires?
Man Blue, you got a lot of time on yer hands with all these write-ups, do you ever go riding?
Hey what'd you use to colour the yellow in your tires?
It used to take me a LONG time, but now, I can get both tires done in about 10 minutes. Really makes the bike look sportier IMO.
And yeah, I like to be through with write-ups. Only takes me about 30 minutes to an hour to do an entire writeup (mainly because I keep re-reading my stuff.)
But I do ride a lot (put 400 miles on the bike this week alone!)

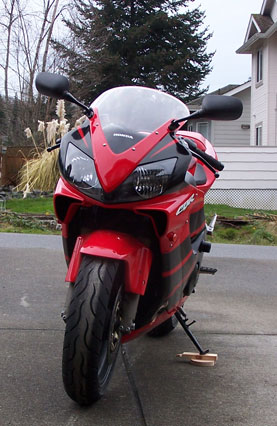
Thread Starter
|
Retired Moderator
Joined: Jul 2006
Posts: 4,697
Likes: 1
From: Las Cruces, NM
RE: "RACCOON MASK" Write Up
ORIGINAL: jjbtao
Hmm... kinda like an inverted version of my F4i...
Nice work though for sure!
Hmm... kinda like an inverted version of my F4i...
Nice work though for sure!
Good work on yours too. I take it you did yours with vinyl too?


Senior Member
Joined: Jul 2006
Posts: 204
Likes: 0
From:
RE: "RACCOON MASK" Write Up
Yeah, I did mine with vinyl too. I did the lowers as well, and that was a chore--such a large space makes keeping the vinyl bubble-free so difficult!
Hopefully some others will get creative with vinyl too--so long as they don't rip us off! HA!
Good luck in the ROTM competition!
Hopefully some others will get creative with vinyl too--so long as they don't rip us off! HA!
Good luck in the ROTM competition!