
HID Installation (for older style HID kits)


Thread Starter
|
Retired Moderator
Joined: Jul 2006
Posts: 4,697
Likes: 1
From: Las Cruces, NM
NEW UPDATED HID WRITE-UP HERE:
https://cbrforum.com/m_379249/tm.htm
-------------------------------------------------------------------------------------------------------------------------------------------
UPDATE: (Feb 27, 2007): Rewire of ballasts & Wire cleanup: See bottom of this post for update.
UPDATE: (Feb 22, 2007): Alternate Igniter Placement: See bottom of this post for update.
Original Post:
This is a write-up for an HID conversion with generic HID kits that consist of a large ballast, large igniter and HID bulb itself for a 2006 600RR. The kit that I used was bought off of an eBay store for 119.99. Yes, it’s VERY generic, but it works, and for 119 bucks, it looks and performs great!
So I can put this to bed….YES…..ANY H7 HID kit will work on our bikes. Cars that use H7’s have the EXACT SAME bulbs as we do in our bikes, so as long as you order and H7 HID kit, it’ll work regardless.
I bought the 10000k HID kit. They are very blue in apperance and have a slightly purple tint to them. (a lot like a BMW M5 or Mazda RX8 wth HIDs). The light output on the road looks like a white LED. Very white with a very SLIGHT hint of blue. They look great, and are very bright. If you want more of a true white, get the 6000k or 8000k. If I was going to buy again, I would probably go with the 8000k's. Just my opinion though.
Now, for the installation......
To start off, you are going to need automotive grade wire. I believe I used 16 gauge “primary” wire. It comes in a 30 ft. package, and you can usually buy it at any automotive store (I bought all of my stuff at Checkers). It’s roughly about 5.00 per package, and I bought a red, white and black one (which I’ll explain why in a later on.)
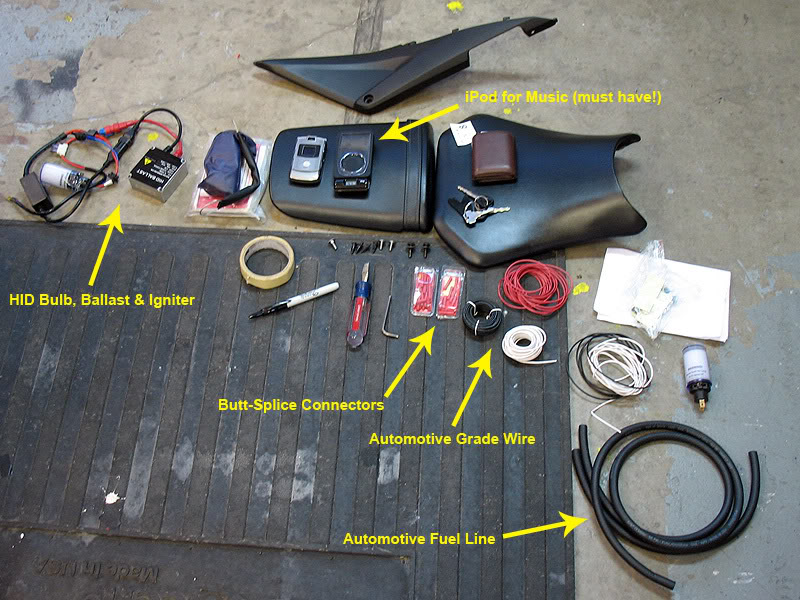
Now, in the picture above, notice how I kept my workspace in ****-like organized manner. This will really help when you are putting your bike back together. Keeping it clean will just make the whole thing go smoother, trust me.
As in the picture, I have the following supplies…..
- Wire strippers
- 16-gauge automotive wire
- Fuel-line hosing
- Hex wrench that came with the bike
- Flat head screw driver
- Butt-splice connectors
- Permanent Marker
- Masking tape
Now, here is how I went about mounting my ballasts. In the generic kits, they are huge when they are compared to the newer smaller ones. So, there isn’t really a place up front to mount them, so I decided to relocate them to under the rear seat. They “just fit” into the nooks on the sides. Plus, this keeps them out of weather (even though they’re water-resistant.)
Also, I didn’t want to take any of my fairings off, so this whole installation was done WITHOUT taking off any fairings with the exception of that triangular piece right below the seat on the left side of the bike, and in a minute, you’ll know why. But if you did take off the fairings, it would go by a little easier.
To start, take off your seats. To take off the main seat, fold back the rear corners of the seat to reveal the bolts holding them down. There should be two at the back. Take these out, put them in your “anally-organized workspace”. Label them with the masking tape (this helps later on, TRUST ME!)
Once you have the seat off, you’ll need to take off that triangular piece right below the seat on the right side. It uses poppers, so you can just pull it off, though I think there is one of those plastic anchors holding the end of it to the rear-seat cowl, so you’ll need to take that out too. You will now notice that the bikes main wiring harness routes itself right through this area, and that’s where we’ll route our “extended” wiring harnesses too.
First thing is to put the bulbs in. Th
https://cbrforum.com/m_379249/tm.htm
-------------------------------------------------------------------------------------------------------------------------------------------
UPDATE: (Feb 27, 2007): Rewire of ballasts & Wire cleanup: See bottom of this post for update.
UPDATE: (Feb 22, 2007): Alternate Igniter Placement: See bottom of this post for update.
Original Post:
This is a write-up for an HID conversion with generic HID kits that consist of a large ballast, large igniter and HID bulb itself for a 2006 600RR. The kit that I used was bought off of an eBay store for 119.99. Yes, it’s VERY generic, but it works, and for 119 bucks, it looks and performs great!
So I can put this to bed….YES…..ANY H7 HID kit will work on our bikes. Cars that use H7’s have the EXACT SAME bulbs as we do in our bikes, so as long as you order and H7 HID kit, it’ll work regardless.
I bought the 10000k HID kit. They are very blue in apperance and have a slightly purple tint to them. (a lot like a BMW M5 or Mazda RX8 wth HIDs). The light output on the road looks like a white LED. Very white with a very SLIGHT hint of blue. They look great, and are very bright. If you want more of a true white, get the 6000k or 8000k. If I was going to buy again, I would probably go with the 8000k's. Just my opinion though.
Now, for the installation......
To start off, you are going to need automotive grade wire. I believe I used 16 gauge “primary” wire. It comes in a 30 ft. package, and you can usually buy it at any automotive store (I bought all of my stuff at Checkers). It’s roughly about 5.00 per package, and I bought a red, white and black one (which I’ll explain why in a later on.)
Now, in the picture above, notice how I kept my workspace in ****-like organized manner. This will really help when you are putting your bike back together. Keeping it clean will just make the whole thing go smoother, trust me.
As in the picture, I have the following supplies…..
- Wire strippers
- 16-gauge automotive wire
- Fuel-line hosing
- Hex wrench that came with the bike
- Flat head screw driver
- Butt-splice connectors
- Permanent Marker
- Masking tape
Now, here is how I went about mounting my ballasts. In the generic kits, they are huge when they are compared to the newer smaller ones. So, there isn’t really a place up front to mount them, so I decided to relocate them to under the rear seat. They “just fit” into the nooks on the sides. Plus, this keeps them out of weather (even though they’re water-resistant.)
Also, I didn’t want to take any of my fairings off, so this whole installation was done WITHOUT taking off any fairings with the exception of that triangular piece right below the seat on the left side of the bike, and in a minute, you’ll know why. But if you did take off the fairings, it would go by a little easier.
To start, take off your seats. To take off the main seat, fold back the rear corners of the seat to reveal the bolts holding them down. There should be two at the back. Take these out, put them in your “anally-organized workspace”. Label them with the masking tape (this helps later on, TRUST ME!)
Once you have the seat off, you’ll need to take off that triangular piece right below the seat on the right side. It uses poppers, so you can just pull it off, though I think there is one of those plastic anchors holding the end of it to the rear-seat cowl, so you’ll need to take that out too. You will now notice that the bikes main wiring harness routes itself right through this area, and that’s where we’ll route our “extended” wiring harnesses too.
First thing is to put the bulbs in. Th

Senior Member
Joined: Aug 2006
Posts: 4,934
Likes: 0
From: ATL
awesome write up...how long did it take you to do the whole thing? I've got a kit I still need to put in but I don't have a garage so it'll have to be a one day thing.
Thread Starter
|
Retired Moderator
Joined: Jul 2006
Posts: 4,697
Likes: 1
From: Las Cruces, NM
1 day is MORE than enough to get this project done. Total, I spent about 5 hours on it. But most of that time was wasted by trying to find out what I need to do, how the HID's worked, how to route them, why the bulbs didn't fit, etc, etc. If you follow the tips in my write-up, you should be able to get it done in no more than a couple hours.


Thread Starter
|
Retired Moderator
Joined: Jul 2006
Posts: 4,697
Likes: 1
From: Las Cruces, NM
ORIGINAL: Evan
Nice write up. I've installed the hid's on several cars and my bike. I never even though of using heater hose or fuel line for a loom. Nice thinking!
Nice write up. I've installed the hid's on several cars and my bike. I never even though of using heater hose or fuel line for a loom. Nice thinking!

Joined: Jan 2007
Posts: 9
Likes: 0
I agree about the fuel line hose. I wonder if electrical shrink tubbing would work for the smaller lines. (Even though most of us are getting pretty proficient with the gift from the gods that is electrical tape)
Where is our update :-(
Where is our update :-(
