

Crack repair


Thread Starter
|
Senior Member
Joined: Aug 2008
Posts: 491
Likes: 0
From: Calgary Alberta
I have a crack on one side of my tail fairing from the previous owner. It is not super noticeable but I have noticed it get a bit bigger this year so I figure I should repair it before it gets any worse. What is the best way to repair a crack in the plastics? I assume some sort of fiberglass from the back? Any tips? I have never worked with fiberglass before and have no idea what I am looking to buy.
Thanks.
Thanks.

Official CBRF Welcome Crew Undercover Agent
Joined: Oct 2008
Posts: 1,907
Likes: 1
From: Colorado, U.S.A.
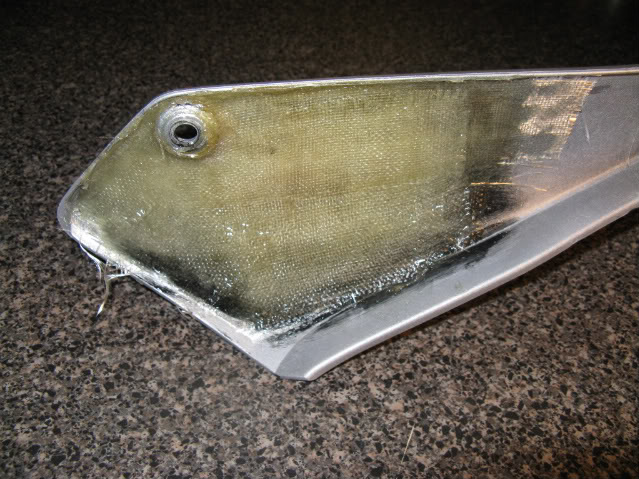
Yeah, fiberglass works good. I've had to use it on my fairings in a couple of places as reinforcement to prevent developing cracks from growing. Placed it on the inside like you mentioned, and it's held up very well; no complaints. Make sure you scuff up the plastic and get all the paint off the repair area before applying the fiberglass for a good bond.
As with the fiberglass, I got mine at Home Depot (Elmer's brand), although any self-respecting hardware store ought to carry it. You're basically going to need the fiberglass cloth, resin, and the hardener. All of them will be next to each other at the store. Follow the directions PRECISELY, if you don't, you may botch the whole job (very messy). You can practice with it before you commence on the actual repair, to see how it behaves.
As with the fiberglass, I got mine at Home Depot (Elmer's brand), although any self-respecting hardware store ought to carry it. You're basically going to need the fiberglass cloth, resin, and the hardener. All of them will be next to each other at the store. Follow the directions PRECISELY, if you don't, you may botch the whole job (very messy). You can practice with it before you commence on the actual repair, to see how it behaves.

Senior Member
Joined: May 2006
Posts: 3,477
Likes: 3
From: Prince George's County, MD
Official CBRF Welcome Crew Undercover Agent
Joined: Oct 2008
Posts: 1,907
Likes: 1
From: Colorado, U.S.A.
No, it's not too difficult, but make sure you practice with it before you start. Cut up the cloth into strips according to the size of your project. For mine I used like 2" by 5" strips (lots of them). Basically, you'll brush on an initial thick coat of the resin/hardener mix on to the fairing then start placing the strips, one at the time on top of one another. Everytime you place a new strip of FG on, you want to use the brush to permiate the cloth with resin, while pushing out all the air bubbles from the cloth. That's the main thing, is getting out all the air from the cloth, and making sure it's thoroughly saturated with resin.
So you'll lay resin on (thick), place a strip of FG, work the resin into it, apply more resin, then place another strip on top. Repeat until the desired thickness is achieved, making sure to remove all the air bubbles as you progress.
With the basic resin kit, you'll have about ten (10) minutes of working time, before the stuff starts to harden, so you have to work quickly. That's why it's important to have everything ready to go when you begin. Also, make sure the ambient temperature is above 70F degress. Any lower & the cure time will take longer. Placing a light bulb 100W next to the project afterwards, or putting it in the sun, will decrease cure time.
Make sure you wear nitrile gloves; resin burns and is a bi*ch to get off your skin and use masking tape in areas you don't want resin to get on (painted surfaces).

Senior Member
Joined: Aug 2005
Posts: 212
Likes: 0
From:
If you need a quick fix(like I did), I went to the local hardware store and bought a drywall repair kit, with the 12 sq inch patch for like 3 bux. Cut it to fit inside the fairing, and epoxy the hell out of it. Kind of like the same as fiberglass, but if you're broke, it works.
Thread Starter
|
Senior Member
Joined: Aug 2008
Posts: 491
Likes: 0
From: Calgary Alberta
Cool, that doesnt sound so bad....it will probably take me longer to take my fairing off then fix it. Drywall repair? I guess that could work....is the patch a type of plastic? I think I will stick to the fiberglass because I only want to fix it once. 


