Tech how2: Rear seat cowl done PROPERLY!


Thread Starter
|
Junior Member
Joined: Sep 2011
Posts: 28
Likes: 0
Right , I promised to do this how2 guide ages ago but I've only just got round to finishing the cowl today. Just finished uploading the pics so here goes....
Basically not long after purchasing my FS1 (UK F4i) I bought a Powerbronze seat cowl. I chose the Powerbronze brand as my rear hugger from them had been an excellent quality item and a superb fit... the seat cowl however was not!
This is the purchased item:

And this was the flimsy fitting kit supplied with the cowl which had to be spaced out with numerous washers as directed by the instructions:


Yes it fitted the bike , but my problems with it were..
1: it had a giant bolt right through the most visible part of the cowl (the top) which completely ruined the smooth look.
and
2: if you put any weight against the cowl whilst pushing the bike the cowl would lift and move literally inches across the bike which was risking damage not only to the flimsy cowl but also to the bike itself. Not good.

So... how could I remedy this I thought to myself?
My immediate thought was to buy another rear seat from a scrap bike and make a hybrid affair from the cowl and an actual Honda seat , so thats exactly what I did.
I sourced a seat for under �20 from a Honda breaker:

Then I set to work dismantling the seat and removing the cloth and foam etc...


Next step was to fit the bare base to the bike and then test fit the cowl skin over the top to see how much modification would be required:


There was quite a gap so I set to work marking and grinding the plastic base away until it mated nicely with the cowl skin giving a neater panel gap:


Once a decent panel gap was achieved I fastened the base down to the bike and then attached the skin to the seat base with wood screws , these were temporary merely to hold it in place , the screws were tightened until the correct gap was achieved along each edge.


with the cowl fixed to the base the whole lot was removed from the bike to be permanently bonded together , this was done by plastic seam welding right around each edge of the base. The welds were then sealed in with fibreglass resin on each side.The seat cowl was then filled internally with expanding foam.
Once the whole thing was permanently bonded the wood screws were removed.


At this stage the holes in the cowl for the original fitting kit etc were permanently filled and the whole thing was smoothed and primed:

Then I needed to address the issue of how the foam pad was to be attached , as the seat cowl was now much thicker than before and also there was no room to get in behind to bolt it on. So I decided rather than use bolts I'd use M6 studs in the seat foam as I could easilly get a nut on the underside of the cowl despite not being able to fit a bolt the other way.
M6 studs were sourced from an Italian scooter manifold...

Cut to length and away we go...


Ready for paint , on with a bit of colour (R-158 , Winning red)

And then build her back up:


Cowl next to standard seat:

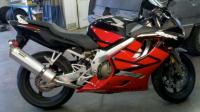
And on the bike , nice fit and feels very solid. Very happy with the result:


Basically not long after purchasing my FS1 (UK F4i) I bought a Powerbronze seat cowl. I chose the Powerbronze brand as my rear hugger from them had been an excellent quality item and a superb fit... the seat cowl however was not!
This is the purchased item:
And this was the flimsy fitting kit supplied with the cowl which had to be spaced out with numerous washers as directed by the instructions:
Yes it fitted the bike , but my problems with it were..
1: it had a giant bolt right through the most visible part of the cowl (the top) which completely ruined the smooth look.
and
2: if you put any weight against the cowl whilst pushing the bike the cowl would lift and move literally inches across the bike which was risking damage not only to the flimsy cowl but also to the bike itself. Not good.
So... how could I remedy this I thought to myself?
My immediate thought was to buy another rear seat from a scrap bike and make a hybrid affair from the cowl and an actual Honda seat , so thats exactly what I did.
I sourced a seat for under �20 from a Honda breaker:
Then I set to work dismantling the seat and removing the cloth and foam etc...
Next step was to fit the bare base to the bike and then test fit the cowl skin over the top to see how much modification would be required:
There was quite a gap so I set to work marking and grinding the plastic base away until it mated nicely with the cowl skin giving a neater panel gap:
Once a decent panel gap was achieved I fastened the base down to the bike and then attached the skin to the seat base with wood screws , these were temporary merely to hold it in place , the screws were tightened until the correct gap was achieved along each edge.
with the cowl fixed to the base the whole lot was removed from the bike to be permanently bonded together , this was done by plastic seam welding right around each edge of the base. The welds were then sealed in with fibreglass resin on each side.The seat cowl was then filled internally with expanding foam.
Once the whole thing was permanently bonded the wood screws were removed.
At this stage the holes in the cowl for the original fitting kit etc were permanently filled and the whole thing was smoothed and primed:
Then I needed to address the issue of how the foam pad was to be attached , as the seat cowl was now much thicker than before and also there was no room to get in behind to bolt it on. So I decided rather than use bolts I'd use M6 studs in the seat foam as I could easilly get a nut on the underside of the cowl despite not being able to fit a bolt the other way.
M6 studs were sourced from an Italian scooter manifold...
Cut to length and away we go...
Ready for paint , on with a bit of colour (R-158 , Winning red)
And then build her back up:
Cowl next to standard seat:
And on the bike , nice fit and feels very solid. Very happy with the result:
Last edited by Doog; Mar 23, 2012 at 03:45 PM.

Thread Starter
|
Junior Member
Joined: Sep 2011
Posts: 28
Likes: 0
Thanks guys!
I was so disgusted with the poor quality of the original item that I thought a write up with plenty pictures was a must , just to point others in the right direction if they were unhappy with theirs.
I was so disgusted with the poor quality of the original item that I thought a write up with plenty pictures was a must , just to point others in the right direction if they were unhappy with theirs.


Senior Member
Joined: Aug 2011
Posts: 273
Likes: 0
From: Indy/Frankfort
that turned out great man, nice work and nice writeup. your idea was better than the original cowl by far. funny that the company didn't do something similar to your idea so it was ready to mount with little to no problems.
I like the way you think, very creative.
I like the way you think, very creative.
Thread Starter
|
Junior Member
Joined: Sep 2011
Posts: 28
Likes: 0
Thanks for the feedback , very much appreciated.
Yeah you would think that for the price of the kit (�90 uk pounds when full price but I bought it on offer for �60) they would have put a bit more thought into it.
It's quite annoying to think that the only useable peice of the kit was the outer skin which is little more than a peice of formed plastic which would cost under a tenner to make.