
New Tail Time. Your thoughts


Junior Member
Joined: Nov 2012
Posts: 29
Likes: 0
First great job, I love it. It looks great and makes the bike look more modern. I hate the banana seat look.
Does the new seat sit lower? I wouldn't mind doing this mod if the seat sat lower since i'm a little short lol.
So basically you made brackets to hold new tail onto the frame? How many brackets or areas of attachment? Seems like the battery and other stuff is really exposed to the elements, do you think that would be a problem?
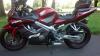
The seat height is pretty much unchanged. I didn't do any before and after measurements but judging by feel it feels the same. I used a stock 04-06 sub frame and basically just shortened it and cut off all the unnecessary tabs so the attachment points to the main frame and angle it comes off the main frame did not change.
As far as attachment points there are 4 total. The fairing wraps around the sub frame rails, so on the underside out back I drilled 2 holes per rail so 4 total and installed threaded inserts into the rail to accept screws. These holes also act as the mounting points for the undertail. In regards to the battery and electronics, I don't feel as thought the battery is anymore exposed then it was with the stock set up and the electronics (rectifier, relays, fuses etc) are totally contained under the tail and seat. I live in SoCal and don't see much rain but I have washed the bike with my garden hose and didn't have any issues. Keep in mind that the electronics are designed to hold up to the elements so there isn't a need to make it completely water tight
Junior Member
Joined: Nov 2012
Posts: 29
Likes: 0
Ok I see the four attachment points in your pic now. I have a 04 F4i so i wont need an extra subframe. Just need the tail fairing, lights. How is the seat attached? Sorry im a newb to bikes but i know my stock seat hooks onto the subframe and locks in place with a latch at the rear.
Wiring for taillight, was that simple? It uses the same type of bulbs?
Wiring for taillight, was that simple? It uses the same type of bulbs?
You can use your 04 sub frame. I only bought a second one because I didn't want my bike to be down while I was doing all the fitting and fabricating. The fairing I used I found on eBay it was a 03-04 race tail. The tail light is a 03-04 fully integrated 600rr tail light and the wiring was pretty straight forward, it's not plug and play so a decent knowledge of wiring would be a big help.
The seat is a 03-04 600rr seat there are two original plastic tabs that hold the rear of the seat down. I fitted the seat and then drilled into the sub frame and installed threaded inserts to accept screws. The front of the seat has two hooks. I used some 90 degree aluminum stock that was riveted to the sub frame and then cut a channel into the aluminum so that the seat hooks catch. The seat then sits on the sub frame rails. In this picture you should be able to see what I'm talking about.

Last edited by zimdbw74; Nov 13, 2012 at 10:26 AM.

Member
Joined: Sep 2011
Posts: 51
Likes: 0
From: UK
gratz dude, i just quickly browsed over the thread, that tail looks freakin sweet.
I much prefer those modern sharp bee-sting-like tails to the original f4i ones.
You got anymore projects lined up for her?
The carbon kinda puts your paintwork to shame tbh, but my god would that bike be some jaw-dropping eye candy if you finished the tank and fairing off in the same carbon.
I much prefer those modern sharp bee-sting-like tails to the original f4i ones.
You got anymore projects lined up for her?
The carbon kinda puts your paintwork to shame tbh, but my god would that bike be some jaw-dropping eye candy if you finished the tank and fairing off in the same carbon.
As far as other projects I would like to do the front wheel fender in the same carbon fiber to balance out the look. I've seen bikes done almost completley in Carbon Fiber and sometimes it borders on overkill.

Junior Member
Joined: Dec 2012
Posts: 6
Likes: 0
How do you do the fiberglass? I am trying to figure it out, but i can't figure out if you do it off the bike, and if so, how do you make the shape that you need? It's my first time fiberglassing, but I know what I need to do pretty much
First I protected the tank with masking tape and painters tape. I started with some thin cardboard as a substructure that I could mold to in the open areas I was trying to cover. After I had an idea of the size I transferred the cardboard to thin sheet metal. Tin flashing used for roofing is a good material to use it's bendable and shapes by hand.

Then I laid down some wax paper to act as a release agent so the fiberglass wouldn't stick to the tank or the masking tape.

I cut strips of fiberglass about 1" thick by 6-8" long and started building layers. I think I did about 4 layers total. I made sure to go well beyond my intended final shape so I had room to cut and shape to my liking.

I Let the fiberglass set for 24 hours before pulling away from the tank. Then from there I started getting my final lines and shaping the glass to meet my desired look.

I hope this helps. If you want more information feel free to ask.