F4I Gauge Cluster LED Change.. Help needed
#1
 03-12-2012, 08:07 PM


Join Date: Mar 2012
Posts: 9
Likes: 0
Received 0 Likes
on
0 Posts
Hello CBRForum,
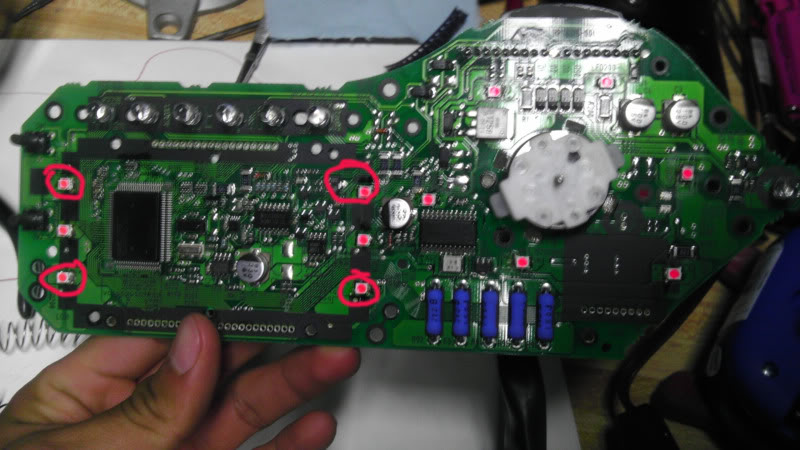
I am currently in the process of replacing the stock LED with different color LEDs. This is my first time doing this and i ran into a bit of a problem. I already soldered the new LEDs into place but however i have four that are not turning on. I tested the LEDs to see if they all light up before resoldering the LCD panel and tach. However, four are not lighting up but i wonder if it's because i didn't solder it well, or if its a bad LED? and if only one isn't working is it gona make the rest of them not work. I was hoping if somebody could give me some feedback or suggestions on whether to either replace all four of those LEDs or what to do or how to test if it's a single one?
My cluster diagram looks like this. "X" marks the non-operational LEDs and "0" marks working ones.
X X 0 0
0 0 0 0
X X 0 0
Any help would be appreciated thanks.
#2
03-12-2012, 08:54 PM

My guess is they are in backwards?
Here is my tutorial I did for doing it: https://cbrforum.com/forum/how-mecha...luster-119967/
Here is my tutorial I did for doing it: https://cbrforum.com/forum/how-mecha...luster-119967/
#3
03-12-2012, 09:18 PM
Join Date: Mar 2012
Posts: 9
Likes: 0
Received 0 Likes
on
0 Posts
#4
03-13-2012, 12:03 AM
Join Date: Mar 2012
Posts: 9
Likes: 0
Received 0 Likes
on
0 Posts
#5
03-13-2012, 06:41 AM
I would just replace them one at a time and re-test.
Make sure you give a good clean/de-solder to the connection point to ensure a good connection.
It could be lots of different things, bad LED, bad solder, melting...
Just remember to put the least amount of heat needed as you don't want to melt stuff.
When its done you will love the look though.
Make sure you give a good clean/de-solder to the connection point to ensure a good connection.
It could be lots of different things, bad LED, bad solder, melting...
Just remember to put the least amount of heat needed as you don't want to melt stuff.
When its done you will love the look though.
#6
03-13-2012, 10:08 AM
Join Date: Mar 2012
Posts: 9
Likes: 0
Received 0 Likes
on
0 Posts

#7
04-01-2012, 01:09 AM
Join Date: Mar 2012
Posts: 9
Likes: 0
Received 0 Likes
on
0 Posts
So it's been a while.. barely doing it now but this was the problem i was running into ..
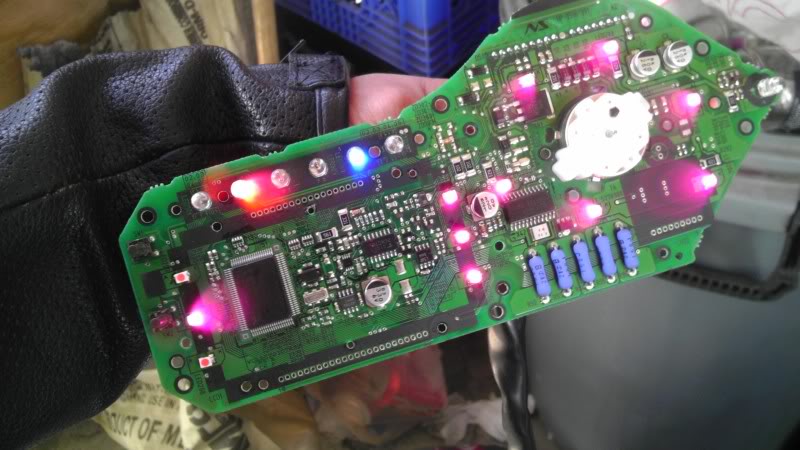
but then i fixed it, turns out some LEDs were bad or didn't solder good.. cleaned it out and replaced them with new ones and this is the finished product.. first time doing it.

Thanks again for the help.
but then i fixed it, turns out some LEDs were bad or didn't solder good.. cleaned it out and replaced them with new ones and this is the finished product.. first time doing it.
Thanks again for the help.
#9
04-04-2012, 10:09 AM
Join Date: Mar 2012
Posts: 9
Likes: 0
Received 0 Likes
on
0 Posts
#10
04-04-2012, 11:52 AM
Mine did that to but before I put it back together I tested it and then just pulled the needle off again and moved it down abit.

Thread
Thread Starter
Forum
Replies
Last Post