
Fuel Pressure Regulator Mod


Thread Starter
|
Junior Member
Joined: Dec 2013
Posts: 12
Likes: 2
From: Tampa Bay
"HELP, MY CBR IS RUNNING RICH!"
apparently this is one of the fatal flaws of the 954 and other cbr's. When i first noticed mine running rich and searched it i came across a ton of help requests and a few tips and helps. The most common issue was the fuel pressure regulator. but the first problem is that its 90 dollars for a little piece of metal and rubber, the second being that it's nearly impossible to find a replacement. so i decide to find a better solution and make a definitive write up to help some folks out. this was done on my 02 954rr but i assume it could at least help for any cbr. so here we go...
DIAGNOSIS-
the main cause for these bikes running excessively rich is a leaking Fuel pressure regulator (FPR for short). luckily they are easy to diagnose on your own. here is a short video explaining what goes wrong and how to check it.
[edit] at 1:05 he accidentally says blood will drip out of it? that's weird. freudian slip? :O [edit]
SOLUTION-
you could get a replacement one if you can find it. if you can't i've heard that a 93 accord fpr will fit and operates at the same psi, but the only ones i found were also like 90 bucks. searching around on ebay i came across one of these
JDM Universal Black Fuel Pressure Regulator with Gauge 0 140 PSI Adjustable FPR | eBay
if the link doesnt work just search fuel pressure regulator and you'll find it.
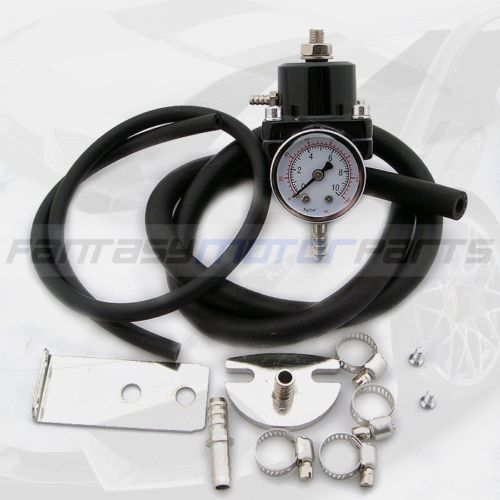
for 24 bucks i figured i'd give it a shot and have some fun tinkering.
THE PROCESS-
(disclaimer, this is not simply a bolt on mod. there is a lot of modifying and retrofitting. but with a little common sense and some patience it is easy. couldnt hurt to keep the old FPR incase it gets screwed up though)
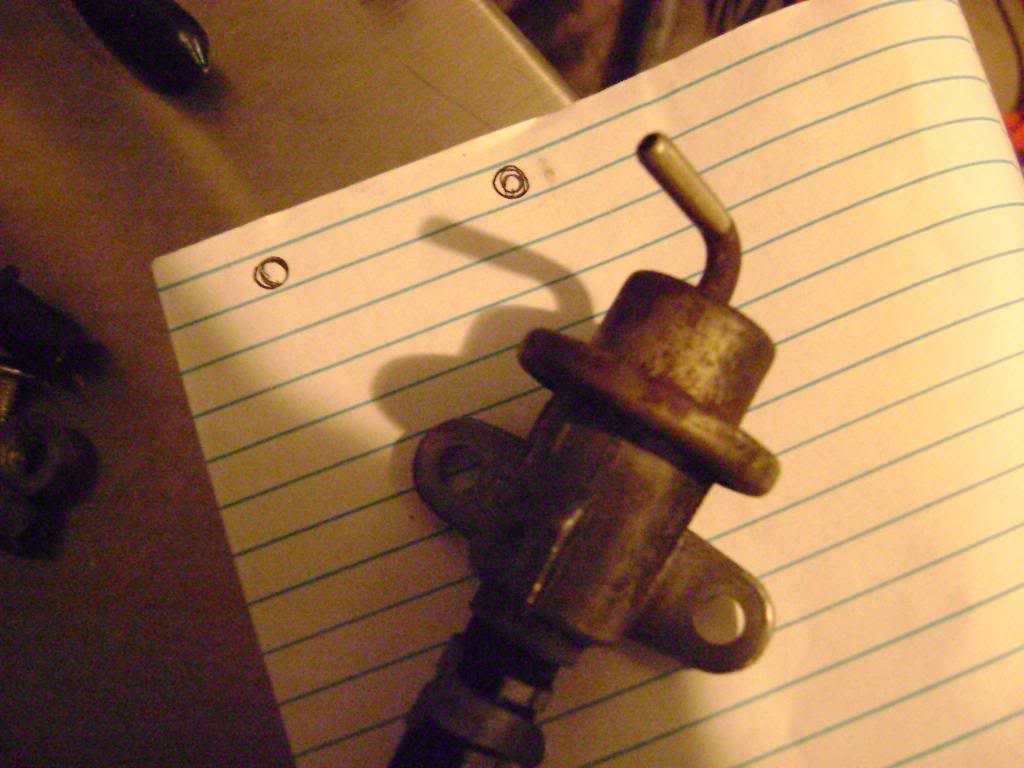
(1)the first step is to remove this guy, the old FPR.
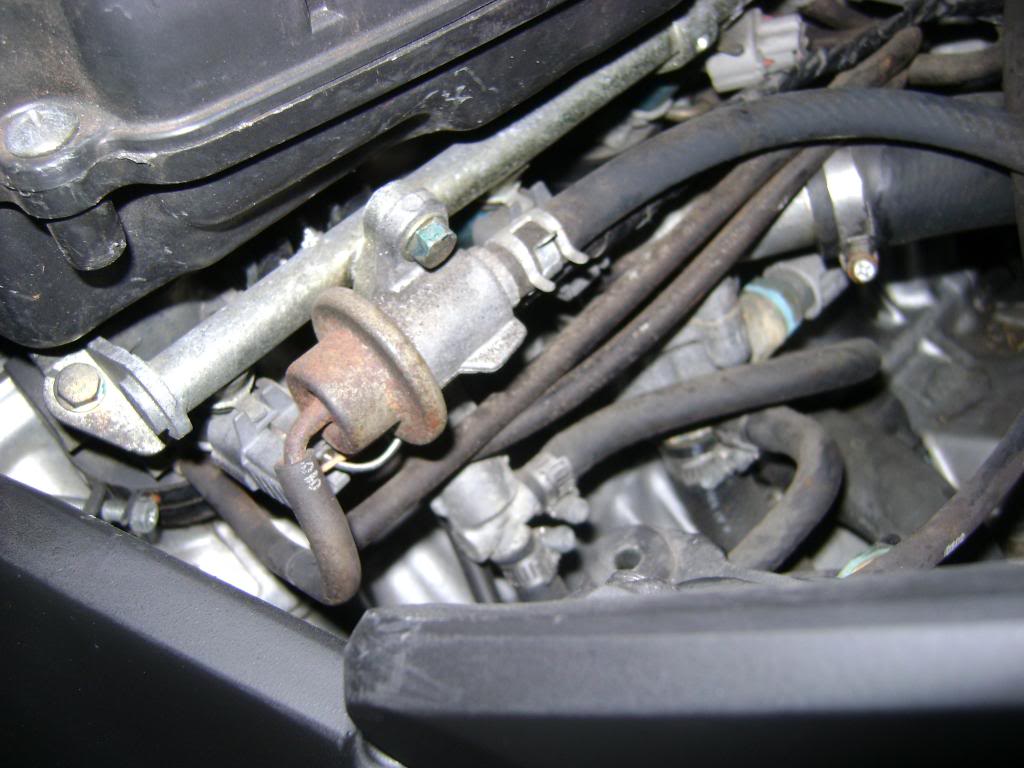
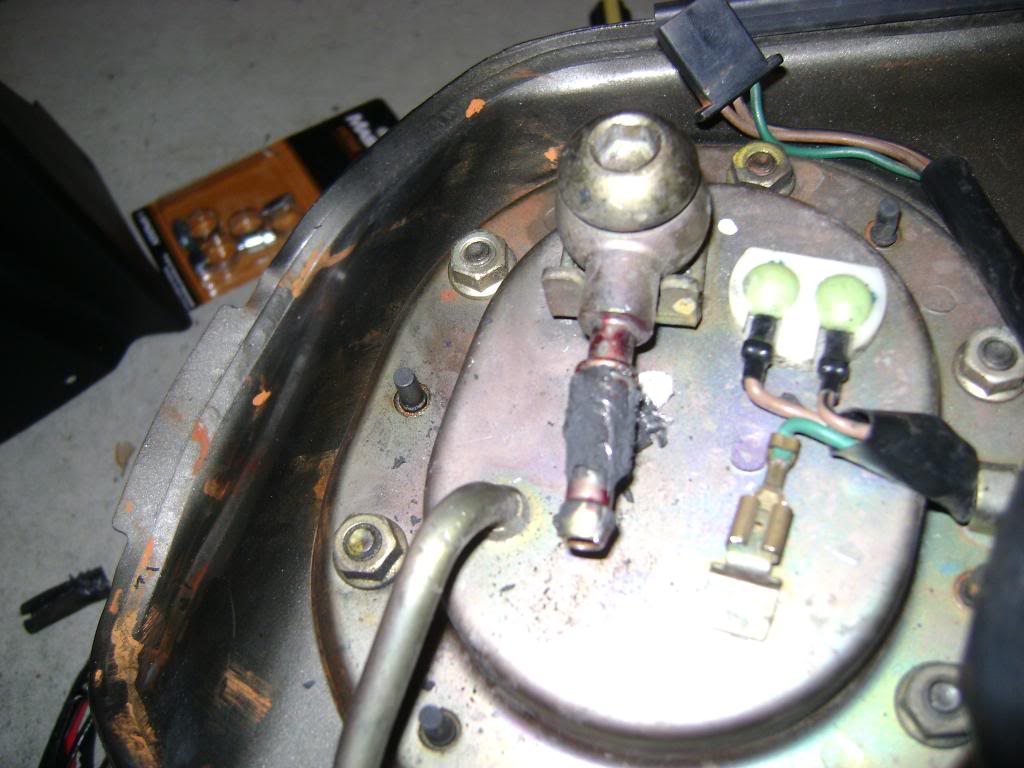
just two small bolts holding it in. remove the fuel inlet line from the FPR and the vacuum line from the T connector. you can either prop the tank up and work in the tight space or remove the tank. if you remove the tank i would highly suggest DON'T TRY TO REMOVE THE OLD FUEL LINES. when i did it i figured i would just cut the lines and throw some new ones in. the heat i assume had literally fused the old lines to the outlet ports. it was a nightmare trying to get them off. there is a connector to hook the new fuel line to the old one. here is a pic of some of the old fuel line still fused on after much scraping and picking.
(2)the new FPR doesnt mount directly to the rail like the stock one. there is an adapter plate that is connected to the new fpr via a length of hose. as i expected the mounting holes don't line up so new ones must be drilled. its just aluminum and pretty easy to drill through.
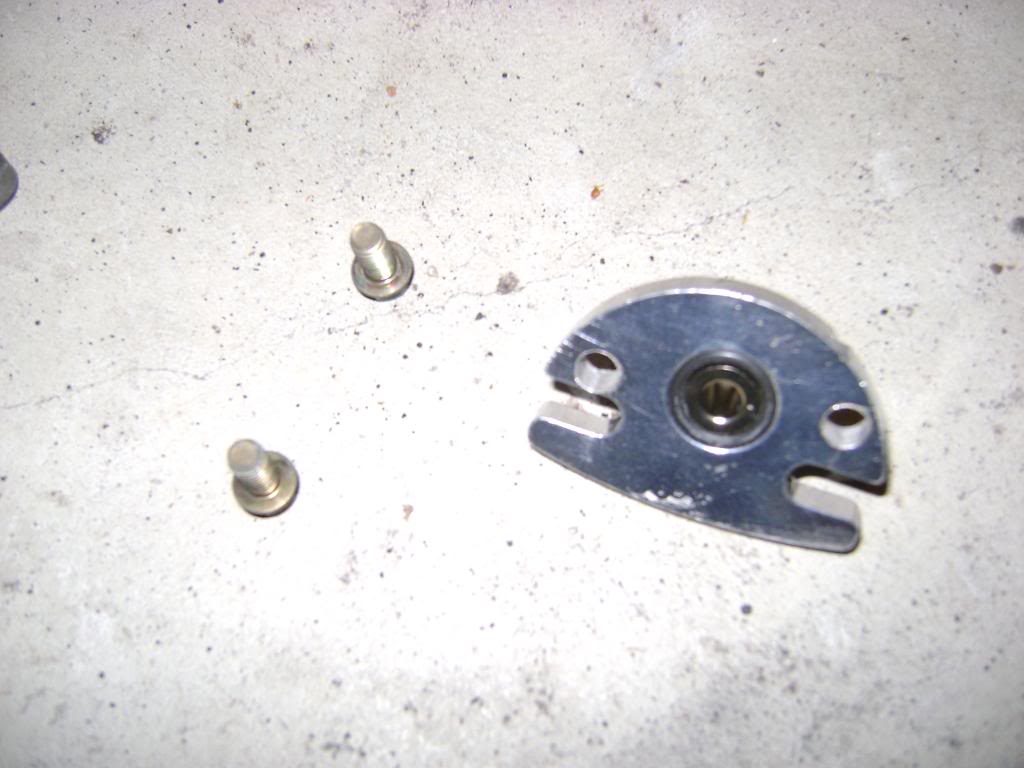
the smart thing to do would be get a ruler or machinist scale (fancy accurate ruler) and measure the distance from hole to hole. story of my life, i can't find a ruler anywhere. so i traced the holes onto a ruled piece of paper folded it in half to find the center and used a light source to line the center of the adapter between the holes and ruling of the paper.
measure twice, cut once! my holes were too close and had to be "adjusted". used a drill bit like a cnc machine
one flaw with cheap ebay stuff, had to reuse the old o-ring. it didn't look thick enough to provide a good seal so i would suggest getting a new one if you don't want fuel spraying onto your engine and hot exhaust.
(3)with the new holes drilled it should mount up to the fuel rail like this.
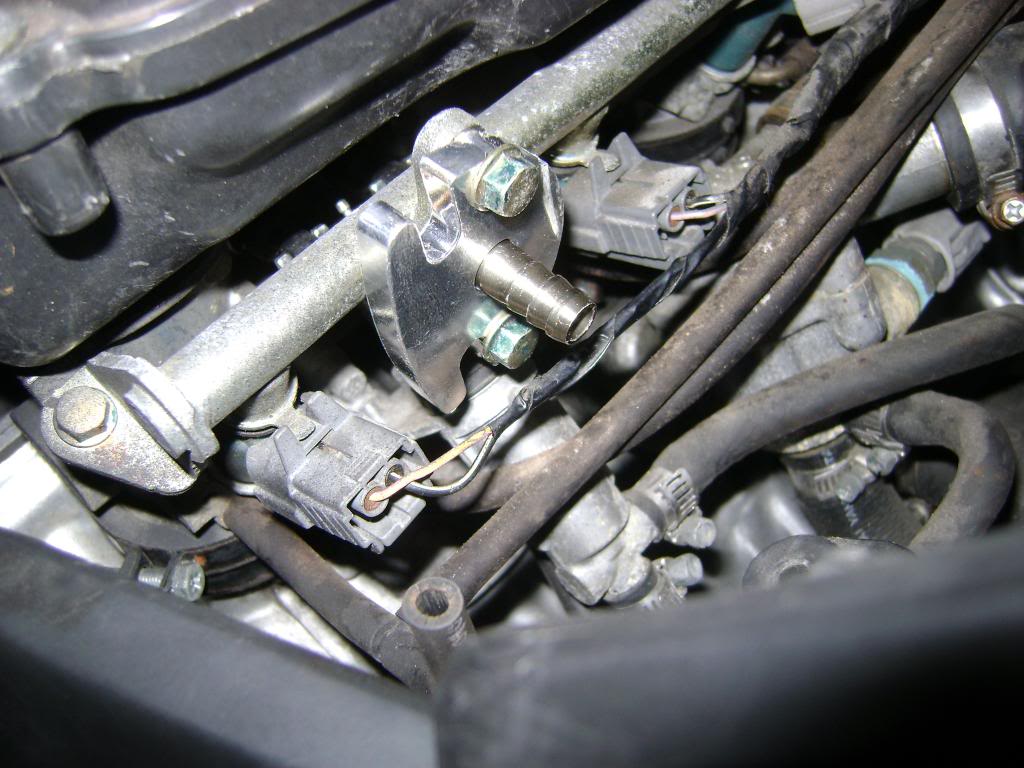
(4) now you must remove your left side fairing and locate this bracket that the fairing mounts to. the FPR came with a little mounting plate that works perfect to bolt onto this (thats the rectangular piece with the hole bolted under the bracket. no drilling neccessary, just gotta get a bolt that fits. i did bend the end up a bit so it would all fit better.
(5) next temporarily mount the fpr to the bracket using the top nut. TECHNICALLY this is not how it's supposed to be mounted, that top screw is for adjusting the pressure and the nut locks it in place. however this seems to hold fine. i suppose you could use the mounting plate properly and drill up into the frame. i was just too lazy for that.
(6) from here you can measure and cut the lengths of hose you will need. didn't come with directions. the vacuum line goes from the t connector near the engine to the fpr. for the fuel hoses, the bottom of the fpr is the inlet (line from the tank) and the side is the outlet (to the adapter on the fuel rail). if you get them backward (of course i did) after it's all buttoned up your guage wont read any pressure and your bike will barely idle.
measure, cut and clamp the hoses on.
(7) finally, go ahead and button it up. stick the fairings back on and test it out. as previously mentioned the stud i used to mount the fpr is actually an adjustment screw. before starting, loosen the lock bolt and use the provided allen key to back the screw all the way out. this is the lowest pressure setting. then disconnect the vacuum line and clamp it or pinch it so you dont have a vacuum leak. start the bike up. it might barely run due to lack of fuel. if it doesnt start at all tighten the screw down till it does start. now screw the adjustment down till the guage reads the desired psi. i believe it is about 50 psi. don't be afraid to screw it in large increments at a time. it's not very sensitive. when you reach 50 psi shut the engine and reattach the vacuum line. finally don't forget to tighten the lock nut when you're done. here is a short video explaining how to adjust it.
if you watch some other videos you may notice the fuel pressure increase with rpm. that is because those are boosted (turbo/supercharged) engines and the vacuum system which actuates the fpr has positive pressure whereas a stock engine like on our bikes has negative pressure. you should notice a slight decreasing flutter in pressure when twisting the throttle due to the negative pressure in the vacuum system.
hope this helps some people out. all in all pretty straight forward mod and looks pretty cool with the gauge subtly poking out. feel free to ask for pointers.
apparently this is one of the fatal flaws of the 954 and other cbr's. When i first noticed mine running rich and searched it i came across a ton of help requests and a few tips and helps. The most common issue was the fuel pressure regulator. but the first problem is that its 90 dollars for a little piece of metal and rubber, the second being that it's nearly impossible to find a replacement. so i decide to find a better solution and make a definitive write up to help some folks out. this was done on my 02 954rr but i assume it could at least help for any cbr. so here we go...
DIAGNOSIS-
the main cause for these bikes running excessively rich is a leaking Fuel pressure regulator (FPR for short). luckily they are easy to diagnose on your own. here is a short video explaining what goes wrong and how to check it.
[edit] at 1:05 he accidentally says blood will drip out of it? that's weird. freudian slip? :O [edit]
SOLUTION-
you could get a replacement one if you can find it. if you can't i've heard that a 93 accord fpr will fit and operates at the same psi, but the only ones i found were also like 90 bucks. searching around on ebay i came across one of these
JDM Universal Black Fuel Pressure Regulator with Gauge 0 140 PSI Adjustable FPR | eBay
if the link doesnt work just search fuel pressure regulator and you'll find it.

for 24 bucks i figured i'd give it a shot and have some fun tinkering.
THE PROCESS-
(disclaimer, this is not simply a bolt on mod. there is a lot of modifying and retrofitting. but with a little common sense and some patience it is easy. couldnt hurt to keep the old FPR incase it gets screwed up though)
(1)the first step is to remove this guy, the old FPR.

just two small bolts holding it in. remove the fuel inlet line from the FPR and the vacuum line from the T connector. you can either prop the tank up and work in the tight space or remove the tank. if you remove the tank i would highly suggest DON'T TRY TO REMOVE THE OLD FUEL LINES. when i did it i figured i would just cut the lines and throw some new ones in. the heat i assume had literally fused the old lines to the outlet ports. it was a nightmare trying to get them off. there is a connector to hook the new fuel line to the old one. here is a pic of some of the old fuel line still fused on after much scraping and picking.

(2)the new FPR doesnt mount directly to the rail like the stock one. there is an adapter plate that is connected to the new fpr via a length of hose. as i expected the mounting holes don't line up so new ones must be drilled. its just aluminum and pretty easy to drill through.

the smart thing to do would be get a ruler or machinist scale (fancy accurate ruler) and measure the distance from hole to hole. story of my life, i can't find a ruler anywhere. so i traced the holes onto a ruled piece of paper folded it in half to find the center and used a light source to line the center of the adapter between the holes and ruling of the paper.


measure twice, cut once! my holes were too close and had to be "adjusted". used a drill bit like a cnc machine
one flaw with cheap ebay stuff, had to reuse the old o-ring. it didn't look thick enough to provide a good seal so i would suggest getting a new one if you don't want fuel spraying onto your engine and hot exhaust.
(3)with the new holes drilled it should mount up to the fuel rail like this.

(4) now you must remove your left side fairing and locate this bracket that the fairing mounts to. the FPR came with a little mounting plate that works perfect to bolt onto this (thats the rectangular piece with the hole bolted under the bracket. no drilling neccessary, just gotta get a bolt that fits. i did bend the end up a bit so it would all fit better.

(5) next temporarily mount the fpr to the bracket using the top nut. TECHNICALLY this is not how it's supposed to be mounted, that top screw is for adjusting the pressure and the nut locks it in place. however this seems to hold fine. i suppose you could use the mounting plate properly and drill up into the frame. i was just too lazy for that.

(6) from here you can measure and cut the lengths of hose you will need. didn't come with directions. the vacuum line goes from the t connector near the engine to the fpr. for the fuel hoses, the bottom of the fpr is the inlet (line from the tank) and the side is the outlet (to the adapter on the fuel rail). if you get them backward (of course i did) after it's all buttoned up your guage wont read any pressure and your bike will barely idle.
measure, cut and clamp the hoses on.
(7) finally, go ahead and button it up. stick the fairings back on and test it out. as previously mentioned the stud i used to mount the fpr is actually an adjustment screw. before starting, loosen the lock bolt and use the provided allen key to back the screw all the way out. this is the lowest pressure setting. then disconnect the vacuum line and clamp it or pinch it so you dont have a vacuum leak. start the bike up. it might barely run due to lack of fuel. if it doesnt start at all tighten the screw down till it does start. now screw the adjustment down till the guage reads the desired psi. i believe it is about 50 psi. don't be afraid to screw it in large increments at a time. it's not very sensitive. when you reach 50 psi shut the engine and reattach the vacuum line. finally don't forget to tighten the lock nut when you're done. here is a short video explaining how to adjust it.
if you watch some other videos you may notice the fuel pressure increase with rpm. that is because those are boosted (turbo/supercharged) engines and the vacuum system which actuates the fpr has positive pressure whereas a stock engine like on our bikes has negative pressure. you should notice a slight decreasing flutter in pressure when twisting the throttle due to the negative pressure in the vacuum system.

hope this helps some people out. all in all pretty straight forward mod and looks pretty cool with the gauge subtly poking out. feel free to ask for pointers.
Last edited by Johnconstantinep; Apr 18, 2014 at 01:48 AM.

Retired Super Moderator and Fighterer
Joined: Nov 2006
Posts: 6,146
Likes: 37
Nice write up. I didn't realize they came with the adapter plate for the fuel rail. I'll have to check, but I think standard fuel pressure is around 43psi. Is your bike running better with it turned up to 50?
Thread Starter
|
Junior Member
Joined: Dec 2013
Posts: 12
Likes: 2
From: Tampa Bay
I don't have a manual so the 50 psi is just hearsay i found on forums. it probably is 43. i'll switch back and forth and ride it to see if i notice a difference. it seems to feel more responsive and powerful than before but i'm terrible at judging things like that by feel. everything "feels much better" to me after i work on something, like new paint = 15 horsepower, red paint is 20
Retired Super Moderator and Fighterer
Joined: Nov 2006
Posts: 6,146
Likes: 37
I don't have a manual so the 50 psi is just hearsay i found on forums. it probably is 43. i'll switch back and forth and ride it to see if i notice a difference. it seems to feel more responsive and powerful than before but i'm terrible at judging things like that by feel. everything "feels much better" to me after i work on something, like new paint = 15 horsepower, red paint is 20

Junior Member
Joined: Dec 2022
Posts: 2
Likes: 0
"HELP, MY CBR IS RUNNING RICH!"
apparently this is one of the fatal flaws of the 954 and other cbr's. When i first noticed mine running rich and searched it i came across a ton of help requests and a few tips and helps. The most common issue was the fuel pressure regulator. but the first problem is that its 90 dollars for a little piece of metal and rubber, the second being that it's nearly impossible to find a replacement. so i decide to find a better solution and make a definitive write up to help some folks out. this was done on my 02 954rr but i assume it could at least help for any cbr. so here we go...
DIAGNOSIS-
the main cause for these bikes running excessively rich is a leaking Fuel pressure regulator (FPR for short). luckily they are easy to diagnose on your own. here is a short video explaining what goes wrong and how to check it.
[edit] at 1:05 he accidentally says blood will drip out of it? that's weird. freudian slip? :O [edit]
Diagnose bad fuel pressure regulator on CBR954rr - YouTube
SOLUTION-
you could get a replacement one if you can find it. if you can't i've heard that a 93 accord fpr will fit and operates at the same psi, but the only ones i found were also like 90 bucks. searching around on ebay i came across one of these
JDM Universal Black Fuel Pressure Regulator with Gauge 0 140 PSI Adjustable FPR | eBay
if the link doesnt work just search fuel pressure regulator and you'll find it.
Attachment 29363
for 24 bucks i figured i'd give it a shot and have some fun tinkering.
THE PROCESS-
(disclaimer, this is not simply a bolt on mod. there is a lot of modifying and retrofitting. but with a little common sense and some patience it is easy. couldnt hurt to keep the old FPR incase it gets screwed up though)
(1)the first step is to remove this guy, the old FPR.
Attachment 29364
just two small bolts holding it in. remove the fuel inlet line from the FPR and the vacuum line from the T connector. you can either prop the tank up and work in the tight space or remove the tank. if you remove the tank i would highly suggest DON'T TRY TO REMOVE THE OLD FUEL LINES. when i did it i figured i would just cut the lines and throw some new ones in. the heat i assume had literally fused the old lines to the outlet ports. it was a nightmare trying to get them off. there is a connector to hook the new fuel line to the old one. here is a pic of some of the old fuel line still fused on after much scraping and picking.
Attachment 29365
(2)the new FPR doesnt mount directly to the rail like the stock one. there is an adapter plate that is connected to the new fpr via a length of hose. as i expected the mounting holes don't line up so new ones must be drilled. its just aluminum and pretty easy to drill through.
Attachment 29366
the smart thing to do would be get a ruler or machinist scale (fancy accurate ruler) and measure the distance from hole to hole. story of my life, i can't find a ruler anywhere. so i traced the holes onto a ruled piece of paper folded it in half to find the center and used a light source to line the center of the adapter between the holes and ruling of the paper.
Attachment 29367
Attachment 29368
Attachment 29369
measure twice, cut once! my holes were too close and had to be "adjusted". used a drill bit like a cnc machine
one flaw with cheap ebay stuff, had to reuse the old o-ring. it didn't look thick enough to provide a good seal so i would suggest getting a new one if you don't want fuel spraying onto your engine and hot exhaust.
(3)with the new holes drilled it should mount up to the fuel rail like this.
Attachment 29370
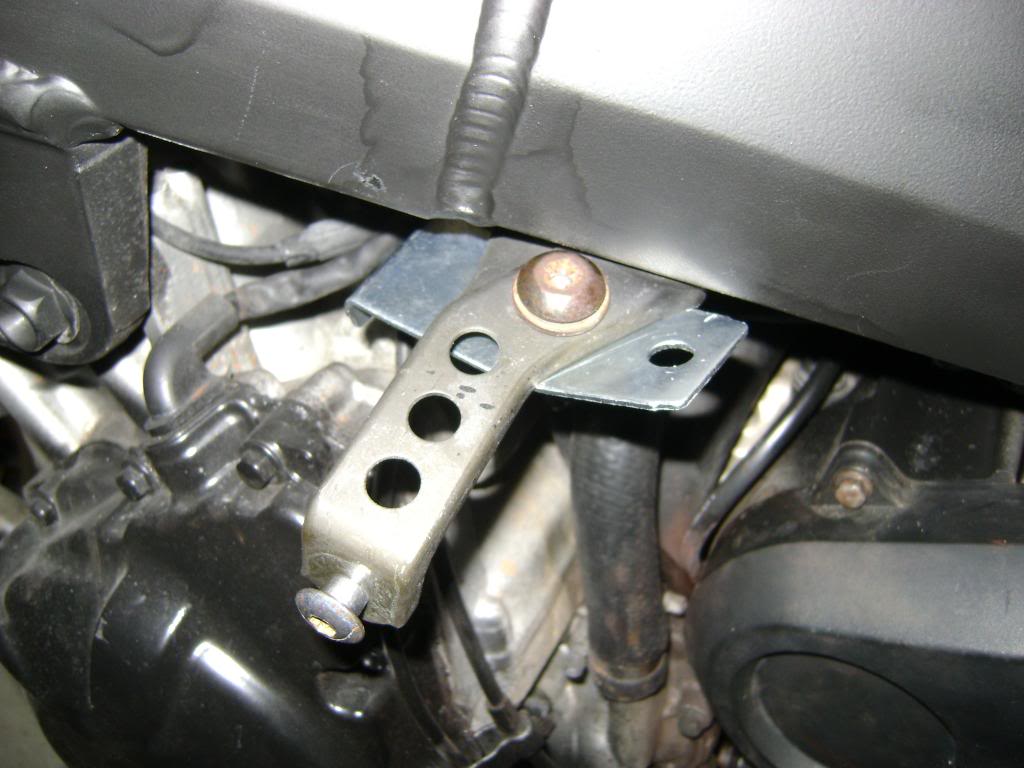
(4) now you must remove your left side fairing and locate this bracket that the fairing mounts to. the FPR came with a little mounting plate that works perfect to bolt onto this (thats the rectangular piece with the hole bolted under the bracket. no drilling neccessary, just gotta get a bolt that fits. i did bend the end up a bit so it would all fit better.
Attachment 29371
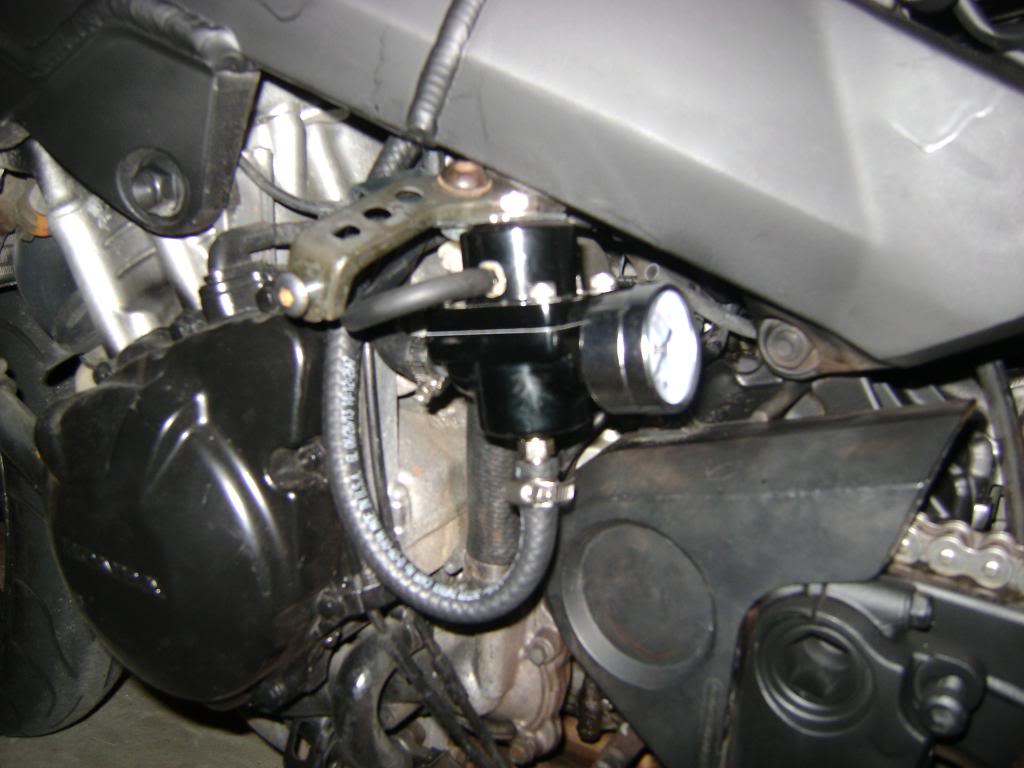
(5) next temporarily mount the fpr to the bracket using the top nut. TECHNICALLY this is not how it's supposed to be mounted, that top screw is for adjusting the pressure and the nut locks it in place. however this seems to hold fine. i suppose you could use the mounting plate properly and drill up into the frame. i was just too lazy for that.
Attachment 29372
(6) from here you can measure and cut the lengths of hose you will need. didn't come with directions. the vacuum line goes from the t connector near the engine to the fpr. for the fuel hoses, the bottom of the fpr is the inlet (line from the tank) and the side is the outlet (to the adapter on the fuel rail). if you get them backward (of course i did) after it's all buttoned up your guage wont read any pressure and your bike will barely idle.
measure, cut and clamp the hoses on.
(7) finally, go ahead and button it up. stick the fairings back on and test it out. as previously mentioned the stud i used to mount the fpr is actually an adjustment screw. before starting, loosen the lock bolt and use the provided allen key to back the screw all the way out. this is the lowest pressure setting. then disconnect the vacuum line and clamp it or pinch it so you dont have a vacuum leak. start the bike up. it might barely run due to lack of fuel. if it doesnt start at all tighten the screw down till it does start. now screw the adjustment down till the guage reads the desired psi. i believe it is about 50 psi. don't be afraid to screw it in large increments at a time. it's not very sensitive. when you reach 50 psi shut the engine and reattach the vacuum line. finally don't forget to tighten the lock nut when you're done. here is a short video explaining how to adjust it.
Setting an EFI Fuel Pressure Regulator - YouTube
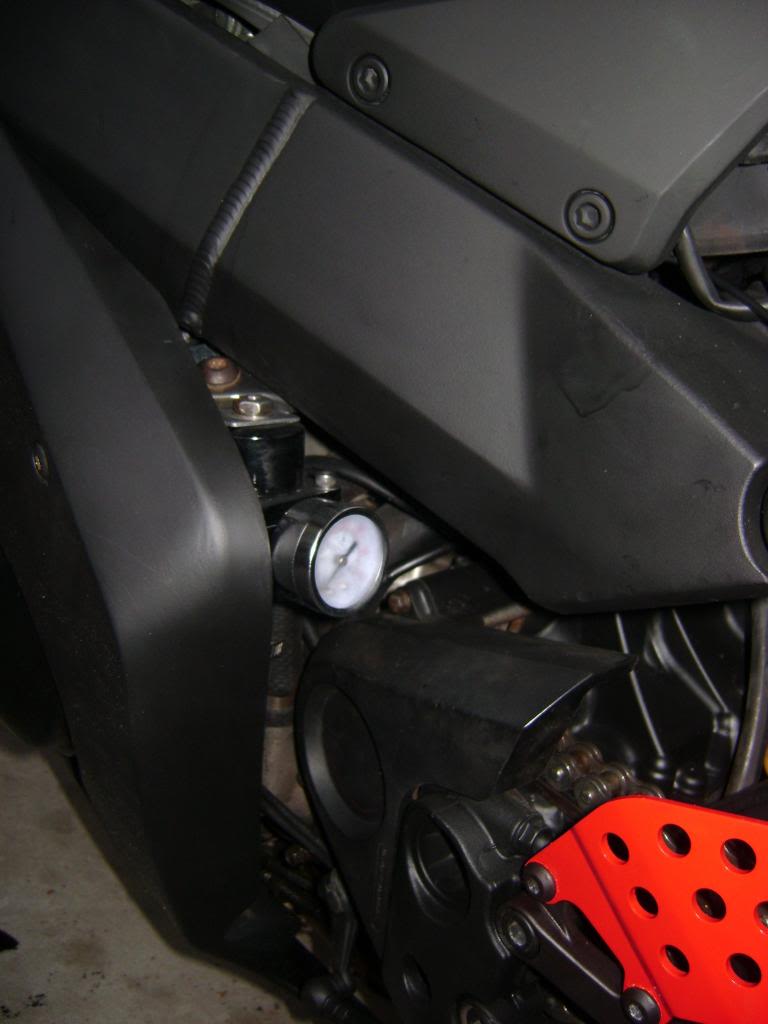
if you watch some other videos you may notice the fuel pressure increase with rpm. that is because those are boosted (turbo/supercharged) engines and the vacuum system which actuates the fpr has positive pressure whereas a stock engine like on our bikes has negative pressure. you should notice a slight decreasing flutter in pressure when twisting the throttle due to the negative pressure in the vacuum system.
Attachment 29373
hope this helps some people out. all in all pretty straight forward mod and looks pretty cool with the gauge subtly poking out. feel free to ask for pointers.
apparently this is one of the fatal flaws of the 954 and other cbr's. When i first noticed mine running rich and searched it i came across a ton of help requests and a few tips and helps. The most common issue was the fuel pressure regulator. but the first problem is that its 90 dollars for a little piece of metal and rubber, the second being that it's nearly impossible to find a replacement. so i decide to find a better solution and make a definitive write up to help some folks out. this was done on my 02 954rr but i assume it could at least help for any cbr. so here we go...
DIAGNOSIS-
the main cause for these bikes running excessively rich is a leaking Fuel pressure regulator (FPR for short). luckily they are easy to diagnose on your own. here is a short video explaining what goes wrong and how to check it.
[edit] at 1:05 he accidentally says blood will drip out of it? that's weird. freudian slip? :O [edit]
Diagnose bad fuel pressure regulator on CBR954rr - YouTube
SOLUTION-
you could get a replacement one if you can find it. if you can't i've heard that a 93 accord fpr will fit and operates at the same psi, but the only ones i found were also like 90 bucks. searching around on ebay i came across one of these
JDM Universal Black Fuel Pressure Regulator with Gauge 0 140 PSI Adjustable FPR | eBay
if the link doesnt work just search fuel pressure regulator and you'll find it.
Attachment 29363
for 24 bucks i figured i'd give it a shot and have some fun tinkering.
THE PROCESS-
(disclaimer, this is not simply a bolt on mod. there is a lot of modifying and retrofitting. but with a little common sense and some patience it is easy. couldnt hurt to keep the old FPR incase it gets screwed up though)
(1)the first step is to remove this guy, the old FPR.
Attachment 29364
just two small bolts holding it in. remove the fuel inlet line from the FPR and the vacuum line from the T connector. you can either prop the tank up and work in the tight space or remove the tank. if you remove the tank i would highly suggest DON'T TRY TO REMOVE THE OLD FUEL LINES. when i did it i figured i would just cut the lines and throw some new ones in. the heat i assume had literally fused the old lines to the outlet ports. it was a nightmare trying to get them off. there is a connector to hook the new fuel line to the old one. here is a pic of some of the old fuel line still fused on after much scraping and picking.
Attachment 29365
(2)the new FPR doesnt mount directly to the rail like the stock one. there is an adapter plate that is connected to the new fpr via a length of hose. as i expected the mounting holes don't line up so new ones must be drilled. its just aluminum and pretty easy to drill through.
Attachment 29366
the smart thing to do would be get a ruler or machinist scale (fancy accurate ruler) and measure the distance from hole to hole. story of my life, i can't find a ruler anywhere. so i traced the holes onto a ruled piece of paper folded it in half to find the center and used a light source to line the center of the adapter between the holes and ruling of the paper.
Attachment 29367
Attachment 29368
Attachment 29369
measure twice, cut once! my holes were too close and had to be "adjusted". used a drill bit like a cnc machine
one flaw with cheap ebay stuff, had to reuse the old o-ring. it didn't look thick enough to provide a good seal so i would suggest getting a new one if you don't want fuel spraying onto your engine and hot exhaust.
(3)with the new holes drilled it should mount up to the fuel rail like this.
Attachment 29370
(4) now you must remove your left side fairing and locate this bracket that the fairing mounts to. the FPR came with a little mounting plate that works perfect to bolt onto this (thats the rectangular piece with the hole bolted under the bracket. no drilling neccessary, just gotta get a bolt that fits. i did bend the end up a bit so it would all fit better.
Attachment 29371
(5) next temporarily mount the fpr to the bracket using the top nut. TECHNICALLY this is not how it's supposed to be mounted, that top screw is for adjusting the pressure and the nut locks it in place. however this seems to hold fine. i suppose you could use the mounting plate properly and drill up into the frame. i was just too lazy for that.
Attachment 29372
(6) from here you can measure and cut the lengths of hose you will need. didn't come with directions. the vacuum line goes from the t connector near the engine to the fpr. for the fuel hoses, the bottom of the fpr is the inlet (line from the tank) and the side is the outlet (to the adapter on the fuel rail). if you get them backward (of course i did) after it's all buttoned up your guage wont read any pressure and your bike will barely idle.
measure, cut and clamp the hoses on.
(7) finally, go ahead and button it up. stick the fairings back on and test it out. as previously mentioned the stud i used to mount the fpr is actually an adjustment screw. before starting, loosen the lock bolt and use the provided allen key to back the screw all the way out. this is the lowest pressure setting. then disconnect the vacuum line and clamp it or pinch it so you dont have a vacuum leak. start the bike up. it might barely run due to lack of fuel. if it doesnt start at all tighten the screw down till it does start. now screw the adjustment down till the guage reads the desired psi. i believe it is about 50 psi. don't be afraid to screw it in large increments at a time. it's not very sensitive. when you reach 50 psi shut the engine and reattach the vacuum line. finally don't forget to tighten the lock nut when you're done. here is a short video explaining how to adjust it.
Setting an EFI Fuel Pressure Regulator - YouTube
if you watch some other videos you may notice the fuel pressure increase with rpm. that is because those are boosted (turbo/supercharged) engines and the vacuum system which actuates the fpr has positive pressure whereas a stock engine like on our bikes has negative pressure. you should notice a slight decreasing flutter in pressure when twisting the throttle due to the negative pressure in the vacuum system.
Attachment 29373
hope this helps some people out. all in all pretty straight forward mod and looks pretty cool with the gauge subtly poking out. feel free to ask for pointers.
Junior Member
Joined: Dec 2022
Posts: 2
Likes: 0
"HELP, MY CBR IS RUNNING RICH!"
apparently this is one of the fatal flaws of the 954 and other cbr's. When i first noticed mine running rich and searched it i came across a ton of help requests and a few tips and helps. The most common issue was the fuel pressure regulator. but the first problem is that its 90 dollars for a little piece of metal and rubber, the second being that it's nearly impossible to find a replacement. so i decide to find a better solution and make a definitive write up to help some folks out. this was done on my 02 954rr but i assume it could at least help for any cbr. so here we go...
DIAGNOSIS-
the main cause for these bikes running excessively rich is a leaking Fuel pressure regulator (FPR for short). luckily they are easy to diagnose on your own. here is a short video explaining what goes wrong and how to check it.
[edit] at 1:05 he accidentally says blood will drip out of it? that's weird. freudian slip? :O [edit]
Diagnose bad fuel pressure regulator on CBR954rr - YouTube
SOLUTION-
you could get a replacement one if you can find it. if you can't i've heard that a 93 accord fpr will fit and operates at the same psi, but the only ones i found were also like 90 bucks. searching around on ebay i came across one of these
JDM Universal Black Fuel Pressure Regulator with Gauge 0 140 PSI Adjustable FPR | eBay
if the link doesnt work just search fuel pressure regulator and you'll find it.
Attachment 29363
for 24 bucks i figured i'd give it a shot and have some fun tinkering.
THE PROCESS-
(disclaimer, this is not simply a bolt on mod. there is a lot of modifying and retrofitting. but with a little common sense and some patience it is easy. couldnt hurt to keep the old FPR incase it gets screwed up though)
(1)the first step is to remove this guy, the old FPR.
Attachment 29364
just two small bolts holding it in. remove the fuel inlet line from the FPR and the vacuum line from the T connector. you can either prop the tank up and work in the tight space or remove the tank. if you remove the tank i would highly suggest DON'T TRY TO REMOVE THE OLD FUEL LINES. when i did it i figured i would just cut the lines and throw some new ones in. the heat i assume had literally fused the old lines to the outlet ports. it was a nightmare trying to get them off. there is a connector to hook the new fuel line to the old one. here is a pic of some of the old fuel line still fused on after much scraping and picking.
Attachment 29365
(2)the new FPR doesnt mount directly to the rail like the stock one. there is an adapter plate that is connected to the new fpr via a length of hose. as i expected the mounting holes don't line up so new ones must be drilled. its just aluminum and pretty easy to drill through.
Attachment 29366
the smart thing to do would be get a ruler or machinist scale (fancy accurate ruler) and measure the distance from hole to hole. story of my life, i can't find a ruler anywhere. so i traced the holes onto a ruled piece of paper folded it in half to find the center and used a light source to line the center of the adapter between the holes and ruling of the paper.
Attachment 29367
Attachment 29368
Attachment 29369
measure twice, cut once! my holes were too close and had to be "adjusted". used a drill bit like a cnc machine
one flaw with cheap ebay stuff, had to reuse the old o-ring. it didn't look thick enough to provide a good seal so i would suggest getting a new one if you don't want fuel spraying onto your engine and hot exhaust.
(3)with the new holes drilled it should mount up to the fuel rail like this.
Attachment 29370
(4) now you must remove your left side fairing and locate this bracket that the fairing mounts to. the FPR came with a little mounting plate that works perfect to bolt onto this (thats the rectangular piece with the hole bolted under the bracket. no drilling neccessary, just gotta get a bolt that fits. i did bend the end up a bit so it would all fit better.
Attachment 29371
(5) next temporarily mount the fpr to the bracket using the top nut. TECHNICALLY this is not how it's supposed to be mounted, that top screw is for adjusting the pressure and the nut locks it in place. however this seems to hold fine. i suppose you could use the mounting plate properly and drill up into the frame. i was just too lazy for that.
Attachment 29372
(6) from here you can measure and cut the lengths of hose you will need. didn't come with directions. the vacuum line goes from the t connector near the engine to the fpr. for the fuel hoses, the bottom of the fpr is the inlet (line from the tank) and the side is the outlet (to the adapter on the fuel rail). if you get them backward (of course i did) after it's all buttoned up your guage wont read any pressure and your bike will barely idle.
measure, cut and clamp the hoses on.
(7) finally, go ahead and button it up. stick the fairings back on and test it out. as previously mentioned the stud i used to mount the fpr is actually an adjustment screw. before starting, loosen the lock bolt and use the provided allen key to back the screw all the way out. this is the lowest pressure setting. then disconnect the vacuum line and clamp it or pinch it so you dont have a vacuum leak. start the bike up. it might barely run due to lack of fuel. if it doesnt start at all tighten the screw down till it does start. now screw the adjustment down till the guage reads the desired psi. i believe it is about 50 psi. don't be afraid to screw it in large increments at a time. it's not very sensitive. when you reach 50 psi shut the engine and reattach the vacuum line. finally don't forget to tighten the lock nut when you're done. here is a short video explaining how to adjust it.
Setting an EFI Fuel Pressure Regulator - YouTube
if you watch some other videos you may notice the fuel pressure increase with rpm. that is because those are boosted (turbo/supercharged) engines and the vacuum system which actuates the fpr has positive pressure whereas a stock engine like on our bikes has negative pressure. you should notice a slight decreasing flutter in pressure when twisting the throttle due to the negative pressure in the vacuum system.
Attachment 29373
hope this helps some people out. all in all pretty straight forward mod and looks pretty cool with the gauge subtly poking out. feel free to ask for pointers.
I don't have a manual so the 50 psi is just hearsay i found on forums. it probably is 43. i'll switch back and forth and ride it to see if i notice a difference. it seems to feel more responsive and powerful than before but i'm terrible at judging things like that by feel. everything "feels much better" to me after i work on something, like new paint = 15 horsepower, red paint is 20

Senior Member
Joined: May 2011
Posts: 1,988
Likes: 438
From: Mesa, AZ
Way FPR works is it automatically adjusts pressure based upon load/vacuum (see vacuum port on side). So under these conditions:
- native pressure, no adjustment = 43.5psi
- idle with good seal = 43.5-psi - 20-24inHg = 31-33psi
- mid-range/partial-throttle = 33-35psi
- WOT = 42-43.5psi
This equalises pressure-differential between injector-inlet pressure vs. injector-outlet/manifold vacuum so that injectors face same differential regardless of load/throttle. This ensures that 4ms pulse-width at idle or WOT injects exact same amount of fuel to make programming EFI system much, much easier and simpler.

Thread
Thread Starter
Forum
Replies
Last Post
Bryantsito
F4i - Main Forum
2
Mar 25, 2012 02:40 PM