Question about Undertails
#1
 06-09-2011, 03:49 PM


Join Date: Jun 2011
Posts: 17
Likes: 0
Received 0 Likes
on
0 Posts
So my current OEM Undertail is crap. After it was laid down by the previous owner, it needs to be replaced. My question is, if I get an aftermarket undertail, do I need to purchase the original oem undertail as well in order to hold the fuses/battery into place? Or do most aftermarket undertails have all those fixtures as well? If the aftermarket undertail does not have those fixtures, does anybody have any pictures of how they set them up?
#2
06-11-2011, 02:36 PM

#3
06-12-2011, 12:08 AM
Join Date: Jun 2011
Posts: 17
Likes: 0
Received 0 Likes
on
0 Posts
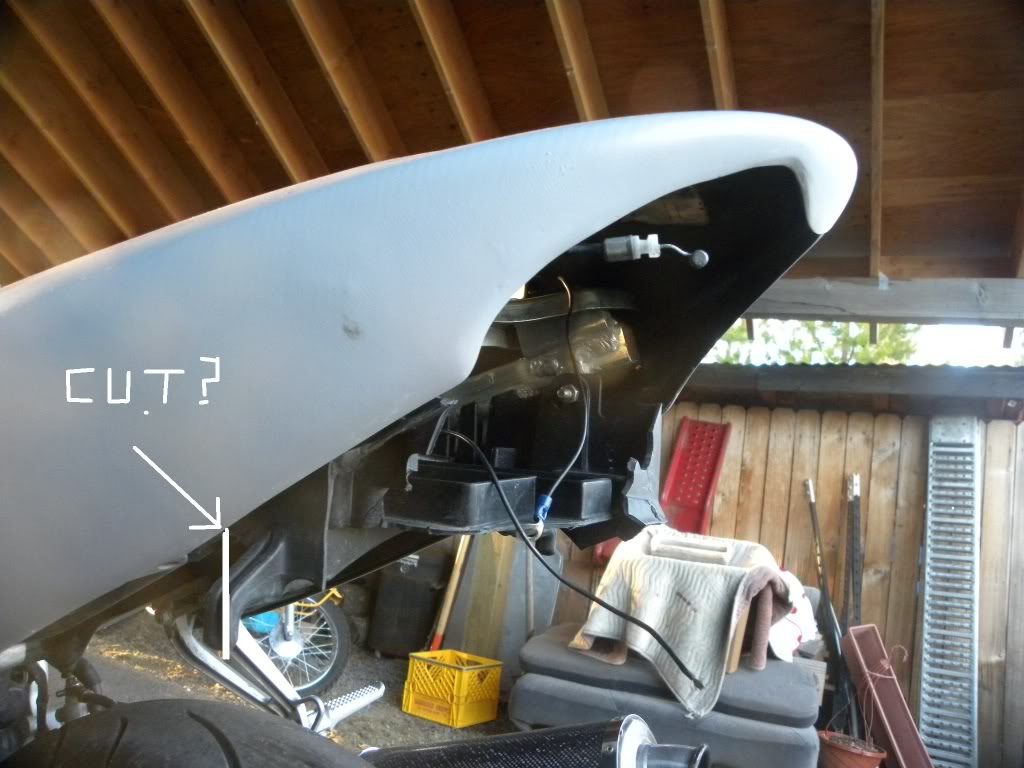
So I got some pictures of of my bike done today (should be up after the kids fall asleep), and a side picture of the tail section. I noticed that after a while, it starts to hang down past the tail fairing, where it starts to "grow" past the tail fairing is where I'll need to cut it off I'm guessing? I'll use MS Paint and show you where I'm thinking, and if you could let me know if I'm correct, I'd appreciate it.
#5
06-12-2011, 11:59 AM

https://cbrforum.com/forum/f4i-main-...rtails-120549/
https://cbrforum.com/forum/f4i-main-...inator-106836/
https://cbrforum.com/forum/f4i-main-...minator-94784/
In that second link, I show how I made my own FE out of sheet metal for a just a few bucks.
There are other DIY FEs on here as well. Check 'em out. They should go a long way in answering a lot of your questions.
#7
06-12-2011, 12:24 PM
Wanted to post a pic here of my old battery tray/undertail but can't seem to find it.
Basically in a nutshell, you only want to cut back as much as necessary that will allow you to install an FE (flat sheet of metal) that will cover the gap from the tail light back the distance to where the tail plastic mounting points (screw holes) are on ea side of the plastic. Understand? You'll see this in my pics on one of those thread links above.
>>>Keep in mind, where the battery tray mounts up to the subframe on ea side at the back - you want to retain those tabs so that the battery tray is secured to the subframe. However, if you can secure the battery tray to the subframe in another fashion, that's ok too.
Last edited by gotcbr; 06-12-2011 at 12:27 PM.
#8
07-03-2011, 09:41 PM

Here is the one I just finished last week using the post I found on this forum. Worked out better then expected and the best part was the total thing cost $20.00 and a few hours of my time.
Items used:
12x24 Sheet Metal (Home Depot)
1.5"x1.5" Aluminum L Channel (Home Depot)
Black Paint
Black Rubber Vehicle Trim
DEI Universal License Plate LED


Items used:
12x24 Sheet Metal (Home Depot)
1.5"x1.5" Aluminum L Channel (Home Depot)
Black Paint
Black Rubber Vehicle Trim
DEI Universal License Plate LED
#10
07-04-2011, 01:32 PM