Question about homemade fender eliminator
#1
 03-07-2010, 10:00 AM


Hello everyone,
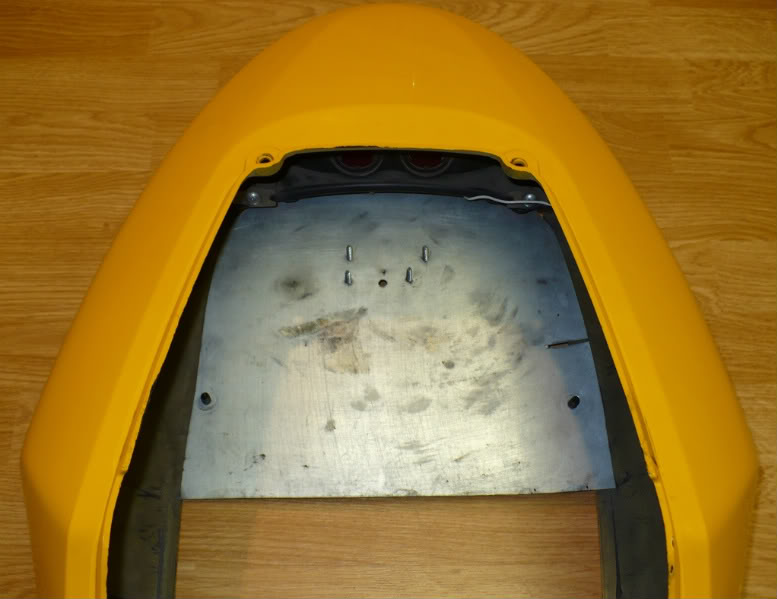
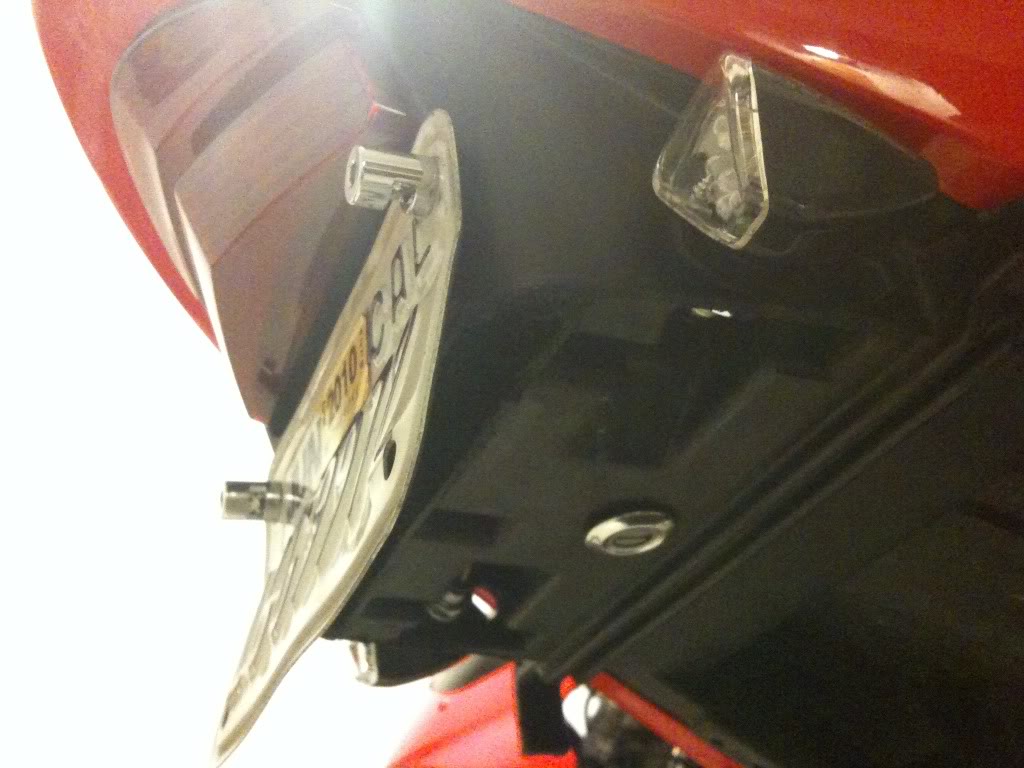
I have a 2004 F4i and I currently have a hacked off fender up to about an inch below the lock. I want to do the homemade fender eliminator with the sheet metal, plastic, or whatever isn't going to put a dent in my walled.
I have an all black F4i so color matching won't be an issue. I've searched through this forum for countless hours and have found some good info, but I still can't get some details on step by step directions.
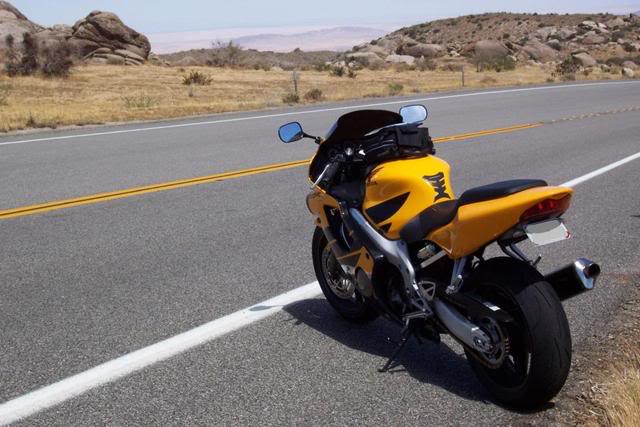
Here is what my fender looks like now:

It was purchased like this and now I want to remove the fender altogether.
Here is what I want to do. I want to remove the fender. I want to remove the turn signals and use an integrated brake light/turn signal (found here: LINK or similar).
I have a couple questions/issues that I need to get resolved before I embark on this project.
1. I have those license plate lights and I don't know if they are required or not to pass inspection. (I live in PA).
2. Is there a way to completely remove the fender or do I just have to go crazy hacking away until I get enough of the plastic removed to install the homemade fender?
3. What will be the new placement of the license plate. (I am okay with keeping it where it is and using a bracket to screw it to, but if I get the integrated brake light/turn signal tail light combo, what about the license plate lights if they are required.
4. I have the banana seat and I will need to know where/how to relocate the lock to the bottom.
I've read through a lot of the threads on this forum and many homemade fender eliminator DIY directions are for the 01-03 F4i. I've read this thread: LINK, but again, this is for an 01-03.
Any help would be greatly appreciated.
Thanks.
I have a 2004 F4i and I currently have a hacked off fender up to about an inch below the lock. I want to do the homemade fender eliminator with the sheet metal, plastic, or whatever isn't going to put a dent in my walled.
I have an all black F4i so color matching won't be an issue. I've searched through this forum for countless hours and have found some good info, but I still can't get some details on step by step directions.
Here is what my fender looks like now:
It was purchased like this and now I want to remove the fender altogether.
Here is what I want to do. I want to remove the fender. I want to remove the turn signals and use an integrated brake light/turn signal (found here: LINK or similar).
I have a couple questions/issues that I need to get resolved before I embark on this project.
1. I have those license plate lights and I don't know if they are required or not to pass inspection. (I live in PA).
2. Is there a way to completely remove the fender or do I just have to go crazy hacking away until I get enough of the plastic removed to install the homemade fender?
3. What will be the new placement of the license plate. (I am okay with keeping it where it is and using a bracket to screw it to, but if I get the integrated brake light/turn signal tail light combo, what about the license plate lights if they are required.
4. I have the banana seat and I will need to know where/how to relocate the lock to the bottom.
I've read through a lot of the threads on this forum and many homemade fender eliminator DIY directions are for the 01-03 F4i. I've read this thread: LINK, but again, this is for an 01-03.
Any help would be greatly appreciated.
Thanks.
Last edited by supersnake83; 03-29-2010 at 07:17 AM.
#2
03-07-2010, 12:53 PM

1) lic plate light - better to have it & not need it, than to need it & not have it. Motrax makes a small LED plate light that sticks via adhesive...inexpensive (about $10) & easy install. Other options are plate light "bolts".
2) You do not want to completely remove the inner fender. It serves as a battery tray, module holder, cable routing, & protection to wiring, lights, etc. Just cut back the excess at the rear, such that you can insert/install a piece of sheet aluminum for a smooth flat install.
3) You can fabricate a plate bracket from the same sheet metal you use for your FE. Its easy. Drill holes in it for plate & mounting to FE. Place it just a few inches back from the tail light.
4) When I had a setup like described, on my F4, b/f I did the split-seat conversion, I did away w/ the lock but kept the cable. I routed the cable thru a hole that I cut in the FE near the L side. Nobody knew it was even there but me. When I needed under my seat, I'd simply pull on the cable end & viola, unlocked. If you still want the lock, you can simply drill a hole in your FE & install the lock mechanism w/ the orig hardware.
Hope this helps. I've pics of my F4 w/ these mods b/f the conversion. If you'd like them, drop me a PM & I'll be glad to help.
#3
03-08-2010, 09:04 AM
#4
03-08-2010, 10:56 PM
Ok, I’ll try to help w/ that.
Here's how my banana seat homemade FE looked b/f I did the split-seat conversion.
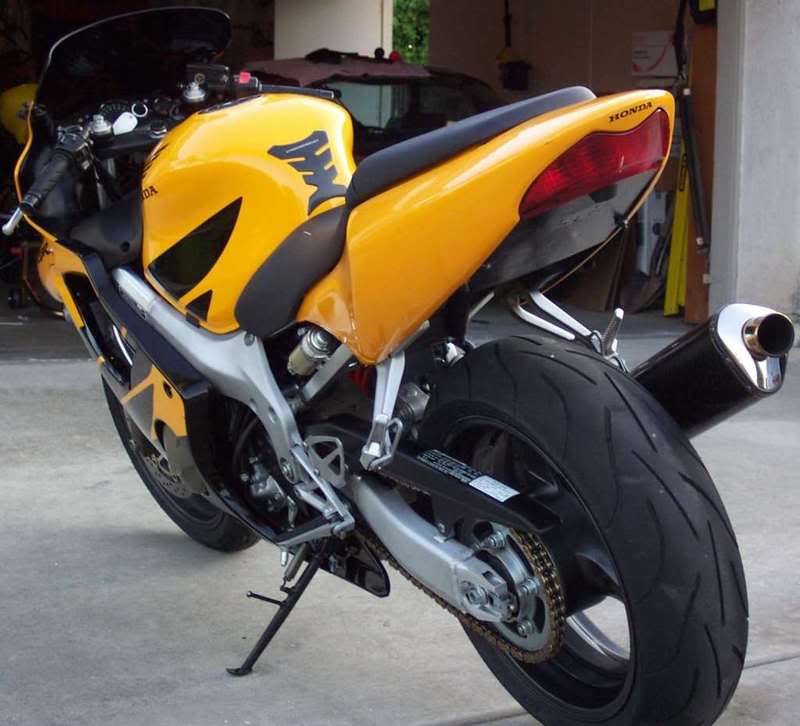
Disclaimer: This pic was taken after the FE had been on the bike for a long time (years).
This is about as simple & inexpensive as you can get...a $5 piece of sheet aluminum & some black spray paint.
Measure & cut to shape, drill holes to mount to existing tail cowl mounting holes, sand & paint, bolt up, done. Ok, there's a little more to it than that, but you get the idea. ;-) Keep in mind though, this isn’t rocket science & it doesn’t have to be perfect.
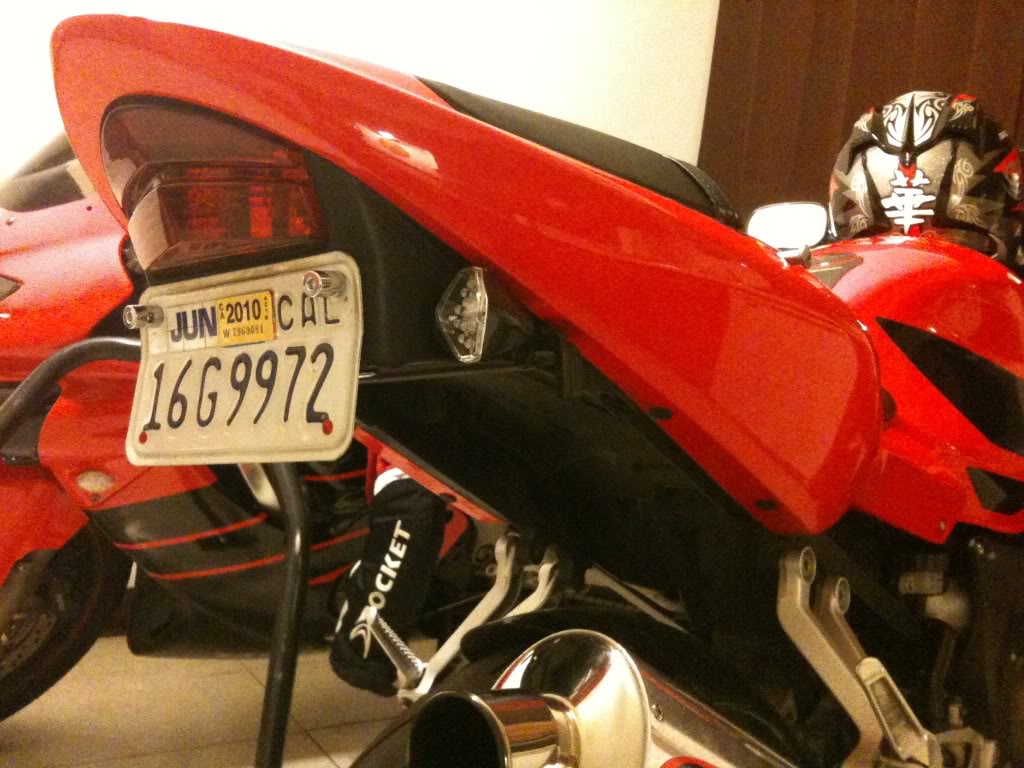
If you look closely in my photo, you can see where I mounted the little plastic motrax LED plate light just in front of the tail light. Also, you can see where I've drilled holes for the lic plate bracket. Too, as I mentioned in my previous post, you can see how I routed the cable from the lock to the L side of the FE, thru a slim slot I cut into it. When I wanted in, I'd just pull on the cable & it would open just as if there'd been a key lock. However, you can just as easily reinstall your original key lock by drilling a hole in the FE & using your orig lock hardware to mount it.
I had a homemade lic plate bracket as well, w/ plate-mounted rear signals.
Since my bike is no longer in this configuration, I’ll have to use what old pics I have of it on the bike & the tail cowl off the bike.
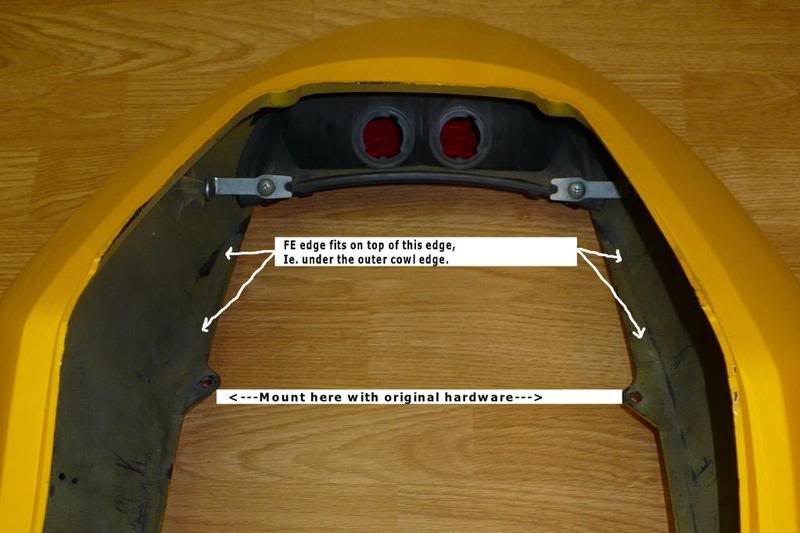
How the FE was done... Pics below…
� Remove rear cowl.
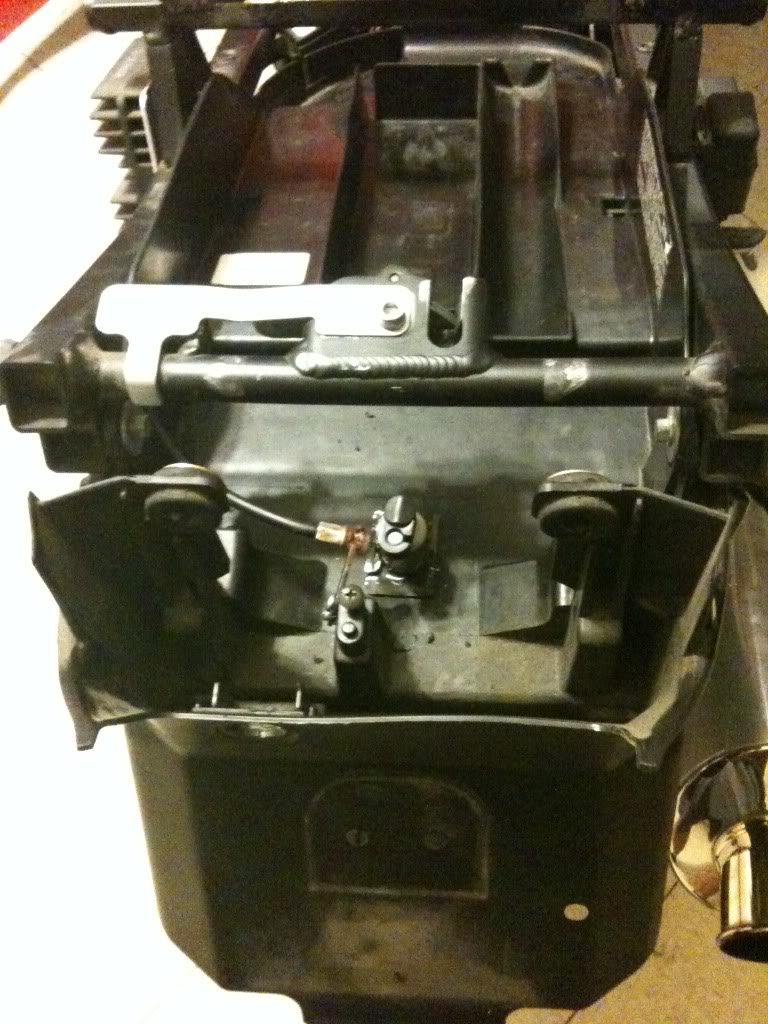
� Cut shovel off of inner fender plastic. Do this carefully. You want to keep the inner fender mounting points at the rear of the subframe intact (1 bolt on ea side)…this will keep the inner fender properly attached to the subframe. You just need to cut the rest of the plastic (a few inches) back such that the FE will fit flush. Test this by taking your piece of sheet metal & holding up to see if it lays flat against bottom of subframe. The inside of the new FE will become your new “trunk area” (same amt of space).
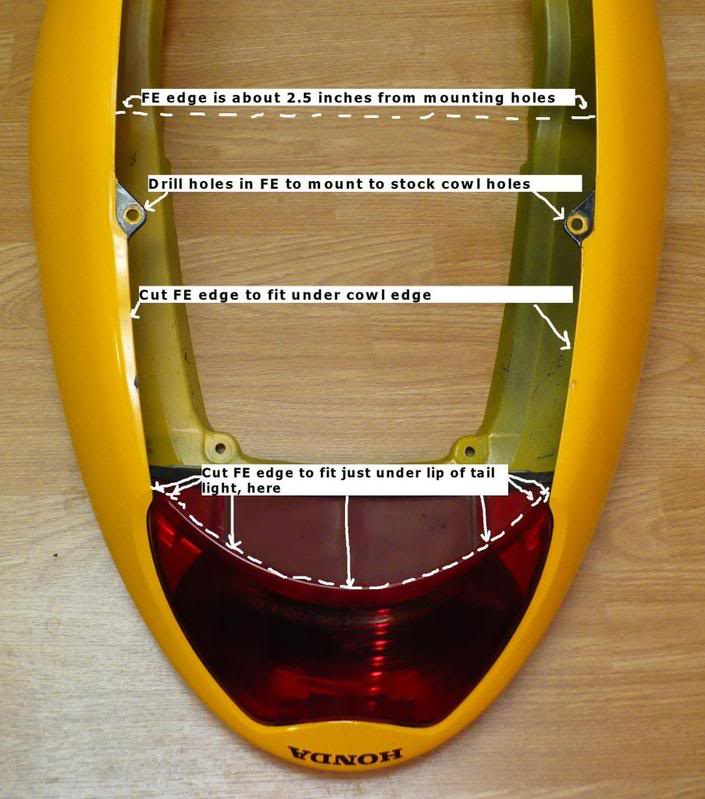
� Make a pattern for your FE - Get a piece of cardboard or paper & trace around the inside edge of the tail cowl plastic, & just under the inner edge of the tail light.
� Transfer pattern to your sheet aluminum & cut to shape. Drill holes to mount. Sand & paint.
� Install - bolt up to same holes where factory cowl mounts. Put tail cowl back on. Done.
The above pic is somewhat deceiving as far as the inner edge of the FE goes...bolting the cowl to the subframe at the front closes that gap.
There's other ways of doing a homemade FE. Just thought I'd share the way mine was. It was quick, inexpensive, & worked very well.
Good luck.
Here's how my banana seat homemade FE looked b/f I did the split-seat conversion.
Disclaimer: This pic was taken after the FE had been on the bike for a long time (years).
This is about as simple & inexpensive as you can get...a $5 piece of sheet aluminum & some black spray paint.
Measure & cut to shape, drill holes to mount to existing tail cowl mounting holes, sand & paint, bolt up, done. Ok, there's a little more to it than that, but you get the idea. ;-) Keep in mind though, this isn’t rocket science & it doesn’t have to be perfect.
If you look closely in my photo, you can see where I mounted the little plastic motrax LED plate light just in front of the tail light. Also, you can see where I've drilled holes for the lic plate bracket. Too, as I mentioned in my previous post, you can see how I routed the cable from the lock to the L side of the FE, thru a slim slot I cut into it. When I wanted in, I'd just pull on the cable & it would open just as if there'd been a key lock. However, you can just as easily reinstall your original key lock by drilling a hole in the FE & using your orig lock hardware to mount it.
I had a homemade lic plate bracket as well, w/ plate-mounted rear signals.
Since my bike is no longer in this configuration, I’ll have to use what old pics I have of it on the bike & the tail cowl off the bike.
How the FE was done... Pics below…
� Remove rear cowl.
� Cut shovel off of inner fender plastic. Do this carefully. You want to keep the inner fender mounting points at the rear of the subframe intact (1 bolt on ea side)…this will keep the inner fender properly attached to the subframe. You just need to cut the rest of the plastic (a few inches) back such that the FE will fit flush. Test this by taking your piece of sheet metal & holding up to see if it lays flat against bottom of subframe. The inside of the new FE will become your new “trunk area” (same amt of space).
� Make a pattern for your FE - Get a piece of cardboard or paper & trace around the inside edge of the tail cowl plastic, & just under the inner edge of the tail light.
� Transfer pattern to your sheet aluminum & cut to shape. Drill holes to mount. Sand & paint.
� Install - bolt up to same holes where factory cowl mounts. Put tail cowl back on. Done.
The above pic is somewhat deceiving as far as the inner edge of the FE goes...bolting the cowl to the subframe at the front closes that gap.
There's other ways of doing a homemade FE. Just thought I'd share the way mine was. It was quick, inexpensive, & worked very well.
Good luck.
Last edited by gotcbr; 03-08-2010 at 11:12 PM. Reason: sp

#6
03-09-2010, 09:25 AM

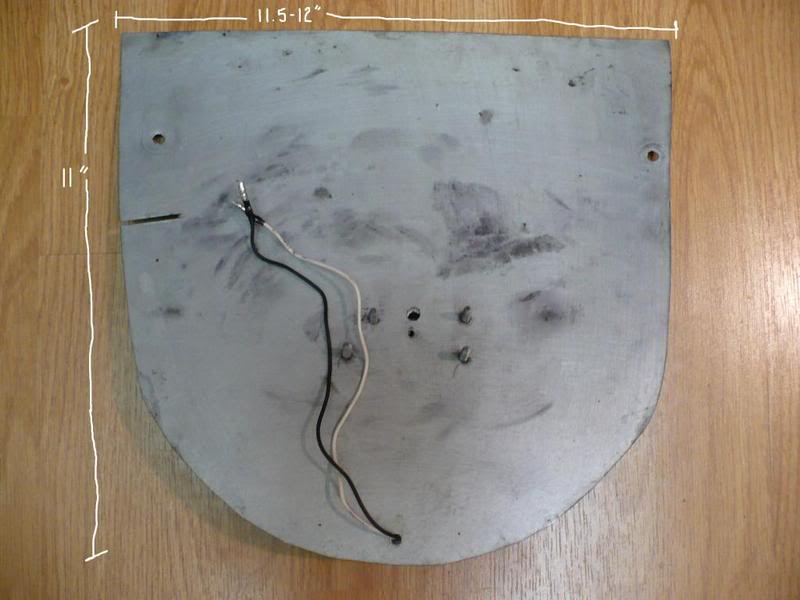
That's how my '02's fender looks like. But, instead of mounting the plate that high and relocating the lock, I took a piece of diamond plate and shaped it to the bottom of the fender and bent a tab to mount the license plate. I didn't want to leave that hole open in the bottom of the fender like it is with your setup.
#7
03-09-2010, 12:48 PM

April 2011 Ride of the Month
Join Date: Jul 2009
Posts: 5,692
Likes: 0
Received 0 Likes
on
0 Posts
+1 to all of this i love the do it urself threads.... if you wanna get really spiffy with if you can take ur aluminum undertail piece and fiberglass over and around it, sand, body filler, sand, prime, paint.. and u have one that matches ur bike ha (reason i did all that for mine is bc i eliminated my entire under tail light and all so i needed to reinforce my aluminum sheet)
#8
03-09-2010, 07:22 PM
Thanks everyone for the replies, pictures and directions.
I now have a better idea of what and how to do this. The only thing I can't picture is the "shovel" part of the rear cowl, but I guess when I actually take the cowl off, I will see what you are talking about gotcbr.
Is there a specific thickness I should get for the sheet metal? I mean, I know I don't want it too thin, so I will just have to see the thickness when I get to the store.
Thanks again for the help.
#9
03-10-2010, 01:27 AM
That's how my '02's fender looks like. But, instead of mounting the plate that high and relocating the lock, I took a piece of diamond plate and shaped it to the bottom of the fender and bent a tab to mount the license plate. I didn't want to leave that hole open in the bottom of the fender like it is with your setup.
I'll have to take a new picture. I've plastic welded everything shut so it's a nice sealed unit now... that was a right when it was done picture...\
Personally still think it looks retarded, but better then that big *** mudflap :P
#10
03-10-2010, 12:52 PM
Thanks everyone for the replies, pictures and directions.
I now have a better idea of what and how to do this. The only thing I can't picture is the "shovel" part of the rear cowl, but I guess when I actually take the cowl off, I will see what you are talking about gotcbr.
Is there a specific thickness I should get for the sheet metal? I mean, I know I don't want it too thin, so I will just have to see the thickness when I get to the store.
Thanks again for the help.
I now have a better idea of what and how to do this. The only thing I can't picture is the "shovel" part of the rear cowl, but I guess when I actually take the cowl off, I will see what you are talking about gotcbr.
Is there a specific thickness I should get for the sheet metal? I mean, I know I don't want it too thin, so I will just have to see the thickness when I get to the store.
Thanks again for the help.
>>>The "shovel" is a nickname for the downward portion of the plastic fender that holds the license plate. You'll be cutting this back for the FE.
>>>The sheet aluminum on mine was stock off the shelf from HomeDepot/Lowe's (can't remember which). Don't remember the specific gauge.
There was a good feeling knowing I had an FE that basically didn't cost me anything but a little bit of my time. I'd always planned to get something better but this worked so well, I just left it that way til I did the split-seat conversion.
I found a couple more old pics that will give you an idea of how it looked... Here's one w/ lic plate bracket & signals removed, & rear light covered w/ vinyl for a trackday...
Here's one w/ the lic plate & signals on the bike. Not as closeup of a pic as I'd like but you get the idea...