My new project
#1
 02-15-2012, 11:17 AM


Join Date: Jan 2012
Location: Guelph, ON
Posts: 100
Likes: 0
Received 0 Likes
on
0 Posts
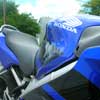
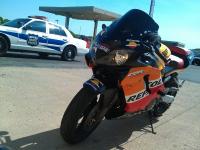
I signed up to this forum a while ago, a few days before getting my 99 F4, and now that I've had a bit of time to work on the bike I thought I would start a thread to show all the work I've done so far. I plan on turning it into a Repsol replica, with a few other mods here and there.
First Step: Bring the bike home, no matter what the weather is like! It was a little tricky loading it into the truck because it was lowered so the exhaust bottomed out on my ramp, but I've since swapped the links back to the stock ones and don't anticipate that being a problem again. I didn't take any pictures while I was changing the links so there will be no write up about that.

Once the bike is in the garage I took a closer look at it. I had to weld the fairings back together around the front turn signals so it would pass a safety inspection. Except for some ugly grips and the previously mentioned lowering likes, the bike is completely stock.

I ordered a bunch of parts to get started on the bike which included:
- Delkevic Tri-Oval CF exhaust
- Integrated tail light
- LED license plate bolt lights
- Swing arm spools
- Frame sliders
First Step: Bring the bike home, no matter what the weather is like! It was a little tricky loading it into the truck because it was lowered so the exhaust bottomed out on my ramp, but I've since swapped the links back to the stock ones and don't anticipate that being a problem again. I didn't take any pictures while I was changing the links so there will be no write up about that.
Once the bike is in the garage I took a closer look at it. I had to weld the fairings back together around the front turn signals so it would pass a safety inspection. Except for some ugly grips and the previously mentioned lowering likes, the bike is completely stock.
I ordered a bunch of parts to get started on the bike which included:
- Delkevic Tri-Oval CF exhaust
- Integrated tail light
- LED license plate bolt lights
- Swing arm spools
- Frame sliders
#2
02-15-2012, 11:42 AM
Join Date: Jan 2012
Location: Guelph, ON
Posts: 100
Likes: 0
Received 0 Likes
on
0 Posts
The first thing that had to go was that massive rear fender. I've done DIY fender eliminators before so I had a pretty good idea of what I wanted to do with this one, but noce I started cutting I realized you had to cut a huge section of the inner fender out if you wanted a clean tail section. This also involved cutting those little trays under the seat in half, which renders them useless because stuff will fall out the back (solution to come later.) Here's how it looked after I attacked the tail with my Dremel.


I got an integrated tail light so I wouldn't have to worry about finding a place to add turn signals. All I have to do now is cover that giant hole and make it look half decent. I got a bunch of cardboard to make some templates, I probably made 3 or 4 before I was happy with the final design. I was trying to get something that would mount in securely (it will be fastened in 6 places) and I wanted something that would almost look like it came from the factory. I ended up making the piece asymmetrical to match the inner fender. Here's the cardboard templates (the other part you see there that looks like a giant fuse, is the beginning of a license plate bracket.)

then I traced the cardboard onto a piece of sheet metal (26 gauge I think)

Then to carefully cut it out with some shears. I did the plate bracket at the same time so I didn't waste any material.

The line on the top of the FE piece is where it needs to be folded. To do this I clamped it down to my workbench, then slowly pushed it down evenly to get a straight crisp fold.

Then I just needed to paint it black. I decided to used a spray can of that rubberized bed liner. Depending on how you spray the stuff you can get smooth or bumpy texture, I wanted something in between that wouldn't stand out beside all the black plastic under the tail. Also it's pretty tough stuff and cleans up easily. You just have to make sure to prep your sheet meal really well because usually the stuff is coated.

And now to install it into the tail section. You can see the two slots on the folded part I made. They slide in behind the screws that hold in the tail light, it's the best solution I came up with to make sure that part of the FE stayed in place. I also swapped out my stock tail light for the integrated one at this point too.

Here's a closer view so you can kind of see the texture of the paint I put on. I'm happy with the results. Also if you've been paying attention, you'll notice the clear section on the bottom of the tail light. Turn out it also has a built in license plate light so the bolts I bought are no longer needed. Not a total waste, they were only about $ shipped from HK and I can use them on another bike project.

And finally here it is installed on the bike. It hasn't been screwed in yet so the fitment will be a little tighter but you get the idea. I'm making the license plate bracket to be removable so when it's not installed this is all you'll see. Nice for pictures and such

More to come!
I got an integrated tail light so I wouldn't have to worry about finding a place to add turn signals. All I have to do now is cover that giant hole and make it look half decent. I got a bunch of cardboard to make some templates, I probably made 3 or 4 before I was happy with the final design. I was trying to get something that would mount in securely (it will be fastened in 6 places) and I wanted something that would almost look like it came from the factory. I ended up making the piece asymmetrical to match the inner fender. Here's the cardboard templates (the other part you see there that looks like a giant fuse, is the beginning of a license plate bracket.)
then I traced the cardboard onto a piece of sheet metal (26 gauge I think)
Then to carefully cut it out with some shears. I did the plate bracket at the same time so I didn't waste any material.
The line on the top of the FE piece is where it needs to be folded. To do this I clamped it down to my workbench, then slowly pushed it down evenly to get a straight crisp fold.
Then I just needed to paint it black. I decided to used a spray can of that rubberized bed liner. Depending on how you spray the stuff you can get smooth or bumpy texture, I wanted something in between that wouldn't stand out beside all the black plastic under the tail. Also it's pretty tough stuff and cleans up easily. You just have to make sure to prep your sheet meal really well because usually the stuff is coated.
And now to install it into the tail section. You can see the two slots on the folded part I made. They slide in behind the screws that hold in the tail light, it's the best solution I came up with to make sure that part of the FE stayed in place. I also swapped out my stock tail light for the integrated one at this point too.
Here's a closer view so you can kind of see the texture of the paint I put on. I'm happy with the results. Also if you've been paying attention, you'll notice the clear section on the bottom of the tail light. Turn out it also has a built in license plate light so the bolts I bought are no longer needed. Not a total waste, they were only about $ shipped from HK and I can use them on another bike project.
And finally here it is installed on the bike. It hasn't been screwed in yet so the fitment will be a little tighter but you get the idea. I'm making the license plate bracket to be removable so when it's not installed this is all you'll see. Nice for pictures and such
More to come!
#3
02-15-2012, 12:56 PM
#4
02-15-2012, 02:57 PM

Nice work! Reminds me of doing my own DIY FE when I still had the banana seat tail. I've got a similar write-up on here somewhere as well.
Like your plan, I made my lic plate bracket removable as well. Was super easy to take it & the rear sigs off for track use. Another great think about painting it black, I could easily shoot another coat of paint on it when it would get chipped from debris.
Like your plan, I made my lic plate bracket removable as well. Was super easy to take it & the rear sigs off for track use. Another great think about painting it black, I could easily shoot another coat of paint on it when it would get chipped from debris.
#5
02-15-2012, 03:10 PM
Join Date: Jan 2012
Location: Guelph, ON
Posts: 100
Likes: 0
Received 0 Likes
on
0 Posts
#6
02-15-2012, 04:45 PM

Junior Member
Join Date: Feb 2012
Location: Connecticut
Posts: 8
Likes: 0
Received 0 Likes
on
0 Posts
Very Nice!
I always notice/appreciate a good custom fab job (plus I have the same color scheme on my 2000 F4). Once i get fully "accepted" into the forum, I will post some pics/info on my mods - Custom fabbed/mounted Vance & Hines highmount, relocated passenger pegs, Targa solo cowl, minor engine tuning...the list goes on...
Adam
#7
02-15-2012, 06:56 PM

Member
Join Date: Apr 2011
Location: Ontario, canada
Posts: 58
Likes: 0
Received 0 Likes
on
0 Posts
looks great, lol when I saw my f4 for the first time in October the very first thing I wanted to do was get rid of the disgusting rear fender/signals etc.
i ordered the same tail but then one of the pimpbike undertails, gotta wait for some warmer weather before i do all my installs and update my thread properly.
i ordered the same tail but then one of the pimpbike undertails, gotta wait for some warmer weather before i do all my installs and update my thread properly.
#8
02-15-2012, 07:06 PM
Join Date: Jan 2012
Location: Guelph, ON
Posts: 100
Likes: 0
Received 0 Likes
on
0 Posts
looks great, lol when I saw my f4 for the first time in October the very first thing I wanted to do was get rid of the disgusting rear fender/signals etc.
i ordered the same tail but then one of the pimpbike undertails, gotta wait for some warmer weather before i do all my installs and update my thread properly.
i ordered the same tail but then one of the pimpbike undertails, gotta wait for some warmer weather before i do all my installs and update my thread properly.