MY F2 - The Red Bull
#1
 09-09-2012, 07:15 PM


Join Date: Mar 2011
Location: Wisconsin
Posts: 14
Likes: 0
Received 0 Likes
on
0 Posts
First off, i'd like to say thnaks to eberyone on here who is or has posted their projects on here. you've all been a great source of information! After utilizing this site so much for ideas,Thought I should dive in and show you all what i've done with your knowledge and guidance.
I bought my first (owned) bike back in the fall of 2009 for a steal. I was riding my fathers 86 Interceptor before for 2 years. My cousin's husband was selling it to help pay for an engagement ring at the time (happily, they are married). What an opportunity! Such a great looking bike!
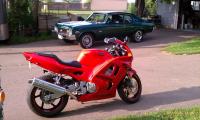
This is what I bought from him:
Attachment 20292
He didn't have much done to it at the time. I believe it has had 2-3 previous owners before myself. It had about 27K miles on it. It was originally in the black/purple/pink paint scheme but got painted to the blue by the owner before him. The bike was laid down at low speed so the front stay is rather crooked and there are clearly repairs done to the bodywork where they connect to the frame.
I got a good two years out of it like this. Before I say anything else, I will say that I'd always kicked around the idea of getting a new set of plastics off of eBay for the bike. The plain blue paint job just started getting boring to me.
Well, I got the push for new plastics the spring of 2011 when I pulled the cover off the bike for the season. I live in Wisconsin, so the winters get cold and the plastic was most likely brittle. I'm not sure when it happened exactly, but I went to go pull the cover off for the season, I got a not so good surprise...
Attachment 20293
I 'm guessing my younger brother was the culprit, but can't be sure. He'd just gotten his learners license at the time, so he was still getting used to the dimensions of our parent's SUV. No matter, It made my decision to get a new set of plastics a little easier.
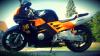
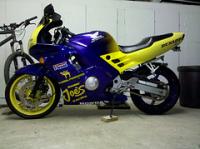
After much deliberation I went with the red bull set off of eBay. It set me back around $500 after shipping and took about 3-4 weeks to ship. I don't have many usable photos of the install on the bike, but I will say like anyone else who's gotten eBay plastics, they do NOT fit out of the box. Be prepared with a dremel, new hardware (the plastics come with NO special connectors for the tail sections like the OEM plastics, many of the tabs will be misaligned, etc) and a lot of patience. These are not OEM plastics. they are slightly thinner, a little more cheaply made but at least for myself, the painjob was done well. I will go more into the install another time. This was the finished product:
Attachment 20294
Attachment 20295
Most of what i've done so far has been cosmetic, but I hope to dig more into the bike over this coming winter. This is what i've done to the bike so far:
- New fairings
- cut down of a Yoshi RS-3 stainless from 18" to 16"
(This was mainly done for cosmetic purposes. The pipe had some road rash from the owner whom laid it down, SO I cut the damaged part off)
- Rim tape (red)
I'm looking at doing a few more things yet to it. Most of it is routine:
- Fork seals
- Front/Back Michelin Pilot tires
- Paint the gas tank to match paint job (theres currently a plastic cover on the tank, but it fits TERRIBLY and is ruining parts of the fairing where the side parts meet up to the tank)
- chain/sprocket
- Spark plugs/wires
Well there's the story so far with my baby. what do you guys thing? any ideas would be greatly appreciated!
I bought my first (owned) bike back in the fall of 2009 for a steal. I was riding my fathers 86 Interceptor before for 2 years. My cousin's husband was selling it to help pay for an engagement ring at the time (happily, they are married). What an opportunity! Such a great looking bike!
This is what I bought from him:
Attachment 20292
He didn't have much done to it at the time. I believe it has had 2-3 previous owners before myself. It had about 27K miles on it. It was originally in the black/purple/pink paint scheme but got painted to the blue by the owner before him. The bike was laid down at low speed so the front stay is rather crooked and there are clearly repairs done to the bodywork where they connect to the frame.
I got a good two years out of it like this. Before I say anything else, I will say that I'd always kicked around the idea of getting a new set of plastics off of eBay for the bike. The plain blue paint job just started getting boring to me.
Well, I got the push for new plastics the spring of 2011 when I pulled the cover off the bike for the season. I live in Wisconsin, so the winters get cold and the plastic was most likely brittle. I'm not sure when it happened exactly, but I went to go pull the cover off for the season, I got a not so good surprise...
Attachment 20293
I 'm guessing my younger brother was the culprit, but can't be sure. He'd just gotten his learners license at the time, so he was still getting used to the dimensions of our parent's SUV. No matter, It made my decision to get a new set of plastics a little easier.
After much deliberation I went with the red bull set off of eBay. It set me back around $500 after shipping and took about 3-4 weeks to ship. I don't have many usable photos of the install on the bike, but I will say like anyone else who's gotten eBay plastics, they do NOT fit out of the box. Be prepared with a dremel, new hardware (the plastics come with NO special connectors for the tail sections like the OEM plastics, many of the tabs will be misaligned, etc) and a lot of patience. These are not OEM plastics. they are slightly thinner, a little more cheaply made but at least for myself, the painjob was done well. I will go more into the install another time. This was the finished product:
Attachment 20294
Attachment 20295
Most of what i've done so far has been cosmetic, but I hope to dig more into the bike over this coming winter. This is what i've done to the bike so far:
- New fairings
- cut down of a Yoshi RS-3 stainless from 18" to 16"
(This was mainly done for cosmetic purposes. The pipe had some road rash from the owner whom laid it down, SO I cut the damaged part off)
- Rim tape (red)
I'm looking at doing a few more things yet to it. Most of it is routine:
- Fork seals
- Front/Back Michelin Pilot tires
- Paint the gas tank to match paint job (theres currently a plastic cover on the tank, but it fits TERRIBLY and is ruining parts of the fairing where the side parts meet up to the tank)
- chain/sprocket
- Spark plugs/wires
Well there's the story so far with my baby. what do you guys thing? any ideas would be greatly appreciated!
#2
09-09-2012, 09:01 PM
Join Date: Mar 2011
Location: Wisconsin
Posts: 14
Likes: 0
Received 0 Likes
on
0 Posts
#4
09-10-2012, 08:30 AM
Join Date: Mar 2011
Location: Wisconsin
Posts: 14
Likes: 0
Received 0 Likes
on
0 Posts
Well I figured out the picture posting process. Imagine that, all I had to do was read the directions in the new members forum area! (those are there for ***** like me)
I copied what mattered form above in case you guys dont feel like scorlling back and forth to get the context of the pictures...
I bought my first (owned) bike back in the fall of 2009 for a steal. a 1992 CBR 600F2. I was riding my fathers 86 Interceptor before for 2 years. My cousin's husband was selling it to help pay for an engagement ring at the time (happily, they are married). What an opportunity! Such a great looking bike!
This is what I bought from him:

He didn't have much done to it at the time. a Yoshi RS-3 Stainless slip-on is about all I can tell. I believe it has had 2-3 previous owners before myself. so mechanically, there could have been other little things here and there. It was originally in the black/purple/pink paint scheme but got painted to the blue by the owner before him. The bike was laid down at low speed so the front stay is rather crooked and there are clearly repairs done to the bodywork where they connect to the frame.
I got a good two years out of it like this.
...
Well, I got the push for new plastics the spring of 2011 when I pulled the cover off the bike for the season. I live in Wisconsin, so the winters get cold and the plastic was most likely brittle. I'm not sure when it happened exactly, but I went to go pull the cover off for the season, I got a not so good surprise...

I 'm guessing my younger brother was the culprit, but can't be sure. He'd just gotten his learners license at the time, so he was still getting used to the dimensions of our parent's SUV. No matter, It made my decision to get a new set of plastics a little easier.
After much deliberation I went with the red bull set off of eBay. It set me back around $500 after shipping and took about 3-4 weeks to ship. I don't have many usable photos of the install on the bike, but I will say like anyone else who's gotten eBay plastics, they do NOT fit out of the box. Be prepared with a dremel, new hardware (the plastics come with NO special connectors for the tail sections like the OEM plastics, many of the tabs will be misaligned, etc) and a lot of patience. These are not OEM plastics. they are slightly thinner, a little more cheaply made but at least for myself, the painjob was done well. I will go more into the install another time. This was the finished product:


*finish reading the first post above for whats left*
I copied what mattered form above in case you guys dont feel like scorlling back and forth to get the context of the pictures...
I bought my first (owned) bike back in the fall of 2009 for a steal. a 1992 CBR 600F2. I was riding my fathers 86 Interceptor before for 2 years. My cousin's husband was selling it to help pay for an engagement ring at the time (happily, they are married). What an opportunity! Such a great looking bike!
This is what I bought from him:
He didn't have much done to it at the time. a Yoshi RS-3 Stainless slip-on is about all I can tell. I believe it has had 2-3 previous owners before myself. so mechanically, there could have been other little things here and there. It was originally in the black/purple/pink paint scheme but got painted to the blue by the owner before him. The bike was laid down at low speed so the front stay is rather crooked and there are clearly repairs done to the bodywork where they connect to the frame.
I got a good two years out of it like this.
...
Well, I got the push for new plastics the spring of 2011 when I pulled the cover off the bike for the season. I live in Wisconsin, so the winters get cold and the plastic was most likely brittle. I'm not sure when it happened exactly, but I went to go pull the cover off for the season, I got a not so good surprise...
I 'm guessing my younger brother was the culprit, but can't be sure. He'd just gotten his learners license at the time, so he was still getting used to the dimensions of our parent's SUV. No matter, It made my decision to get a new set of plastics a little easier.
After much deliberation I went with the red bull set off of eBay. It set me back around $500 after shipping and took about 3-4 weeks to ship. I don't have many usable photos of the install on the bike, but I will say like anyone else who's gotten eBay plastics, they do NOT fit out of the box. Be prepared with a dremel, new hardware (the plastics come with NO special connectors for the tail sections like the OEM plastics, many of the tabs will be misaligned, etc) and a lot of patience. These are not OEM plastics. they are slightly thinner, a little more cheaply made but at least for myself, the painjob was done well. I will go more into the install another time. This was the finished product:
*finish reading the first post above for whats left*
#5
09-10-2012, 08:19 PM
#6
09-10-2012, 09:03 PM
Join Date: Mar 2011
Location: Wisconsin
Posts: 14
Likes: 0
Received 0 Likes
on
0 Posts
I know on the stock fairings, there's some sort of plastic bracket or tab that holds the rear of the light in. This is what it looks like on the stocks (I highlighted the part yellow):
From the back:

Side View:

I'm guessing,since your asking, that yours didn't come with that little tab either...
First off, I know the holes for the blinkers were way too big on mine. had to be between 1/8" and 1/4" all the way around (where do they get these dimensions from when they mold these!?!?!). I went out to the hardware store and bought a roll of window/door insulation. I think I got 1/4" thinkness by 1/2" wide so I'd have a decent strip around the light for any time I got caught in weather. that was the best way to make them to look passable (in my opinion).
Ok, now for that tab: here's the fun part. there may be a better way to do this but I couldn't think of anything at the time... I made it out of ABS plastic pipe. I picked up a 90-degree bend from the hardware store. usually you'll find ABS pipe next to the PVC pipe in the hardware store.
In order to get the form I wanted, I actually had to cut a bit of that ABS pipe fitting off (about the size of the tab on the stocks) and MELT it with a soldering iron. Once you get the shape your looking for, you can either glue it on with some sort of epoxy, or do what I did and melt it to the fairing itself. Almost like welding it. BE CAREFULL NOT TO GET IT TOO HOT OR YOU MAY DAMAGE YOUR NEW FAIRING'S PAINTJOB!!!
I've heard many say not to melt ABS when repairing or fabricating because it weakens it blah blah blah, but it's held together for 2 years now without any issues. I actually melted ABS around the nuts I wanted to hold those side doors on. It beats trying to reach around and undo the nut by hand!
#7
09-10-2012, 10:55 PM
Join Date: Mar 2011
Location: Wisconsin
Posts: 14
Likes: 0
Received 0 Likes
on
0 Posts
Well, extending on my list of past projects, I thought I'd share my (and my friend's) idea with the rear blinkers on my bike. I did this last summer after the LED integrated tail light that was on the bike started acting up (the brake light seriously DIMMED when I braked!  )
)
I didn't like the idea of actually mounting any blinkers to the fairings for when they needed to be removed in a hurry and most of the aftermarket ones are so tiny you can't see them! I wanted something lo-profile, just not THAT low-profile that you couldn't see it when necessary. A buddy of mine had a set of these flexible LED strips lying around his place. Typically blinkers are yellow, I know but he only had the reds lying around (red or yellow both are legal in WI) Since I barely use the cargo net bars by the passenger pegs, this became the ideal spot for them. I attached them using double sided mounting tape and a few small clear zip-ties.
here's what it looks like from behind. And yes that IS a Red Bull can under the tail light

They're highly visible! even during the day!
This is what they look like from the side when they're not on.
I was worried someone in a truck higher off the ground wouldn't see them, but I had my friend with a lifted truck prove that wrong. Totally visible from all around in day or night.
There, cheap, sensible, AND functional. what do you guys think?
I didn't like the idea of actually mounting any blinkers to the fairings for when they needed to be removed in a hurry and most of the aftermarket ones are so tiny you can't see them! I wanted something lo-profile, just not THAT low-profile that you couldn't see it when necessary. A buddy of mine had a set of these flexible LED strips lying around his place. Typically blinkers are yellow, I know but he only had the reds lying around (red or yellow both are legal in WI) Since I barely use the cargo net bars by the passenger pegs, this became the ideal spot for them. I attached them using double sided mounting tape and a few small clear zip-ties.
here's what it looks like from behind. And yes that IS a Red Bull can under the tail light
They're highly visible! even during the day!
This is what they look like from the side when they're not on.
I was worried someone in a truck higher off the ground wouldn't see them, but I had my friend with a lifted truck prove that wrong. Totally visible from all around in day or night.
There, cheap, sensible, AND functional. what do you guys think?
#8
09-10-2012, 11:29 PM
Senior Member
Join Date: Nov 2010
Location: Brainerd mn
Posts: 106
Likes: 0
Received 0 Likes
on
0 Posts
#9
09-11-2012, 11:18 AM
Senior Member