
My CBR F2 '92
#21
 05-09-2013, 08:28 AM


Join Date: Oct 2012
Location: Toronto, Canada
Posts: 23
Likes: 0
Received 0 Likes
on
0 Posts
Some Photo Updates:
Tail fairing holders (In place until I do something with the tail):


And here's what came in the mail:

and the bike in various stages of things being taken off:


Based on the developments, I highly believe I will chop the tail and make it a solo seat. Will also clean the engine / paint engine / frame / wheels and the end of the season and see how much $ I can sink into upgrading old parts / what is needed.
I've made some clamps as per the streetfighters forum, with an aluminum bar wrapped around (in my case, a socket) something circular. I will try to get the wiring organized and headlight + gauge mounted and wired in this weekend.
One question though: I took out the speedometer cable that is attached to the gearbox on the front wheel, should I also remove the gearbox from the front axel? will I need a spacer in it's place? or should I just put a cap to close off the speedometer cable hole in the gearbox?
Thanks!
Tail fairing holders (In place until I do something with the tail):
And here's what came in the mail:
and the bike in various stages of things being taken off:
Based on the developments, I highly believe I will chop the tail and make it a solo seat. Will also clean the engine / paint engine / frame / wheels and the end of the season and see how much $ I can sink into upgrading old parts / what is needed.
I've made some clamps as per the streetfighters forum, with an aluminum bar wrapped around (in my case, a socket) something circular. I will try to get the wiring organized and headlight + gauge mounted and wired in this weekend.
One question though: I took out the speedometer cable that is attached to the gearbox on the front wheel, should I also remove the gearbox from the front axel? will I need a spacer in it's place? or should I just put a cap to close off the speedometer cable hole in the gearbox?
Thanks!

#23
05-09-2013, 09:27 AM
Senior Member
#24
05-10-2013, 08:11 AM
Join Date: Oct 2012
Location: Toronto, Canada
Posts: 23
Likes: 0
Received 0 Likes
on
0 Posts
Sorry Campos, I felt more comfortable going with the streetfighter route than the racer 
anyway, heres some updates:
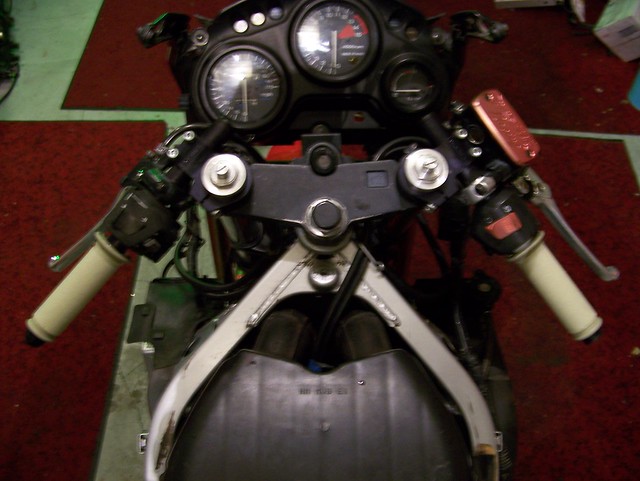
clamps almost done (just need holes, rounded corners and polish):

Clamps on the fork:

Triple drilled for new gauge mount (still not sure exactly how I want to mount it, but I think I will use all those holes haha):

I have a feeling someone spray painted the triple (previous owner who go spray paint happy), I'm guessing the triple used to be flat brushed finish? anyone know? It doesnt seem like its been powdercoated.
another somewhat silly question, if I want to change stock brake cables to braided steel, I need to drain the brake fluid reservoirs, is that correct?
anyway, heres some updates:
clamps almost done (just need holes, rounded corners and polish):
Clamps on the fork:
Triple drilled for new gauge mount (still not sure exactly how I want to mount it, but I think I will use all those holes haha):
I have a feeling someone spray painted the triple (previous owner who go spray paint happy), I'm guessing the triple used to be flat brushed finish? anyone know? It doesnt seem like its been powdercoated.
another somewhat silly question, if I want to change stock brake cables to braided steel, I need to drain the brake fluid reservoirs, is that correct?
#25
05-10-2013, 08:19 AM

#26
05-10-2013, 08:26 AM
Join Date: Oct 2012
Location: Toronto, Canada
Posts: 23
Likes: 0
Received 0 Likes
on
0 Posts
Thanks Mattson, The trick I found with the clamps is two fold:
1) get a large socket like 1-1/4" and a vise-grip
2) clamp the piece of aluminum (centre) with the vise-grip on the square end side of the socket
3) put the socket in a vise, and I manually bent the aluminum by hand into a semi-circle around the socket contour
4) then I used the table vise and slowly clamped down on the left over handles of the clamp to be
Once I figured it out, and found the right sized socket (the one i use is about 38mm OD, so it's a little small, resulting in the gaps, but I will end up putting my connectors/ brackets in those gaps), I found it took 5 min / clamp... including cutting the aluminum by hand! hope this helps!
#27
05-10-2013, 10:22 AM
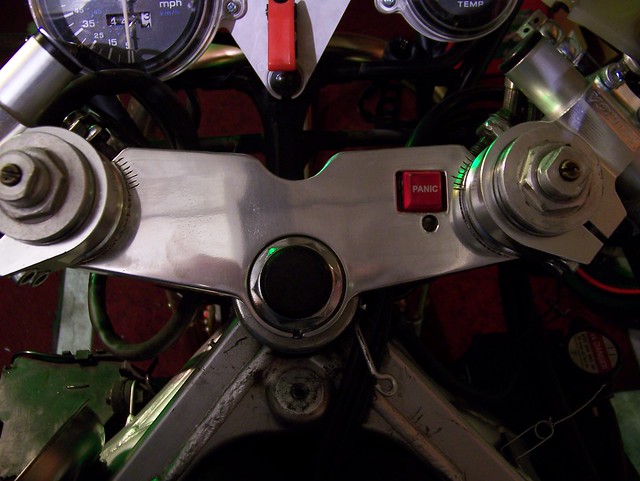
I stripped the finish, and polished mine, after trimming the collar that surrounds the OEM iginition switch, and creating some 2mm marks for clip-on adjustment... looks like this, now:

I would just put hoses on both bleeder valves, open the reservoir, and pump the brakes until all seems dry, and then perform a full bleed with brand new fluid, when you change over to the braided lines - if you've got a Mity-vac, or something similar, you can use that to completely evacuate the system.
Last edited by JNSRacing; 02-24-2014 at 01:55 PM.
#28
05-10-2013, 01:12 PM
Senior Member
#29
05-12-2013, 02:24 PM
Join Date: Oct 2012
Location: Toronto, Canada
Posts: 23
Likes: 0
Received 0 Likes
on
0 Posts
Hey guys, heres the update, after 12hrs spent yesterday with a buddy, got the light installed and the gauge installed as well and all wired in and everything works (of course there was a 3hr detour with wiring when the headlight suddenly stopped working... found out the problem was in the starter switch housing where the contract plate for the starter and headlight broken, which required a creative solution of placing some retaining plastic). anyway, next issue is getting all the wiring organized, chopping the tail, new taillight/plate holder etc.
For the wiring, as you can see its all in a ziptied cluster, I was thinking of getting a hammond insulated box, and dropping it into a Monster energy can and use it instead of an overflow . anyway, heres some photos:

[img]https://lh4.googleusercontent.com/-OWgYdOELV9s/UY_gggev-TI/AAAAAAAAA8g/6iv9pNRUBaI/w605-h454-no/IMAGE_0CA800CD-CF05-4C25-90DD-BAD77C1A8072.JPG/img]
Here you can see that 4-contact plate has a broken retainer, "fixed" it by placing a piece of machined plastic to keep the contract plate intact with the switch contact.

Bee's nest of wiring (which will probably go into a Monster Can )


For the wiring, as you can see its all in a ziptied cluster, I was thinking of getting a hammond insulated box, and dropping it into a Monster energy can and use it instead of an overflow
. anyway, heres some photos:[img]https://lh4.googleusercontent.com/-OWgYdOELV9s/UY_gggev-TI/AAAAAAAAA8g/6iv9pNRUBaI/w605-h454-no/IMAGE_0CA800CD-CF05-4C25-90DD-BAD77C1A8072.JPG/img]
Here you can see that 4-contact plate has a broken retainer, "fixed" it by placing a piece of machined plastic to keep the contract plate intact with the switch contact.
Bee's nest of wiring (which will probably go into a Monster Can
)
#30
05-12-2013, 03:30 PM
Argh, those switches are a royal PITA if they start acting up, specially if some wrench monkey has rounded the screw ends for you... Which reminded me I gotta clean my hi/lo switch cause it`s cutting out...
Just an opinion, but I`d put those headlight clamp ends inside the plastic if at all possible... Other than that looks pretty good.
Just an opinion, but I`d put those headlight clamp ends inside the plastic if at all possible... Other than that looks pretty good.