[Wall of Text] First Street Bike, First Project,
#1
 04-30-2013, 12:58 AM


Join Date: Apr 2013
Posts: 18
Likes: 0
Received 0 Likes
on
0 Posts
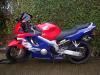
Hey guys, I joined the Club about a year ago picked up a non-runner(was Winter) on Craigslist for just under 700 bucks. Little rough, ad claimed new clutch disks were needed thought nothing of it(more on this later) for 700 surely it would be a decent bike to learn how to do my own maintenance on. I quickly ran short on patience pulling my carbs off the first time and realized even after watching a few tutorials on youtube that i had no idea what i was doing.
I tried to put them back and and obviously no good, bike never started, However it does turn over (yay i suppose lol) As i said i lost patience with it and took it out to the shop here in town, U-Motors. Nice fat quote of 900 bucks for a carb clean, rebuild, re-sync, and a new back tire. Well that never happened, I ok'd the order and let the gaping hole in my wallet be outshine by my excitement of being able to ride my bike for the first time; Buuuut, i get a call saying they cant find the parts they'll need to finish the build or even start it for that matter. Now i feel like a total sucker.
Flash forward to December 2012, I picked up a set of carbs off of a 89(i think) 600F that was claimed "Fresh off a running bike" for a smooth 80 bucks after shipping. Come to find out that the phrase "Fresh" probably means sitting in a box on a shelf in some random place in California for the better part of 15 years. None of the slides moved, it was full of red powder (i imagine thats dried out gas?) That's beside the point. Either way I looked at it, these carbs are only good to me as parts. Yay i suppose.
This week, I decide its time to get things rolling Im itching to get out on the streets released from the cage. So i pull my carbs off the bike again, and bring them into the apartment (hah stupid idea, Girlfriend wasn't to happy) Spent the better part of 3 hours tearing them down. Ive got the float bowls empty-ish, Everything i could get out with a screwdriver except the float(needed some pliers to ease the pin out.) now i have a rack of carbs slightly taken down, And im sure i will probably need to clean the entire unit.
This is where im stuck, I dont know if i need to take the carbs down even more, or if i can boil them in lemon juice without taking them to every little piece. on top of all this I cant remember if the guy said that Second gear was popping out and that's why i might need a new clutch kit, or if i got boned lol. So that will be a great surprise once....If i can get this beast running.
So quick recap on a few things for those that dont need my backstory
- Bought what i thought was a decent starter bike for under 700(non-running), With claimed clutch issue
- "real" honda Mechanics couldnt find random parts needed for carbs
- Bought what i hoped to be the easy way to get my bike running, turned out to be way wrong
- Tore down carbs, (float Bowls, and diaphragms)Not sure if i can or how to totally clean the rack as it sits.
- probably going to have 2nd gear issues maybe not but my hopes on this one isn't exactly high. If second gear pops can i shift over it?
#2
04-30-2013, 11:02 AM

June 2013 ROTM
Hi and welcome to the forum! Sorry to hear about your woe's. Carbs can seem a little overwhelming, but they can done! You mentioned lemon juice, which I found to be a great cleaner/degreaser. Just don't leave the rubber diaphragms in. You do not want to disassemble the rack if you don't have to.
Pics of where you are at would help, but assuming you have the main and pilot jet out, and the emulsion tube (the thing the main jet screws into), and the diaphragms/needles/springs... you can boil the rest. Some carb cleaner and compressed air should help you clean the small passages after the lemon-aid.
As for the clutch... if it jumps out of second, a new clutch won't help. The jumping out of gear is caused by worn gear dogs, which cannot be fixed without a new gear/core. A shift kit will help if its just started to jump, but won't fix a broken transmission.
Get some pics of your work, and your bike up.
PS: Make sure you vote!
#3
04-30-2013, 11:32 AM

Member
Join Date: Jun 2012
Location: Spring Lake, MI
Posts: 51
Likes: 0
Received 0 Likes
on
0 Posts
Hey just wanted to add, dont let those rubber diaphragms sit out in the sun or anything for extended periods of time, they are probably already very weak in in a 25 year old bike. They can also tear very easily. Carb work is tedious but not very difficult. Have you thought about getting a shop manual and maybe talking to a friend who may be able to offer assistance? As far as cleaning copper wire strands and carb cleaner works for the smaller holes. Its nice to see another person getting our old birds back on the streets!!
#4
04-30-2013, 02:32 PM
Senior Member
Join Date: Apr 2012
Location: Sheffield, England
Posts: 229
Likes: 0
Received 0 Likes
on
0 Posts
Hi David great to hear you're working on this great bike!
I did the carb cleaning bike over the winter for the first time. If I can do it so can you. I didn't take the rack apart or tamper at all with the enrichment circuit or mixture screw settings. I reckon just cleaning the basic serviceable stuff is the thing to do first. Diaphragm covers off, springs out, diaphragms out. Bowls off, floats out, needle valves out, needle valve seat and its filter out. Then clean it all well and carefully.
I did one carb at a time using fresh gas and high quality fine artists' brushes to clean everything. I also ran gas through the jets and passages and blew it through gently with a foot pump with a plastic adapter on the end (high pressure isn't needed). I was careful when blowing gas through the enrichment passage as I think I heard a small diaphragm working in there.
I think I cleaned everything with gas (was careful with it tho) as I know it doesn't rot anything in there at all. Put some engine assembly lube on the pistons/slides before you pop 'em back in (I didn't but wish I had).
If you do the simple service first and put the carbs back on then you'll have a starting point from which to work from if you find another issue or two with them.
There are good vids on youtube: mrmaxstorey does a great carb cleaning vid as does dawino6260. The service manual is very good too.
If I gave any poor advice on here guys let me know - I've only done it once but this worked for me
#5
04-30-2013, 08:28 PM
Make sure you take the main jets, pilot jets and pilot screw (packing 0-ring, washer and spring...make sure they are there and in good condition), needle and seat out of the carb when you clean it. Pilot jet needs to be clean. I use a small wire to get them clean (hole is very small). Check needle and seat for wear and replace if looks like a ring around the needle tip.
Clean pilot circuit is critical for idle through quarter throttle. Usually the culprit for poor running because the pilot jets clog up easy with today's crappy fuel.
Clean pilot circuit is critical for idle through quarter throttle. Usually the culprit for poor running because the pilot jets clog up easy with today's crappy fuel.
#6
05-06-2013, 03:29 AM
Join Date: Apr 2013
Posts: 18
Likes: 0
Received 0 Likes
on
0 Posts
Hey guys, sorry about how long this took me work has been a killer. Anyway, I got some pictures of the Carburators here. Hopefully they show up.


ok So i've got a few questions,
ok So i've got a few questions,
- On the second picture, the three brass "things" in the bowls are not removable except for the one the fuel valve goes in, correct? Before i boil these should i take those out? If the other two cylindrical items can come out how would one go about doing that? (assuming thats necessary)
- Picture number 3, The Left Center carb is cracked as you can see. Im realllllllllly hoping that's not gonna be a major issue. A "Mechanic" friend of mine claims it shouldn't be an issue, I guess I'll find out soon enough eh?
- As they sit now I can throw em in a pot and boil them with what im assuming is 50/50 mix of lemon juice and water, Right?
- Replacement screws are going to be necessary , as i took the carbs apart i had to cut slots in 3/4 of all of them i ran up to fastenal and grabbed a few bags of screws. I picked up M4X10, M4X12, and M4X16 >_> zinc plated (100pc's of each lol) should those hold up pretty well?
- Last one question atm, I just picked up a battery charger (the battery in the bike is new....uncharged im sure but new hopefully it will hold a charge) What amperage should i charge at 2 or 4 ?
#7
05-06-2013, 09:52 PM
June 2013 ROTM
#8
05-06-2013, 10:04 PM

Senior Member
Join Date: Feb 2012
Location: SoCal
Posts: 109
Likes: 0
Received 0 Likes
on
0 Posts
ok So i've got a few questions,
- On the second picture, the three brass "things" in the bowls are not removable except for the one the fuel valve goes in, correct? Before i boil these should i take those out? If the other two cylindrical items can come out how would one go about doing that? (assuming thats necessary)
- Picture number 3, The Left Center carb is cracked as you can see. Im realllllllllly hoping that's not gonna be a major issue. A "Mechanic" friend of mine claims it shouldn't be an issue, I guess I'll find out soon enough eh?
1) Those brass things are your jets though... if it has a slot for a flathead or looks like you can use a socket to remove them, then do that. take the jets out and make sure you can see through them. even a tiny dot of light. If you can't then they need cleaning
definitely remove the one where the float sits because behind this is a very small fuel filter that is easily clogged
2) I should have a rack of carbs coming in the mail and if you desperately need a new carb body or float bowl I can probably sell you one.
#9
05-06-2013, 10:19 PM
Senior Member
Join Date: Apr 2012
Location: Sheffield, England
Posts: 229
Likes: 0
Received 0 Likes
on
0 Posts
#10
05-07-2013, 03:09 AM
Join Date: Apr 2013
Posts: 18
Likes: 0
Received 0 Likes
on
0 Posts
Hey guys, sorry about how long this took me work has been a killer. Anyway, I got some pictures of the Carburators here. Hopefully they show up.
ok So i've got a few questions,
ok So i've got a few questions,
- On the second picture, the three brass "things" in the bowls are not removable except for the one the fuel valve goes in, correct? Before i boil these should i take those out? If the other two cylindrical items can come out how would one go about doing that? (assuming thats necessary)
- Picture number 3, The Left Center carb is cracked as you can see. Im realllllllllly hoping that's not gonna be a major issue. A "Mechanic" friend of mine claims it shouldn't be an issue, I guess I'll find out soon enough eh?
- As they sit now I can throw em in a pot and boil them with what im assuming is 50/50 mix of lemon juice and water, Right?
- Replacement screws are going to be necessary , as i took the carbs apart i had to cut slots in 3/4 of all of them i ran up to fastenal and grabbed a few bags of screws. I picked up M4X10, M4X12, and M4X16 >_> zinc plated (100pc's of each lol) should those hold up pretty well?
- Last one question atm, I just picked up a battery charger (the battery in the bike is new....uncharged im sure but new hopefully it will hold a charge) What amperage should i charge at 2 or 4 ?
So that being said its a 1990 in case that makes and difference what so ever.
So Evidently Google is a crappy image host lol. Didn't think it'd work but no biggy. But because these are raw Pictures from my phone (IE Bigish) ill just do the URL rather than link to the forums i dont want to explode the page with massive pictures.
ImageShack� - Online Photo and Video Hosting
ImageShack� - Online Photo and Video Hosting
ImageShack� - Online Photo and Video Hosting
ImageShack� - Online Photo and Video Hosting
There we go, Now I've got some old 88-89 Carbs (the ones i mentioned buying off of Ebay) They have a slot on them but i cant tell if its a weight saver or actually a functional item.
ImageShack� - Online Photo and Video Hosting
So they should be in the same order, so same questions, also Considering the variation in carbs, Will the 88-89 carbs work on the 90 >_> i don't even think the gaskets are the same so that would be annoying. Also, I supose i have one question, Would it be worth the effort to do the coil on plug(Stick) conversion or should i stick with what i have until absolutely necessary?(Obviously dont fix whats not broken but reliability and what have you?)