
1987 Hurricane to 2003 CBR600RR Conversion


Junior Member
Joined: Apr 2015
Posts: 20
Likes: 0
From: SW Michigan
Thanks so much for the positive comments. When I started this thread it was because I searched all over the web for information and there just wasn't much. Also many of the bikes I found that had the RR conversion were not executed very well.
It's funny because after your comments in another thread I went back and looked at some of my earlier posts. The bike has come a long way, and I went through a lot of stuff along the way. A couple of surgeries and most of last year putting the shop together so I had a good place to work.
I actually worked on the bike yesterday in between getting my other bikes ready for spring and prepping a couple of bikes I have for sale.
I'm at the final detail stage. Worked on final mounting of the gauges. I need to find some threaded stand-offs to get them positioned correctly. Small stuff but it all takes time. I'm going to paint the oil cooler today so I can mount it and then the engine will be ready to run for the first time. She will be on the road soon.
If you plan on doing one of these, plan for a long down time
I have to say going through this thread was like reading a book. I was on the edge of my seat wondering if the bike would get finished when you said you needed surgery on your back. I am really happy you made a fairly quick recovery and are feeling better now though!
Keep at it, this bike is something to be proud of! How is that Norton coming along?
Thread Starter
|
Senior Member
Joined: Dec 2012
Posts: 873
Likes: 8
The original paint scheme was like the Yamaha Raven...black with gold wheels and gold accents. I still like that scheme and might do the next one that way. I saw a couple of MotoGP Playboy bikes and really liked that scheme...it was really hard to do the paint...it pushed all of my painting experience to the limits. But it did turn out nice and it sort of makes the bike IMO.
The Norton has been on the back burner. I've built a rolling platform for it so I can roll it around the shop. It's in the number one work area in the shop waiting for me to get going on it. I've been acquiring all the parts I need for it. I am just about ready to tear it down and paint the frame to start the build. It is my dream bike and want to get it done next. I really want to ride it.
The big problem is that I am still transitioning from my divorce. I have two places and am trying to fix up my family house to sell so I can move to where the shop is. It cuts into play time.
I also have way too many motorcycles and am trying to ready some of them to sell.
I have multiple project bikes, 3 of which are sitting in the barn and I need to move some other bikes so I can get them into the shop. I guess these are all "good" problems to have...just seems like there isn't enough time right now.
Last edited by dennisgb; Mar 14, 2016 at 11:43 AM.
Junior Member
Joined: Apr 2015
Posts: 20
Likes: 0
From: SW Michigan
The original paint scheme was like the Yamaha Raven...black with gold wheels and gold accents. I still like that scheme and might do the next one that way. I saw a couple of MotoGP Playboy bikes and really liked that scheme...it was really hard to do the paint...it pushed all of my painting experience to the limits. But it did turn out nice and it sort of makes the bike IMO.
The Norton has been on the back burner. I've built a rolling platform for it so I can roll it around the shop. It's in the number one work area in the shop waiting for me to get going on it. I've been acquiring all the parts I need for it. I am just about ready to tear it down and paint the frame to start the build. It is my dream bike and want to get it done next. I really want to ride it.
The big problem is that I am still transitioning from my divorce. I have two places and am trying to fix up my family house to sell so I can move to where the shop is. It cuts into play time.
I also have way too many motorcycles and am trying to ready some of them to sell.
I have multiple project bikes, 3 of which are sitting in the barn and I need to move some other bikes so I can get them into the shop. I guess these are all "good" problems to have...just seems like there isn't enough time right now.
The Norton has been on the back burner. I've built a rolling platform for it so I can roll it around the shop. It's in the number one work area in the shop waiting for me to get going on it. I've been acquiring all the parts I need for it. I am just about ready to tear it down and paint the frame to start the build. It is my dream bike and want to get it done next. I really want to ride it.
The big problem is that I am still transitioning from my divorce. I have two places and am trying to fix up my family house to sell so I can move to where the shop is. It cuts into play time.
I also have way too many motorcycles and am trying to ready some of them to sell.
I have multiple project bikes, 3 of which are sitting in the barn and I need to move some other bikes so I can get them into the shop. I guess these are all "good" problems to have...just seems like there isn't enough time right now.
It sounds like you have more projects than time! I would love to have a shop like that in the future, hopefully one day.
Thread Starter
|
Senior Member
Joined: Dec 2012
Posts: 873
Likes: 8
The paint does make the bike, your skills with painting and masking are master level. I am proud of myself for just laying a nice smooth coat on, I need a lot more practice to be comfortable taking on something so complex and intricate. How does the CBR ride?
It sounds like you have more projects than time! I would love to have a shop like that in the future, hopefully one day.
It sounds like you have more projects than time! I would love to have a shop like that in the future, hopefully one day.
Sadly the bike has not hit the road yet, although I am very close. I need to pull the exhaust and paint the headers because the exhaust system was a mock up that turned permanent. I wasn't sure if the upswept pipe was going to work.
I did put the battery in last weekend when I was finishing up the wiring so I am very close.
There are tricks to getting a good quality paint job. Part prep is most important. Using proper materials. It's hard to do a quality job with spray cans because the fan width is small and that causes you to lay down too much paint and makes it hard to blend as you spray. I have done nice paint jobs with rattle cans but it is much harder to do. A good quality gun is so much better.
I've built a professional filtered spray booth in the shop with a 6500 CFM fan. Haven't used it yet but it will also help a lot in finish quality.
Masking edges takes time and proper technique to not get bleed between colors. I use good quality tape and burnish it down so there are no spaces. Using 2 part paint that can be color sanded helps also so you can fix any edges that do bleed. You can do it with laquer under the clear coat, but you have to let it dry for a long time before clear coat.
Good quality 2 part clear is a must. It needs to be laid down fairly thick to get a nice surface after sanding and polishing. Not to mention protection from fuel and oil.
It's hard for the average guy to get good results, because it does take good equipment which is a huge cost.
I enjoy painting and doing the best job I can, so it made sense for me to spend the money on that.
Junior Member
Joined: Apr 2015
Posts: 20
Likes: 0
From: SW Michigan
Sadly the bike has not hit the road yet, although I am very close. I need to pull the exhaust and paint the headers because the exhaust system was a mock up that turned permanent. I wasn't sure if the upswept pipe was going to work.
I did put the battery in last weekend when I was finishing up the wiring so I am very close.
There are tricks to getting a good quality paint job. Part prep is most important. Using proper materials. It's hard to do a quality job with spray cans because the fan width is small and that causes you to lay down too much paint and makes it hard to blend as you spray. I have done nice paint jobs with rattle cans but it is much harder to do. A good quality gun is so much better.
I've built a professional filtered spray booth in the shop with a 6500 CFM fan. Haven't used it yet but it will also help a lot in finish quality.
Masking edges takes time and proper technique to not get bleed between colors. I use good quality tape and burnish it down so there are no spaces. Using 2 part paint that can be color sanded helps also so you can fix any edges that do bleed. You can do it with laquer under the clear coat, but you have to let it dry for a long time before clear coat.
Good quality 2 part clear is a must. It needs to be laid down fairly thick to get a nice surface after sanding and polishing. Not to mention protection from fuel and oil.
It's hard for the average guy to get good results, because it does take good equipment which is a huge cost.
I enjoy painting and doing the best job I can, so it made sense for me to spend the money on that.
Thread Starter
|
Senior Member
Joined: Dec 2012
Posts: 873
Likes: 8
I am with you. My experience tells me that the key is to get a good clean setup area (a nice HVLP gun wont hurt either!). Without a clean work area it is going to be tough to lay anything down and get a smooth finish. From there it is really all in the prep. My problem is maintaining the patience to sand for hours until it is perfect.
I can talk for hours about painting...I learned years ago from a master painter so have a lot of tricks.
You can cut your sanding time down by using some tricks and materials. A good sandable filler primer is a must. Good primer gives you a base that is easy to sand. The filler in the primer allows you to build the surface and get rid of scratches and old imperfections in the paint. Spot putty fills the larger imperfections but shouldn't be used to build any structure (cracked edges and such) because it's not strong enough. Body filler should be used for bigger imperfections. Structures should be repaired properly first. Cut bondo with course sandpaper and then feather spot putty over it once shaped.
If you have areas that you are shaping watch them closely when you prime while the paint is wet to see if they are blended right. Then you can go back and fix them if needed. On complicated shapes I will shoot some gloss paint so I can see if the part is going to look good when done. Using a dark color helps to see levels when sanding.
When I feel I have all the imperfections right I spray one last coat of primer and sand it with 600 grit paper.
Blow the part of with air, clean it with paint prep to get rid of fingerprints, go over it with a tack cloth and your ready to shoot.
It usually only takes a couple of hours at most to prep each part for paint.
Spraying is the easy part. I always shoot a light coat to get a surface for the paint to stick to. Let it tack up for a minute or so.
Then you can lay on the paint. I spray complicated surfaces first, like air ducts on on front fairing. These are the spots that are impossible to get because of all the different angles. If you spray the main surface first you will get too much paint around these areas and cause runs. Let those areas tack up a little before you spray the main areas.
Use a paint that can be color sanded. I color sand before shooting the clear coat. I use a good 2 part clear and color sand and polish it.
Probably too much information


Junior Member
Joined: Sep 2021
Posts: 1
Likes: 0
I got started on mounting the 2003 CBR600RR fairings on my 1987 Hurricane and thought people might like to see the progress. I spent a lot of time researching this conversion and had a pretty good idea how to do this. I started by mounting the 2003 fairing stay with the upper fairing:
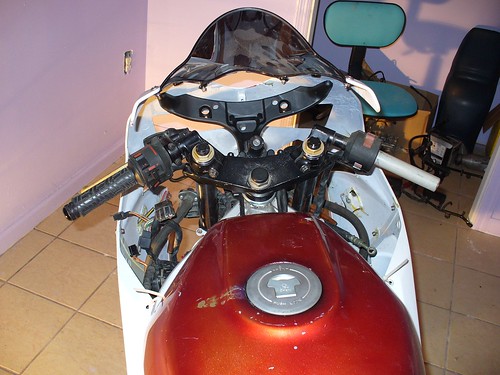
Then I mounted the side fairings to the upper and moved things around until I found the best position. I cable tied the sides so I could make additional adjustments. At this point I can see that I need to trim the fairings a little to get the best fit.
Here's some picture of the progress so far:
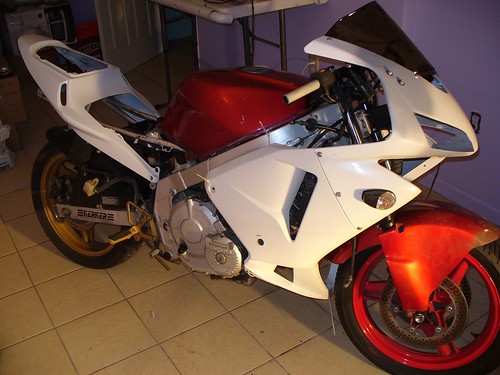
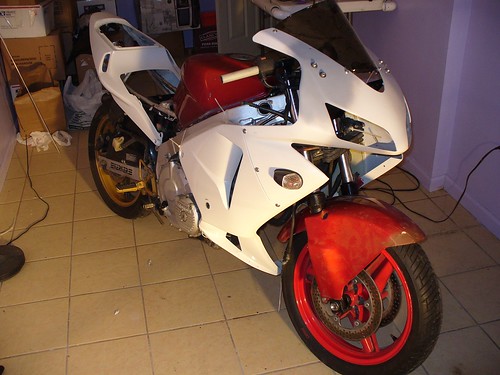
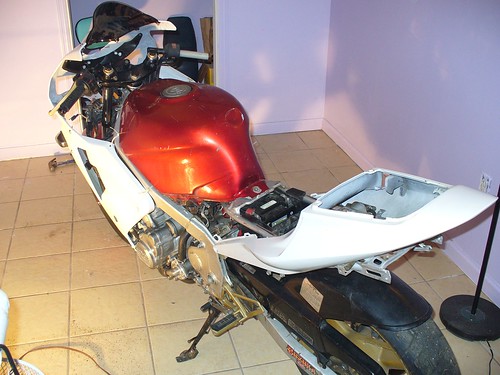
Tomorrow I will trim the side fairings and mark the positions so I can fabricate the mounting brackets for the lowers. Right now everything fits pretty well and the front tire clears the underside of the fairings. I have full side to side turning.
Let me know what you think.
Then I mounted the side fairings to the upper and moved things around until I found the best position. I cable tied the sides so I could make additional adjustments. At this point I can see that I need to trim the fairings a little to get the best fit.
Here's some picture of the progress so far:
Tomorrow I will trim the side fairings and mark the positions so I can fabricate the mounting brackets for the lowers. Right now everything fits pretty well and the front tire clears the underside of the fairings. I have full side to side turning.
Let me know what you think.
and what kind of exhaust will work and where should i look for one?
Last edited by Perkele; Sep 12, 2021 at 05:53 PM.

Senior Member
Joined: Apr 2014
Posts: 257
Likes: 1
From: Bainbridge Is., WA
Thread Starter
|
Senior Member
Joined: Dec 2012
Posts: 873
Likes: 8
There should be pictures and explanations of how the tail was done. The subframe was cut and welded at the proper angle for the RR seats and tail fairing. I customize an exhaust for a Kawasaki Ninja to get the upswept more RR like look.
If you can�t find the links let me know and I�ll try to get you the information.

Thread
Thread Starter
Forum
Replies
Last Post