
Rebuilding the petcock - any hints?


Thread Starter
|
Member
Joined: Dec 2013
Posts: 47
Likes: 0
From: Houston, TX
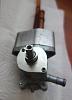
Okay, so my petcock has had a slight leak - enough to fill the garage with a gas odor. At first, couldn't find the issue, but have determined that it's leaking around the adjustment shaft (part the **** screws to). This "side" of the petcock has the rivets holding the faceplate on, so the intent is that this side is not "user serviceable".
Here's the petcock off the tank in all its glory:
I decided I'd file off the rivet heads and service this unit myself ... and here's what I'm up against for the rebuild:
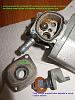
The cleanup part is a no-brainer. I'm sure folks have performed this rebuild.
1) What about the odd-shaped o-ring in the perimeter of the housing?
2) For the 2 o-rings on the valve-adjuster's snout - anything special about these ... they appear to be "square" rather than round o-rings.
.
Here's the petcock off the tank in all its glory:

I decided I'd file off the rivet heads and service this unit myself ... and here's what I'm up against for the rebuild:

The cleanup part is a no-brainer. I'm sure folks have performed this rebuild.
1) What about the odd-shaped o-ring in the perimeter of the housing?
2) For the 2 o-rings on the valve-adjuster's snout - anything special about these ... they appear to be "square" rather than round o-rings.
.

Welcome Crew
Joined: Dec 2012
Posts: 1,830
Likes: 1
From: newbury u.k
you can get a repair kit, these are on uk ebay,
1993 honda cbr1000f fuel tap repair kit | eBay
repaired mine on my 1988 with one and had to put bolts through where it had been drilled out
1993 honda cbr1000f fuel tap repair kit | eBay
repaired mine on my 1988 with one and had to put bolts through where it had been drilled out

Administrator, MVN / ROTM NOV 2012
Joined: Aug 2008
Posts: 11,003
Likes: 3
From: Republic of Boon Island

Senior Member
Joined: Nov 2005
Posts: 845
Likes: 1
From: Cincinnati, OH
None of those kits appear to have the correct parts to rebuild the **** side of the petcock. The vacuum operated valve side diaphragm and check are there but not the shaft seals and such in picture 2. Anyone used these kits?
Administrator, MVN / ROTM NOV 2012
Joined: Aug 2008
Posts: 11,003
Likes: 3
From: Republic of Boon Island
And I always thought you kept an oring kit for all kinds of emergencies 
There's always the "i don't have time for this ****" approach
There's always the "i don't have time for this ****" approach
Thread Starter
|
Member
Joined: Dec 2013
Posts: 47
Likes: 0
From: Houston, TX
And I always thought you kept an oring kit for all kinds of emergencies
There's always the "i don't have time for this ****" approach
There's always the "i don't have time for this ****" approach
I enjoy tinkering, and a bit of a challenge is fun. Plus, if I can get the parts for $5, I could use the other $95 for something else on the CBR or the ST !
I'll tinker with the CBR tomorrow - gotta go in the garage and install some Angel GTs on the ST ..
.
Last edited by caldercay; Feb 27, 2014 at 06:23 PM.


Thread Starter
|
Member
Joined: Dec 2013
Posts: 47
Likes: 0
From: Houston, TX
Took the oddly-shaped "o-ring" to the hardware store, opened up the o-ring drawer and looked for a close match - incredibly, found one that fit perfect ("lengthwise" and in diameter (cross-section wise). Also picked up two self-tapping screws, about 1/4" in length, not sure of the diameter - it would be the same diameter of the original hole size for the 2 rivets.
Drilled the rivet holes deep enough to accept the self-tapping screws.
I used Permatex Permashield Fuel Resistant gasket sealant in the gasket "groove" of the petcock's body - i used the sealer mostly to hold the new o-ring in place (as the groove is not round, but more of a rectangular shape). After the sealant set (about 5+ minutes), i put the outer plate in place and turned the 2 screws in place.
No leaks!
Link to images: 1993 CBR1000F - Petcock fix
Last edited by caldercay; Mar 17, 2014 at 10:25 AM.
