
New 1000FK (L owner South Wales UK. My project.


Thread Starter
|
Senior Member
Joined: Apr 2016
Posts: 217
Likes: 1
From: South Wales, UK
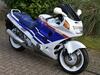
Spent a few hours on the plastics, cleaning them up and polishing them with Meguiars 3 stage polish, there's a few busted moutings which have been repaired with double bubble 2 pack epoxy and it's all cleaned up well. The only issue is going to be the lower fairings as they have been poorly painted in the past and the fixings aren't the best. I'll keep my eyes peeled for some fairing lowers but for now I still have plenty to do.


Thread Starter
|
Senior Member
Joined: Apr 2016
Posts: 217
Likes: 1
From: South Wales, UK
Continued to prep the subframe today and stuck some paint on it. Then ran some M5, M6 & M8 taps through the painted threads which will eventually all get stainless cap heads where the bolt selection is not critical.
As it started,

following an hour or two's work.

The finished job.

I then decided to cut a piece of alloy plate to make a heat sink for the reg/rec unit and sat it in heatsink compound. I also found one of the reg wires had rotted out of the plug which is gonna need a repair.


As it started,
following an hour or two's work.
The finished job.
I then decided to cut a piece of alloy plate to make a heat sink for the reg/rec unit and sat it in heatsink compound. I also found one of the reg wires had rotted out of the plug which is gonna need a repair.
Thread Starter
|
Senior Member
Joined: Apr 2016
Posts: 217
Likes: 1
From: South Wales, UK
Man that looks complex!!! Is it a big job???
Jobs like the CCT, the alternator chain, balancer etc will wait until it's MOT'd and in use. If I decide to keep it long term then I'll contemplate doing them over next winters lay up.
Jobs like the CCT, the alternator chain, balancer etc will wait until it's MOT'd and in use. If I decide to keep it long term then I'll contemplate doing them over next winters lay up.
Senior Member
Joined: Jul 2015
Posts: 195
Likes: 4
From: East Sussex.
Its not a big job atall. Once the exhaust is off , the most agro is if a bolt snaps holding the sump on. There are about a dozen, in my case, all except 1 bolt. Eventually I got it out. As for the balancer shaft, follow the manual, watch for the thrust washer, and really, if you have the new rubber cushions, its a 5 minute job, excluding sump/exhaust removal.
A bit of jiggling required.
A bit of jiggling required.
Thread Starter
|
Senior Member
Joined: Apr 2016
Posts: 217
Likes: 1
From: South Wales, UK
Cheers. That's another job for the future then. 
Got the under tray and rear plastics on today, it now feels like I have achieved something.


The rear cowl has to come off again at some point to refit the luggage brackets which I've taken off to paint but at least now any bolts that are not specific shouldered or flange types have been changed for stainless cap heads and have been assembled with copper slip!


Got the under tray and rear plastics on today, it now feels like I have achieved something.
The rear cowl has to come off again at some point to refit the luggage brackets which I've taken off to paint but at least now any bolts that are not specific shouldered or flange types have been changed for stainless cap heads and have been assembled with copper slip!
Last edited by exuptoy; May 5, 2016 at 01:32 PM.
Thread Starter
|
Senior Member
Joined: Apr 2016
Posts: 217
Likes: 1
From: South Wales, UK
Cheers Woof.
Just been in the garage looking to see if I can rescue most of the original fixings.
I stuck one in the chuck of my battery drill and spun it up whilst holding a green scotch pad on it, then I put some Solvol Autosol on a rag and spun it up again to polish it, then I used a clean rag to take the polish off. The results speak for themselves, so if you are restoring a bike and wanna save a few quid then this works wonders. I have a feeling some bolts may lose their original coated finish but a quick wipe with WD-40 every once in a while will see them kept clean and rust free.
These original footrest hanger bolts are €5 x 4 each from Honda Netherlands
Last edited by exuptoy; May 5, 2016 at 05:51 PM.