
Hurricane rebuild

Thread Starter
|
Welcome Crew
Joined: Dec 2012
Posts: 1,830
Likes: 1
From: newbury u.k
this week i didnt get alot done, it was one of them weekends,bits and bobs that i have been avoiding (so i can get in the shed ) had to be done, i only managed an hour last night, so it was more pannel repairs,but i did manage a while back to source a couple of cheap tools to assist me during the rebuild (see pics).
these were cheap of ebay, i have struggled before removing swinging arm bearings and hope the puller might assist, last time i rebuilt the rear end of a bike a fzr1000 exup i had to put a steel tube through the bearing and tack weld it to nock them out, so im hoping this will make it easier, and the bearing driver should save my sockets from being used as drifts, like i say these were cheap so im hoping their up to the job, i will let you know.
these were cheap of ebay, i have struggled before removing swinging arm bearings and hope the puller might assist, last time i rebuilt the rear end of a bike a fzr1000 exup i had to put a steel tube through the bearing and tack weld it to nock them out, so im hoping this will make it easier, and the bearing driver should save my sockets from being used as drifts, like i say these were cheap so im hoping their up to the job, i will let you know.

Thread Starter
|
Welcome Crew
Joined: Dec 2012
Posts: 1,830
Likes: 1
From: newbury u.k
im going to try to start work on the front end this weekend, so i will be using them at the weekend, i got both of ebay for �40 odd, including delivery, which is quite cheap,the quality doesn`t seem too bad,but i have had issues with cheapo tools before, but for this price i couldnt resist them, will keep you posted on the results or a trip to the local hospitals A&E department 
Thread Starter
|
Welcome Crew
Joined: Dec 2012
Posts: 1,830
Likes: 1
From: newbury u.k
had a good few hours out in the shed this weekend and managed to get a bit more done,
MORE PANNEL WORK its a never ending job but i have only got the nose cone and seat unit to repair and rub down now, then there all ready for primer ,
,
FRONT END.
a couple of tips if you havent done this before (i should imagine most of you have).
LOOSEN ALL BOLTS PRIOR TO GETTING THE FRONT WHEEL OFF THE GROUND.
LET THE AIR OUT OF THE FORKS AND LOOSEN OFF THE CAPS (it save using a vice when there out)
USE A BLOCK OF WOOD UNDER THE SUMP THEN JACK UP.
I HAVE MADE A FRONT STAND OUT OF A BIT OF ALLY TUBE AND A PIECE OF CHANNEL (see pic) THAT I PUT UNDER THE HEAD STOCK TO HELP STEADY THE BIKE, i will move this behind the head stock when i do the head bearings.
i have started at the front end, loosened the forks off ready to take them out for a check over, paint and new oil, the seals look good so it dosent look like a full strip down.the brake callipers have come off for a check, clean and new pads.
the front wheels out, discs off, there rusty so i will see if i can dress them up a bit, the bearings are out, the new slide hammer/blind bearing puller worked a treat (kneel on the wheel 5 bangs and there out) money well spent
MORE PANNEL WORK its a never ending job but i have only got the nose cone and seat unit to repair and rub down now, then there all ready for primer
FRONT END.
a couple of tips if you havent done this before (i should imagine most of you have).
LOOSEN ALL BOLTS PRIOR TO GETTING THE FRONT WHEEL OFF THE GROUND.
LET THE AIR OUT OF THE FORKS AND LOOSEN OFF THE CAPS (it save using a vice when there out)
USE A BLOCK OF WOOD UNDER THE SUMP THEN JACK UP.
I HAVE MADE A FRONT STAND OUT OF A BIT OF ALLY TUBE AND A PIECE OF CHANNEL (see pic) THAT I PUT UNDER THE HEAD STOCK TO HELP STEADY THE BIKE, i will move this behind the head stock when i do the head bearings.
i have started at the front end, loosened the forks off ready to take them out for a check over, paint and new oil, the seals look good so it dosent look like a full strip down.the brake callipers have come off for a check, clean and new pads.
the front wheels out, discs off, there rusty so i will see if i can dress them up a bit, the bearings are out, the new slide hammer/blind bearing puller worked a treat (kneel on the wheel 5 bangs and there out) money well spent
Last edited by wheelnut; Feb 8, 2013 at 06:37 AM.
Thread Starter
|
Welcome Crew
Joined: Dec 2012
Posts: 1,830
Likes: 1
From: newbury u.k
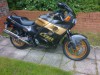
managed to take the forks off the hurricane this weekend,i have cable tied the clip-ons on the top yolk for safe keeping. i have had them slip over before and find them dangling the next morning.
A quick question about my clip-ons, are they original (see picture) or has a previous owner swapped the originals for high risers ?.
The forks have been cleaned up (this bike lived on a farm and i rekon half of the farm is dotted round my bike), and stripped out and cleaned, the seals look new and the A.T.F fluid that was in there looks new, so its just a clean up,new oil, set of dust seals and repainting.
I was thinking of re-filling them with 10wt (i think A.T.F is about 8wt) and will refill measuring the air gap any recomendations on the gap or just as the manual states.
My credit card took a hiding this week as i ordered up the bits and pieces i need, why oh why do the rubber boots on brakes allways fall apart when you strip the brakes down.
Its been a couple of years since i last stripped a bike down for a make over and its made me realise id be a right misserable sod without a bike to ride and maintain.

September 2009 ROTM Winner - Faster than a Speeding ..........
Joined: Nov 2008
Posts: 3,808
Likes: 3
From: UK
Glad to hear the tools worked well. Quality tools are always better, but when it's a job you're only going to do once every blue moon, it's just not worth the investment. But they seem to be up to the job and a good price as well.
Those clip-ons don't look original to me, but the other MK1 guys will be able to confirm that. They look like maybe they're off the VFR750?
One way to stiffen the front up is to increase the size of the spacer, or fit some washers to compress the spring a bit if that's what you're after.
Those clip-ons don't look original to me, but the other MK1 guys will be able to confirm that. They look like maybe they're off the VFR750?
One way to stiffen the front up is to increase the size of the spacer, or fit some washers to compress the spring a bit if that's what you're after.
Thread Starter
|
Welcome Crew
Joined: Dec 2012
Posts: 1,830
Likes: 1
From: newbury u.k
the fronts not overly soft, but i think i will add a few washers just to add a little more stiffness,i didnt think the bars were original, but i might leave them on there for now as their quite comfortable 
Thread Starter
|
Welcome Crew
Joined: Dec 2012
Posts: 1,830
Likes: 1
From: newbury u.k
got back onto the hurricane friday after work
time to have a look and check of the steering head bearings, placed the clip ons up on the tank and tied them together, ready to remove the triple clamps, i have already loosened the top nut, so its just a matter of disconnecting the ignition barrel and taking the top yolk off, got the correct c spanner from the tool chest and undone the castellated nuts and dropped the bottom yolk out,
now my bike is covered in farm muck, but the previous owner has maintained the bike as all the grease was clean and the bearings were well packed, so i cleaned the grease off and inspected the ***** and the races, all ok so its just a regrease and paint the yolks up as well as clean the inside of the clamps up, the only problem there was is at some point someone has undone the bottom castle nut with a drift and put a small dent in the cover, but luckily it flattened out, i will re-assemble tomorrow, but wont re-set the head bearings till i put the forks back in
i have put a red arrow on the picture of the head bearing assembley as i dont want to confuse anyone with how i put it down whilst cleaning it all up
Last edited by wheelnut; Feb 16, 2013 at 02:46 PM.


