
Bike is on the side of the road
#21
 08-09-2012, 02:42 AM


Somehow the calipers and rotor got covered with some type of grease it took me hours to clean it all
Check your wheel bearings - maybe that side is leaking and "throwing" grease out onto the rotor.
How do I fix this? Will a carb cleaning take care of this
Yes - there are a number of threads on carb cleaning - read any of them, the principles are all the same.
Check your wheel bearings - maybe that side is leaking and "throwing" grease out onto the rotor.
How do I fix this? Will a carb cleaning take care of this
Yes - there are a number of threads on carb cleaning - read any of them, the principles are all the same.
#22
08-09-2012, 08:21 AM

Join Date: Jul 2012
Location: Bottom of a Bottle in RI US
Posts: 388
Likes: 0
Received 0 Likes
on
0 Posts
How do I fix this? Will a carb cleaning take care of this
Yes - there are a number of threads on carb cleaning - read any of them, the principles are all the same.
Yes - there are a number of threads on carb cleaning - read any of them, the principles are all the same.
PICS of The 350 reinstall as promised like 4 days ago.
")
http://forums.bimmerforums.com/forum...2&postcount=36
I'll try to take pics of the bike when I do the carbs. Trying to do too many things at once! Thank god I've only had to do small things to the 740il the last few weeks.
Last edited by Hueristic; 08-09-2012 at 10:28 AM. Reason: Added link for pics
#23
08-09-2012, 12:14 PM

Senior Member
Join Date: Aug 2011
Location: Indy/Frankfort
Posts: 273
Likes: 0
Received 0 Likes
on
0 Posts
#24
08-09-2012, 01:55 PM
Join Date: Jul 2012
Location: Bottom of a Bottle in RI US
Posts: 388
Likes: 0
Received 0 Likes
on
0 Posts
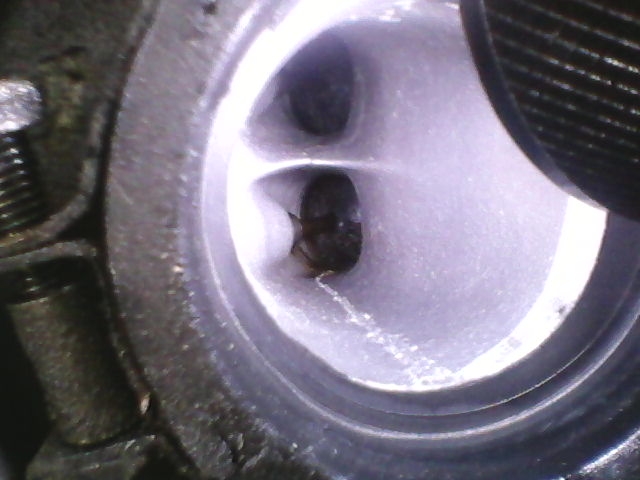
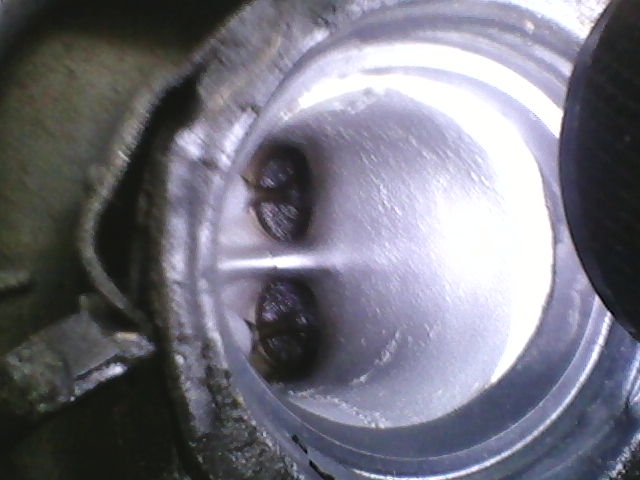
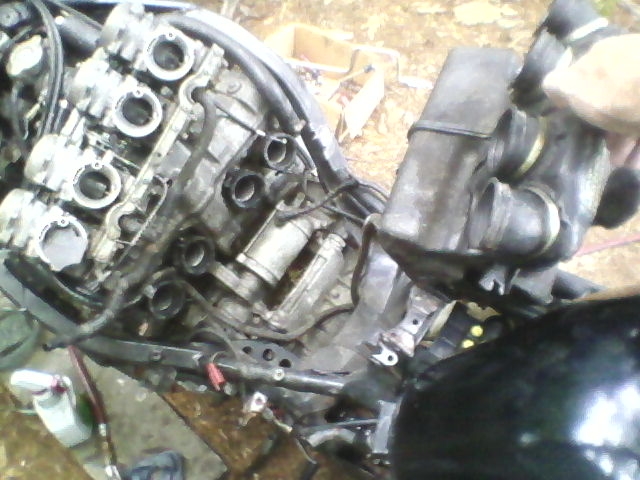
So pulled the carbs and airbox some pics for u guys. The valves are crudded up badly what should i do about it? I tried to get pics of them but they came out lousy with my crappy phone. 2 of them should be good enough to give an idea of what they look like.
Drunk Neighbor sneaking through my yard with her six pack
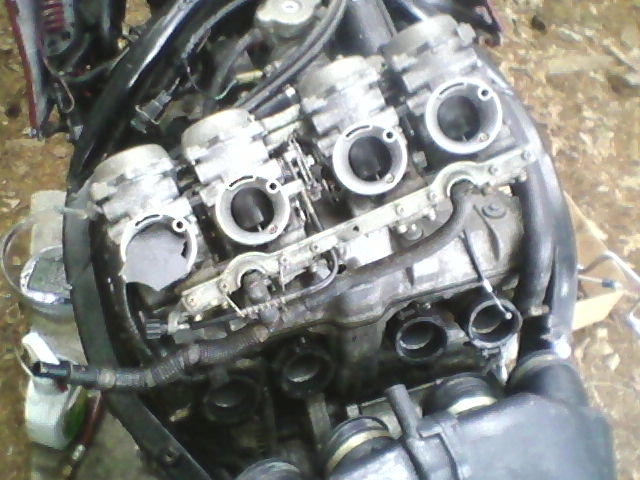
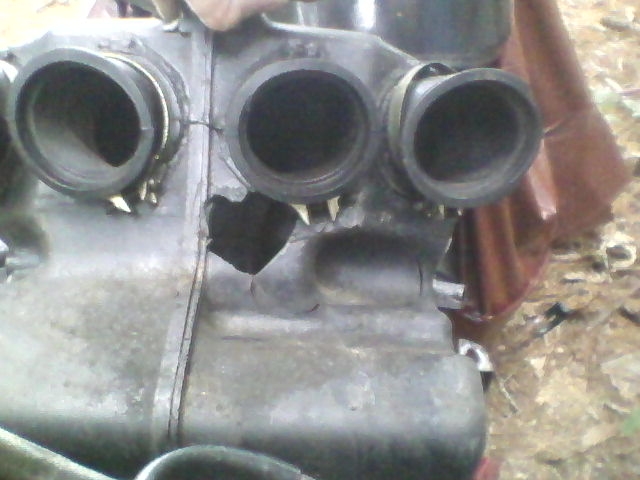
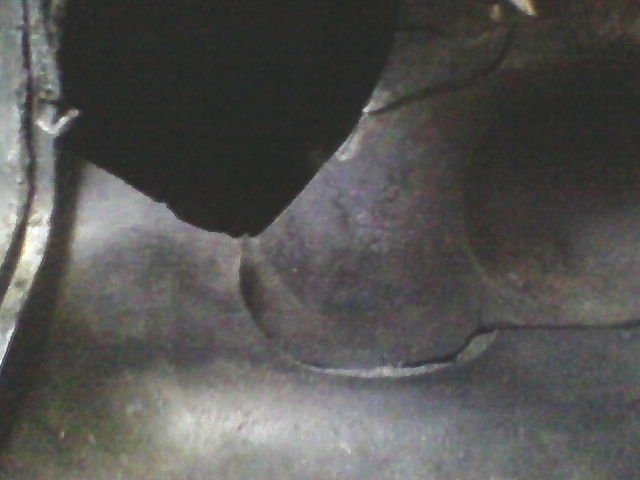
Carbs with chunk of airbox that was cutting off #1 also #2 cylinder doesn't open so WTF no big surprise the thing was dieing!
#25
08-09-2012, 04:21 PM

Super Moderator
That is one big chunk of airbox in the carb!
You still should be able to fix that. As for carb 2 not moving the slide, it might just be gunk sticking the needle, so remove the top cover carefully, noting which way it went on, look for holes/tears in the black rubber diaphragm and if thet's ok remove the slide and clean the needle.
Cheers, SB
You still should be able to fix that. As for carb 2 not moving the slide, it might just be gunk sticking the needle, so remove the top cover carefully, noting which way it went on, look for holes/tears in the black rubber diaphragm and if thet's ok remove the slide and clean the needle.
Cheers, SB
#26
08-09-2012, 05:03 PM
Join Date: Jul 2012
Location: Bottom of a Bottle in RI US
Posts: 388
Likes: 0
Received 0 Likes
on
0 Posts
That is one big chunk of airbox in the carb!
You still should be able to fix that. As for carb 2 not moving the slide, it might just be gunk sticking the needle, so remove the top cover carefully, noting which way it went on, look for holes/tears in the black rubber diaphragm and if thet's ok remove the slide and clean the needle.
Cheers, SB
You still should be able to fix that. As for carb 2 not moving the slide, it might just be gunk sticking the needle, so remove the top cover carefully, noting which way it went on, look for holes/tears in the black rubber diaphragm and if thet's ok remove the slide and clean the needle.
Cheers, SB
Gotta get out the soldering gun for the airbox. Found a K$N filter in her. clean as a whistle lol the PO must have put it in with the hole in there. Ordered a K&N 99-5050 Filter Care Service Kit - Squeeze.
#27
08-09-2012, 05:55 PM
Senior Member
Join Date: Aug 2011
Location: Indy/Frankfort
Posts: 273
Likes: 0
Received 0 Likes
on
0 Posts
I would pull those carb boots off and put them on the carbs before you put them back on the bike, tighten the clamps on the boot to carb, they are a b**** to put back on, a lil up and down motion will work them back on nice and easy with some good pressure, make sure they are seated all the way, tighten all boot to motor clamps. Get some new float needles too to put in there, save you from rebuilding them again.
#28
08-09-2012, 06:06 PM
Join Date: Jul 2012
Location: Bottom of a Bottle in RI US
Posts: 388
Likes: 0
Received 0 Likes
on
0 Posts
I would pull those carb boots off and put them on the carbs before you put them back on the bike, tighten the clamps on the boot to carb, they are a b**** to put back on, a lil up and down motion will work them back on nice and easy with some good pressure, make sure they are seated all the way, tighten all boot to motor clamps.
 Should I use oil on the boots to make it slide on easier?
Get some new float needles too to put in there, save you from rebuilding them again.
#29
08-09-2012, 06:27 PM
Senior Member
Join Date: Aug 2011
Location: Indy/Frankfort
Posts: 273
Likes: 0
Received 0 Likes
on
0 Posts
#30
08-09-2012, 09:27 PM

No offence I'd have to differ with you that idea
having just been doing multiple sets of carbs on
3 different Hurricanes lately . tightening the clamp
closest to the head is a lot harder than the one at the
carb end
Put them back the same way they were leveraged off
usually from left to right with some hand sanitizer for lube
Pop number 1 in and 2 , 3 , 4 follow easily enough with firm
pressure
as for the airbox - take the remaining piece and JBWeld it on and cut
some light alum (HD alum roofing shingle) and jb that to it to
reinforce.
As for cruddy carbs - when she's running just keep putting
Seafoam or your favorite carb cleaner through it
Yeah a good cleaning and checking on those carbs is in order man
I would pull those carb boots off and put them on the carbs before you put them back on the bike, tighten the clamps on the boot to carb, they are a b**** to put back on, a lil up and down motion will work them back on nice and easy with some good pressure, make sure they are seated all the way, tighten all boot to motor clamps. Get some new float needles too to put in there, save you from rebuilding them again.
Last edited by Sprock; 08-09-2012 at 09:36 PM.