When you click on links to various merchants on this site and make a purchase, this can result in this site earning a commission. Affiliate programs and affiliations include, but are not limited to, the eBay Partner Network.
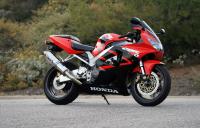
I have 4 CBR1000F - 3 x SC21 ( 1987/88) one ( Black/Red) I have completed restored to factory original the other 2 in rebuild stage, however on 13th June 2020 I came across this SC24 (1989 - 1992) in the White/Blue/Red livery, and given I had a new one back in the day I felt obliged to save it.
Thus as I restore it I thought it might be of interest to some if they go down the same path, please bear in mind I am purist for the old ones, yes i get the performance mods but not a fan on on these old girls.
So some brief history for those interested. The SC21 was released in 1987 as the first CBR1000F - 998 cc water-cooled in line four as the big jump from the previous CB900 / 100 Boldor.
In 1989 the SC24 was released (essentiality the second gen CBR1000F). It had all new styling for the fairing and some minor upgrades:- modification to the dreaded cam chain tensioner, increased power, bigger tyres, mods to the rear caliper set up, speedo sync from the gear box (as opposed to the front wheel) and more weight doh!
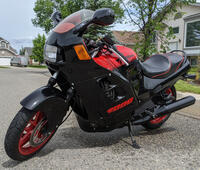
This bike I found in Lilydale, Melbourne, Australia, reasonably clean but like most bikes from 1989 it needs some cosmetic attention just about everywhere. At 58,000 km (36,039 ml) the good news is the cam chain is not rattling and the engine gear box are sound. Bad news is for last 8 years it has been used with out a seat latch .. lol, its been dropped on the left side and every piece of plastic has a crack somewhere, the clutch and brakes all need reconditioning and the exhaust and tail have been modified from original. But I have the OEM parts so with time and patience she will rise like new.
My resto philosophy is this:
If its not broken don't fix it
If its rusted or corroded , clean it, lube it then polish or paint as needed.
If its not OEM replace it.
Do it once, Do it right
STEP 1 - Strip and Clean
So all plastics off, 4 into one exhaust off, rear brake master cylinder and caliper off (seized on the bench for strip and rebuild). Next, wheels out and fronts brakes / clutch out.
Very nice garage set up. Is that your personal one or a commercial set up?
Build threads are the best. Keep reporting in and put up lots of pics. You never know when the smallest detail captured can help someone with a big problem
Since this doesn't seem like it will be a "how to" thread, I will move it to the 1000f main section, but let me know if you were going to include write ups on how to do something.
Hi Guys, that's my personal set up and hobby where I do my work and work for others as requested, at 52 lucky enough to be retired.
Have a full workshop and do all the plastic welding and fairing repairs in house.
I see there are quite a few How To's that cover most issues but if anyone has a question please let me know. Also in you are in Melbourne and want to visit for a look just message me.
Rear Master Cylinder and pedal set up... done. I use the All Ball's and or Brake Crafters kits, both excellent.
On to the rear Caliper and swing arm and shocker next , then moving front.
 06-22-2020, 08:50 PM