87 Hurricane 1000 - Riding resto
#31
 02-08-2018, 05:09 PM

That red though!
Got the first batch of red parts painted. Both rims and dash. Sand scratches on one of the dash filler pieces and a giant sag on one of the inners so they'll go in the redo pile
This is the first bc/cc I've done in a while, and the gun was purchased from the widow of an old painter. It's an oldschool conventional gun. Sprays like a firehose but oh my does it lay a nice flat clear
The rims were very roughly cast. Can see where the factory had to hack off the molding marks with a grinder, and they have a very rough texture on all but the outermost edge. Possibly one of Soichiro's cost-saving measures. Even so, I'm pretty pleased with the results. The zipties are there to keep the tire off the rim, and I slipped the old seals in for a quick mask over the new bearings. I didn't photograph the front rim as it's currently curing along with the rest of the dash but that one did have the tire off so I'll have to let it harden up for a couple weeks before sending it off to be mounted. I'd spoon it on myself but I don't want to chip the paint
We're using Velspar (cheapo paint) and this color is called 'Freightliner Red'
I think it's worth better so I've been calling it 'Lipsmackin Red'
Yum!

#33
02-09-2018, 01:10 AM
Haha the best thing you can say about yellow is that it's visible. Really really visible. Thanks but no thanks
We are going for maximum boredom here so won't be draping her in gold-flake or pearl either. Could have been tempted to try tinting the clear and ghosting in a little geometric design or something, but I'm not that good of a painter. I might experiment on something with less sentimental value
We are going for maximum boredom here so won't be draping her in gold-flake or pearl either. Could have been tempted to try tinting the clear and ghosting in a little geometric design or something, but I'm not that good of a painter. I might experiment on something with less sentimental value
#34
02-09-2018, 08:33 PM

Senior Member
#36
02-10-2018, 01:55 AM
Senior Member
#37
02-20-2018, 11:34 AM
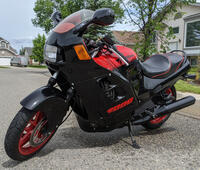
Back on two wheels, finally!
A bit of mild hackery on the frame around the passenger pegs - I hadn't painted the frame, for various reasons, but most of all that it is completely hidden on these bikes. The only part of the frame that is visible is around the passenger pegs/grab handles. A little scuff n spray in black gloss and she looks mint. I trust y'all will keep my secret, but I did say upfront that this is a riding resto, for personal use, not a fancy museum piece
Also, the brake rotors got a bit of 'billet silver metallic' in the non-contact surfaces. Along with the swingarm and calipers which were previously done (hence the dust) she's looking fresh, even if I've reused the vast majority of parts
Probably could have gone with a sparkly gold chain, but opted for black steel for a more OEM look. JT sprockets at standard toothing - she'll be used for commuting and occasional weekend runs up to the mountains so I didn't feel the need to mess with it, though if I find myself getting bored it might go back up +3 in the rear at the next change
With two wheels, brakes, and drive, she now meets the minimum requirements for the definition of 'motorcycle'
Lovely bones, but plenty more to do

#39
02-20-2018, 02:45 PM

#40
02-20-2018, 04:08 PM
Thanks. Can't really take credit for picking the red - it was as close as I could find to the original since I'm leaving the tank alone. The fairings will be the real test. They're funny to block since they've got so many little curves, swoops, and bumps. It's like a damn vw
Of course they'll be in black to magnify any imperfections, so there's that...
Of course they'll be in black to magnify any imperfections, so there's that...