'87 CBR1000F - Keeping the fiery side up and the rubber side down
#1
 01-07-2016, 04:23 AM


Join Date: May 2015
Location: Delft, Netherlands
Posts: 22
Likes: 0
Received 0 Likes
on
0 Posts
I'll start off by copying my post in the Newbie thread since it already contained a lot of the info and I was content with it.
I've been meaning to post here for quite some time now but never gotten round to do it. Since exams are coming up I magically found the time to do so, so here goes.
I bought my CBR1000F SC21 build in '87 last year in March.

It had about 68 000km (42 250 miles) on the clock and I would become the third owner. At first sight there were a few dings but nothing too bad, later I would find out it had been dropped at least once.
In the following months I gave it some of the TLC it deserved. Replacing fork seals, upgrading the spark coils, new rubber, filters changed etc.
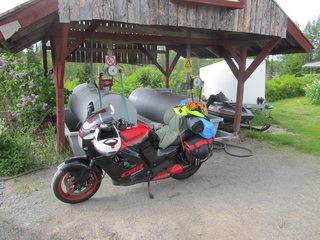
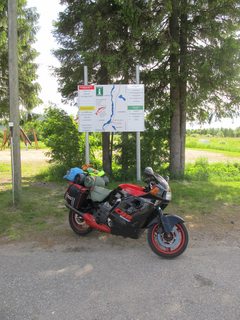
During the summer we've had our ups.
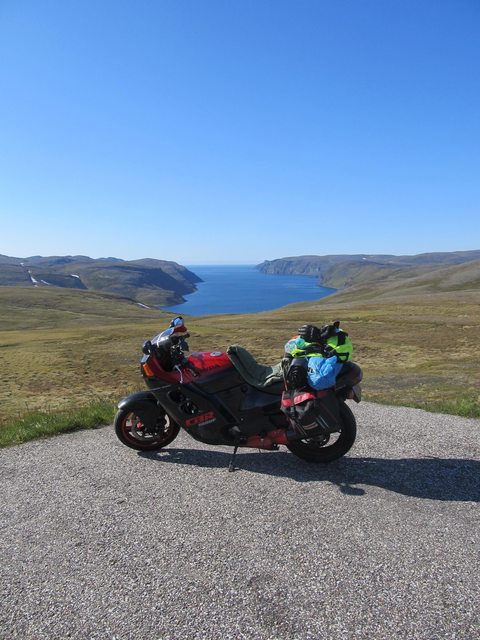
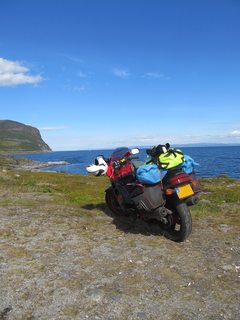
As seen here near the North Cape, Europe's northernmost point.
And there were downs
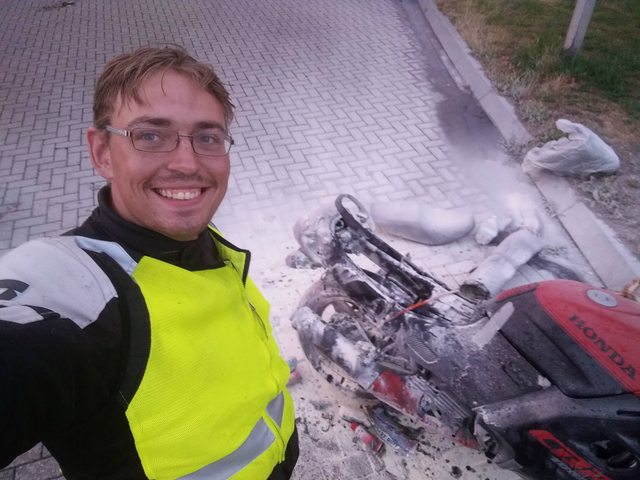
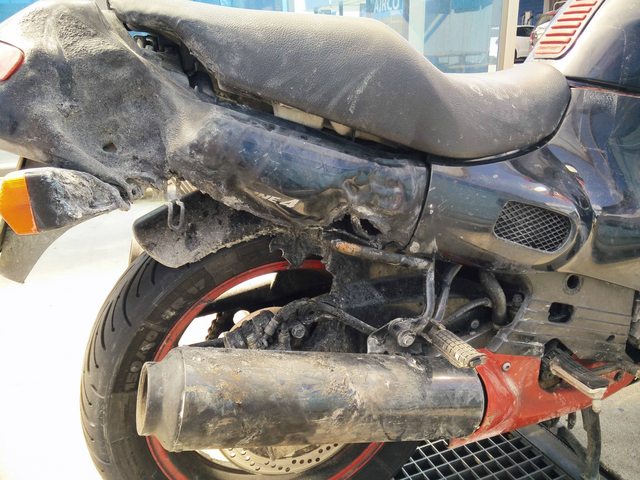
When my saddlebags caught fire. I was smiling because it was the only thing left to do. I had ridden 1200km (745 miles) that day and had another 200km till home. Luckily only my luggage, rear panel, brake line and electrics got burned.
I was lucky my seat was spared since I had just redone the upper weeks prior.
Eventually I made it home safely and got working on repairs. I wasn't ready to bin it because of a minor mishap.
Since then I've fixed the electrics, replaced the brake line, redone the brakes in general and a whole lot of other fixes to get ready for the spring.
I've been meaning to post here for quite some time now but never gotten round to do it. Since exams are coming up I magically found the time to do so, so here goes.
I bought my CBR1000F SC21 build in '87 last year in March.
It had about 68 000km (42 250 miles) on the clock and I would become the third owner. At first sight there were a few dings but nothing too bad, later I would find out it had been dropped at least once.
In the following months I gave it some of the TLC it deserved. Replacing fork seals, upgrading the spark coils, new rubber, filters changed etc.
During the summer we've had our ups.
As seen here near the North Cape, Europe's northernmost point.
And there were downs
When my saddlebags caught fire. I was smiling because it was the only thing left to do. I had ridden 1200km (745 miles) that day and had another 200km till home. Luckily only my luggage, rear panel, brake line and electrics got burned.
I was lucky my seat was spared since I had just redone the upper weeks prior.
Eventually I made it home safely and got working on repairs. I wasn't ready to bin it because of a minor mishap.
Since then I've fixed the electrics, replaced the brake line, redone the brakes in general and a whole lot of other fixes to get ready for the spring.
#2
01-07-2016, 04:54 AM
Join Date: May 2015
Location: Delft, Netherlands
Posts: 22
Likes: 0
Received 0 Likes
on
0 Posts
Part of the reason I started this thread was to show some of the work I'm doing on my CBR, all various fixes and what not.
Episode 1: the Clutch.
So as I reached the North Cape I noticed that around 6k rpm at W.O.T. my clutch started slipping. My initial thought were worn plates but since I was 3400km from home with no way of checking I just had to keep the rpms down. It did cause me to take the shortest route back home again since I didn't want to get stranded abroad with a broken down clutch.
Once home I tore my clutch apart. As I may have mentioned before one of the previous owners did some interesting handiwork, which turned out to be the cause of my slipping clutch.
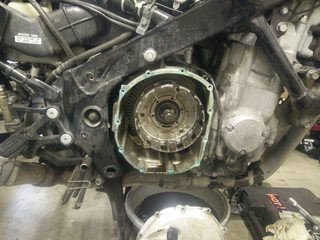
I opened up the clutch side of the transmission, which was a personal first.

Retrieved the clutch package and noticed that some plates seemed darker on the outside than others.

Which also was the case on the face of the plates. They all seemed straight and the friction plates were well within spec, so there had to be something else.
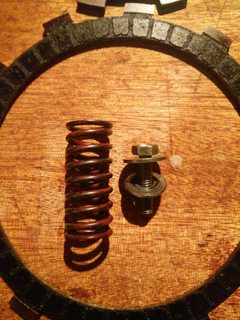
See that clutch spring retainer bolt? It is supposed to have just 1 washer, not 2. At this point I suspected that there was something fishy with springs. After measuring them they were well under the minimum specified length.
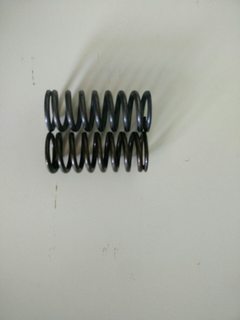
Turns out the previous owner had installed new springs (and probably friction plates as well) but used the wrong size springs. And instead of ordering/using new springs botched a hack solution by adding an extra washer. The addition of an extra washer would have worked when installed correctly, in this case the hole in the washer was too small which meant they rested on the clutch housing instead of compressing the spring further and thereby increasing the force.
Ordering and installing new springs of the proper length solved all my clutch problems.
Next time I'll go to work or have a nice ride I'll remember to take pictures.
Episode 1: the Clutch.
So as I reached the North Cape I noticed that around 6k rpm at W.O.T. my clutch started slipping. My initial thought were worn plates but since I was 3400km from home with no way of checking I just had to keep the rpms down. It did cause me to take the shortest route back home again since I didn't want to get stranded abroad with a broken down clutch.
Once home I tore my clutch apart. As I may have mentioned before one of the previous owners did some interesting handiwork, which turned out to be the cause of my slipping clutch.
I opened up the clutch side of the transmission, which was a personal first.
Retrieved the clutch package and noticed that some plates seemed darker on the outside than others.
Which also was the case on the face of the plates. They all seemed straight and the friction plates were well within spec, so there had to be something else.
See that clutch spring retainer bolt? It is supposed to have just 1 washer, not 2. At this point I suspected that there was something fishy with springs. After measuring them they were well under the minimum specified length.
Turns out the previous owner had installed new springs (and probably friction plates as well) but used the wrong size springs. And instead of ordering/using new springs botched a hack solution by adding an extra washer. The addition of an extra washer would have worked when installed correctly, in this case the hole in the washer was too small which meant they rested on the clutch housing instead of compressing the spring further and thereby increasing the force.
Ordering and installing new springs of the proper length solved all my clutch problems.
Next time I'll go to work or have a nice ride I'll remember to take pictures.
#3
01-07-2016, 03:00 PM

Jeez louise what happened?! Did the saddlebag rub on the muffler or what caused it to catch fire? Would have surely soiled my nickers if that happened to me!
Something fishy with Norway I`ll tell you that, everyone I know that has gone there by bike has had the oddest mishaps there like a sheared rear brake line by a gap it shouldn`t even reach...
I have a faint memory asking in your noobie thread but did you ride through the tunnel all the way to the Nordkapp island? You seem to have caught one of the very few clear days in a year there.
#5
01-08-2016, 03:23 AM

#6
01-08-2016, 07:50 AM
Join Date: May 2015
Location: Delft, Netherlands
Posts: 22
Likes: 0
Received 0 Likes
on
0 Posts
And especially for Naga_Thai, some pictures of the trip.

I was low on gas and saw a sign to a petrol pump. Since I didn't want to risk running dry I followed it off of the main road and ended up at this manual pump. Very friendly old geezer filled the bike up.
About an hour later I found myself in Finland at the arctic circle. Just some touristy stuff there, nothing noteworthy in my opinion.
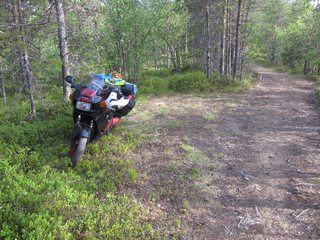
The fun thing is how you can camp pretty much anywhere (some restrictions do apply) in Scandinavia and the best spots are always somewhat off the main road. I actually ditched that spot since there were some tracks of either a bear or a very big dog and I wasn't ready to find out which.
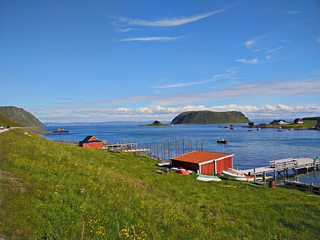
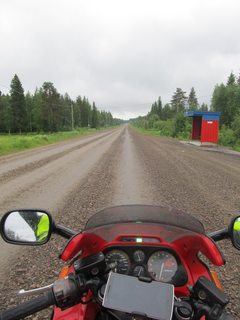
According to the time stamp this was 2-3 hours before I reached the North Cape. The weather was, albeit a bit chilly, perfect riding weather. The view was magnificent.
Free Wi-Fi on the side of the road, views like these, I could get used to it.
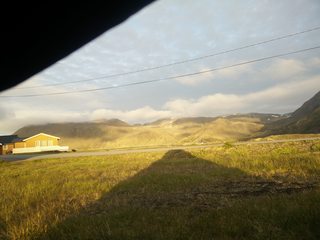
Timestamp was about 00:11. It's strange how 4 days of not seeing darkness and 2 nights of the sun not setting messes up your cycle. At the moment of the photo I was freezing my butt of with about 8�C (46.5�F) whilst my friends had a heat wave with temperatures well above 30�C (90�F) in the Netherlands.
And on the way back home again the road just stopped. Fortunately I was the only one on the road so I could swerve about finding the path with the least amount of gravel.
And that was about it with pictures from that trip. Things you get when riding alone.
#7
01-11-2016, 05:31 PM
Join Date: May 2015
Location: Delft, Netherlands
Posts: 22
Likes: 0
Received 0 Likes
on
0 Posts
So as winter rolls around I've been wanting to check the valve clearances for a while now. Thing is, as a junior hobby mechanic I didn't have all the tools needed, especially as some of the tools are a bit more special and pricey.
According to my Haynes Manual I needed some feeler gauges and a torque wrench. The feeler gauges I could get at my local hardware store for a reasonable price. The torque wrench would prove a lot pricier.
Luckily my father came to the rescue and gifted me this:
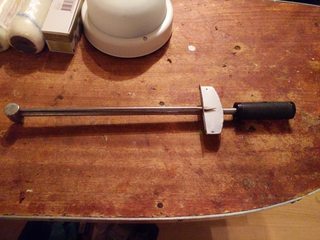
His old torque wrench. I felt a sort of pride, as my father was entrusting me with some of his tools, tools he bought when he was my age and rode his own motorcycle.
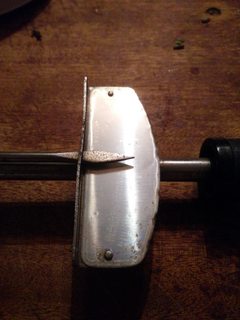
Unfortunately the scale was almost completely washed out and barely legible. The rest of the tool still seemed straight and not warped in any way.
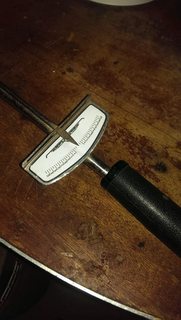
So with some digital magic I made myself a new scale.
I was ready to do this, that was until all went to hell.
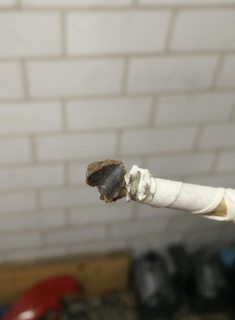
This little bugger right here? One of two parts of the insulation of my old ignition coil unit that broke off and stayed in the spark plug hole in the valve cover. The other one?
You've guessed it, fell into the cylinder as I pulled the spark plug.
So now I've gotta pull the head to check nothing is left in the cylinder before I can fire up again. Way to make a small job a big job.
According to my Haynes Manual I needed some feeler gauges and a torque wrench. The feeler gauges I could get at my local hardware store for a reasonable price. The torque wrench would prove a lot pricier.
Luckily my father came to the rescue and gifted me this:
His old torque wrench. I felt a sort of pride, as my father was entrusting me with some of his tools, tools he bought when he was my age and rode his own motorcycle.
Unfortunately the scale was almost completely washed out and barely legible. The rest of the tool still seemed straight and not warped in any way.
So with some digital magic I made myself a new scale.
I was ready to do this, that was until all went to hell.
This little bugger right here? One of two parts of the insulation of my old ignition coil unit that broke off and stayed in the spark plug hole in the valve cover. The other one?
You've guessed it, fell into the cylinder as I pulled the spark plug.
So now I've gotta pull the head to check nothing is left in the cylinder before I can fire up again. Way to make a small job a big job.
#8
01-11-2016, 10:06 PM

Super Moderator
#9
01-15-2016, 04:39 PM
Join Date: May 2015
Location: Delft, Netherlands
Posts: 22
Likes: 0
Received 0 Likes
on
0 Posts
I was little hopeful of finding a borescope, turns out one of my friends has one that might be able to fit through the spark plug hole, huzah!
Today I started tearing up the engine to get to the shift forks and drum for inspection but I'm running into trouble with removing the gear shift cover plate, anyone got tips?
Today I started tearing up the engine to get to the shift forks and drum for inspection but I'm running into trouble with removing the gear shift cover plate, anyone got tips?
#10
01-24-2016, 03:43 PM
Join Date: May 2015
Location: Delft, Netherlands
Posts: 22
Likes: 0
Received 0 Likes
on
0 Posts
So as I've stated in the other thread, still no luck getting the gear shift cover off, and as a result she's in a sorry state now. 
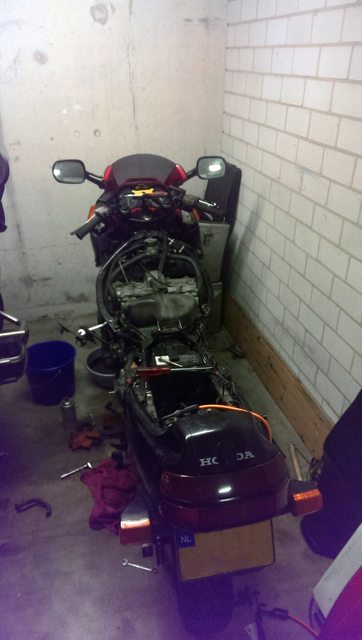
Luckily it it's not all bad since I did finish my new gear storage (the idea of which was of course shamelessly stolen from someone else).
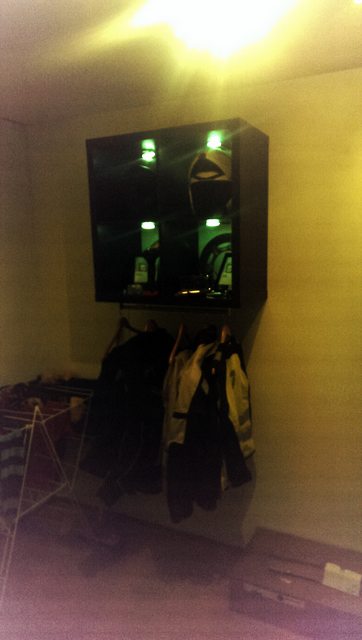
My apologies for the potato quality, apparently the camera in my mobile phone suffered from heat, a design flaw from what I've read.
Luckily it it's not all bad since I did finish my new gear storage (the idea of which was of course shamelessly stolen from someone else).
My apologies for the potato quality, apparently the camera in my mobile phone suffered from heat, a design flaw from what I've read.