How to paint a bike without a compressor or gun **Not Considered A Rattle Can Job**
#1
 08-12-2010, 11:52 AM


Join Date: Jul 2009
Posts: 5,692
Likes: 0
Received 0 Likes
on
0 Posts
Materials and Costs
- Adhesion Promoter.....1 cans. $24.24. Bulldog. (KLE ETP0123B)
- Acid Etch Primer......1 cans. $15.65. U-Pol #8 Acid Etch Primer. (UPO 741)
- High Build Primer...2-3 cans. $15.44. U-Pol #5 High Build Primer. (UPO 763)
- Guide Coat............1 cans. .$8.53. U-Pol Guide Coat(UPO 2043)
- Base Coat...........3-4 cans. .$5.04. U-Pol Power Can - Gloss Black (UPO 803)
- Clear Coat..........4-6 cans. $15.15. U-Pol #1 Clear Coat (UPO 796)
Total: $205.80 + $30.19 shipping to CA + $15.95 tax.
Total: $251.94
* Calculation of total used highest number of cans (3 high build primer, 4 basecoat, 6 clear coat). Prices as of 3/1/2009.
Prices and product codes are from http://www.tcpglobal.com.
(open thread)
Introduction
This is NOT a "how to paint with rattle cans" article.
Instead it deals with how to get truly professional results WITHOUT having a compressor, or spray gun, and the $350 in accessories IN ADDITION to the compressor and spray gun,.....read and enjoy
Background
I have been painting motorcycles, cars, bicycles and just about anything that will hold still long enough for something like 35+ years now.
I started off like most, with rattle cans in the garage or driveway, but I got bitten bad by the kustom kraze in the early seventies, and wanted to airbrush and pinstripe, just like Ed 'big daddy' Roth, so I went out and got brushes, paints and a paasche VL (good ol airbrush) and just completely screwed up perfectly good looking motorcycles, cars and bikes for a couple of years or so (all my own, thank god), but eventually I learned the rattle can way, the hard way, the easy way, the fast way, the super uber quality way, and just about everyway in between�.
I spent so much money on paint and airbrushes, and compressors and supplies I had to start my own restoration-custom paint business, and did just that for many years.
Being an avid biker since I can remember I would get MANY requests to paint motorcycles, and more questions ABOUT painting motorcycles than any other, the ONE question that kept coming up over and over was �can I paint my motorcycle with rattle can paints and get good results, that LAST?�
Since most of you can probably (or already have) figured out the hard way, and the �it looked good for a week� way, in this article I�ll detail how to paint a motorcycle using nothing but rattle can, or �spray bomb� paints, and get truly professional LONG lasting results. (7+ years looking perfect is not at ALL uncommon) it�ll cost a bit more than your typical spray bomb job, and the toughest thing will probably be convincing people that it really IS a rattle can job.
Preparation
Public nuisance, practice panel, safety stuff, and paint quality were covered.
Let's get started.
Methodology
- Adhesion Promoter.....1 cans. $24.24. Bulldog. (KLE ETP0123B)
- Acid Etch Primer......1 cans. $15.65. U-Pol #8 Acid Etch Primer. (UPO 741)
- High Build Primer...2-3 cans. $15.44. U-Pol #5 High Build Primer. (UPO 763)
- Guide Coat............1 cans. .$8.53. U-Pol Guide Coat(UPO 2043)
- Base Coat...........3-4 cans. .$5.04. U-Pol Power Can - Gloss Black (UPO 803)
- Clear Coat..........4-6 cans. $15.15. U-Pol #1 Clear Coat (UPO 796)
Total: $205.80 + $30.19 shipping to CA + $15.95 tax.
Total: $251.94
* Calculation of total used highest number of cans (3 high build primer, 4 basecoat, 6 clear coat). Prices as of 3/1/2009.
Prices and product codes are from http://www.tcpglobal.com.
(open thread)
Introduction
This is NOT a "how to paint with rattle cans" article.
Instead it deals with how to get truly professional results WITHOUT having a compressor, or spray gun, and the $350 in accessories IN ADDITION to the compressor and spray gun,.....read and enjoy
Background
I have been painting motorcycles, cars, bicycles and just about anything that will hold still long enough for something like 35+ years now.
I started off like most, with rattle cans in the garage or driveway, but I got bitten bad by the kustom kraze in the early seventies, and wanted to airbrush and pinstripe, just like Ed 'big daddy' Roth, so I went out and got brushes, paints and a paasche VL (good ol airbrush) and just completely screwed up perfectly good looking motorcycles, cars and bikes for a couple of years or so (all my own, thank god), but eventually I learned the rattle can way, the hard way, the easy way, the fast way, the super uber quality way, and just about everyway in between�.
I spent so much money on paint and airbrushes, and compressors and supplies I had to start my own restoration-custom paint business, and did just that for many years.
Being an avid biker since I can remember I would get MANY requests to paint motorcycles, and more questions ABOUT painting motorcycles than any other, the ONE question that kept coming up over and over was �can I paint my motorcycle with rattle can paints and get good results, that LAST?�
Since most of you can probably (or already have) figured out the hard way, and the �it looked good for a week� way, in this article I�ll detail how to paint a motorcycle using nothing but rattle can, or �spray bomb� paints, and get truly professional LONG lasting results. (7+ years looking perfect is not at ALL uncommon) it�ll cost a bit more than your typical spray bomb job, and the toughest thing will probably be convincing people that it really IS a rattle can job.
Preparation
- LOCATION
First off you�ll need a space to paint free of any ignition sources, and with good ventilation: usually painting outside with the ground wetted down, and then the piece moved into a sealed up garage or shed after painting works VERY well,
HOWEVER! be VERY careful about over spray settling onto neighbors property as nothing will **** off a neighbor more than finding the family truckster dusted with paint over spray after they saw you shooting your bike yesterday (so you get tarps, and offer to cover the nearby cars or whatever if need be) - RESPIRATOR
Second thing is you only get two lungs, and only so many brain cells per lifetime, so go get a GOOD charcoal canister dust/mist/vapor respirator, and WEAR IT WHEN YOU SHOOT. - PAINT SUIT
Most of the crap that lands in a paint job (professionally called �nibs�) come from YOU, NOT the surrounding area as it might seem, so when you get your respirator, get a .99 cent disposable PAINT SUIT AND HOOD, and WEAR IT WHEN YOU SHOOT, not so much to protect you from the paint (which it DOES), but it also contains all your skin cells, hair, dandruff, sanding dust, yada yada.
besides half the fun of painting is having someone you know see you while your painting, when you look like someone from the andromeda galaxy,�. and if you like peace and quiet, know that 99% of people will NOT approach a person dressed like he�s going to a nuclear radiation accident!
- TEST PANEL
The BIGGEST (and most common) rookie mistake is to try and "learn" how to shoot ON the thing you are trying to paint, DO NOT DO THIS unless you have experience shooting MOTORCYCLES and that�s the rub, just because you know how to lay glass on a car hood, or fender, don't think you can just start shooting bikes with totally new spray can products and not have a learning curve, so take my advice, and make your mistakes on the practice piece, and not your R1, or BMW or whatever.
Get a section of old fairing, or a piece of something roundish (old helmet?) and pretend it�s the bike, shoot and sand everything EXACTLY like you�re going to do on the bike, sort of a dress rehearsal, you�ll have plenty of paint leftover for your project, and you�ll KNOW what each product will do and if you mess up you can just wipe it all off with thinner, or grind it off with a sanding disc and start again. practice on the test panel till you feel comfortable , then shoot the bike. - PAINT QUALITY
There is a HUGE difference in WHAT ACTUALLY goes IN a spray can, and only a few dollars difference between garbage, and gold, so forget about going to the hardware store, or any discount auto supply, or wal-mart.
Look in your yellow pages under �automotive paint supply� or �color shop� and you should find several professional auto body supply shops
Some can actually make custom spray cans so you can get ANY automotive color you can think of (and afford), so if you REALLY love that crazy orange color shift on the Lamborghini Murcelago, you can get it put in a spray can, THAT COLOR would probably be a $200 dollar spray can, but you get the idea, billions of color choices, and truly professional basecoat urethanes in a spray can.
- PRIMER QUALITY
The ETCH PRIMER, and the HIGH BUILD PRIMER are also critical to durability so again, avoid cheap hardware/auto supply look alikes, and buy the primers at the color shop, and you�ll get the results I promise in this article. - PURCHASING SUPPLIES
There are also MANY places online that will ship these products, simply do searches for the names of the products listed and you should see several suppliers of these, and similar products available for shipment. - BRANDS
Good brands to stick with are: SEM, or U-Pol (my personal choice), or EVERCOAT. At this writing, FINISHMASTER carries �SMART� brand, which apparently is simply repackaged SEM products, good stuff.
Public nuisance, practice panel, safety stuff, and paint quality were covered.
Let's get started.
Methodology
- TEAR IT DOWN COMPLETELY
Clips, grommets, EVERYTHING, as nothing looks more amateur than tell tale over spray on rubber or shiny bits, because they should have been removed, not masked off.
Remove the petcock from the tank (or mask off the HYOOGE fuel pump thingy), REMOVE THE GAS CAP, and carefully mask off the neck. - CLEAN THE FREAKIN� THING!
Paint will not stick to oil or grease, wax, cheeseburger drippings, or taco juice and that includes the oils from your hands. (taco or not)
Plastics, and painted surfaces can be cleaned with alcohol or mineral spirits or wax & grease removers like PPG�s DX330.
Once cleaned DO NOT TOUCH IT WITH BARE HANDS, USE GLOVES. - REPAIR IT
You�ll have to repair any damage like cracks, broken tabs, rash deep enough to make a hole, etc,�- For fiberglass you can use standard �home depot� fiberglass resin and cloth and get great results, but to really do it right you should use a slower setting epoxy, it sticks better, and remains much more flexible after it cures.
Marine grade epoxy by TAP is by far the most durable and flexible. complete instructions for fiberglass repair are also available at TAP, follow them COMPLETELY. - For non-fiberglass fairings (90% of them are NOT fiberglass) first you have to ID the plastic.
Look for a mark on the inside surface somewhere it�ll look like this :
>PA6+AS+MD10<
or
>ABS<
or whatever your particular plastic is will be inside the �> <� marks.- For ABS you can get really good chemical welds (bonds) using MEK as a bonding agent (methyl ethyl ketone: available at any hardware store, sold as a paint thinner/stripper).
Take a q-tip and wet it with the MEK, then brush it along the crack.
It�ll seep into the crack, then using moderate force push the two broken pieces together until you see some melted plastic ooze from the crack.
Hold it that way for a minute or so.
Then once it�s set, but still wiggles.
Using wide 3� masking tape, stretch the tape across the crack. Inside and out to hold the two broken halves together and leave it set for at LEAST an hour. - For any other fairing plastics you pretty much have to weld it.
So go find a body shop that �repairs bumpers�, or a plastics shop and have the pieces welded.
Having whoever is doing the welding work to pay EXTREME ATTENTION TO WARPING, as 1/8� thick plastics melt at VERY LOW TEMPS, and it�s just incredibly easy to accidentally melt a vent or warp a mounting tab.
- For ABS you can get really good chemical welds (bonds) using MEK as a bonding agent (methyl ethyl ketone: available at any hardware store, sold as a paint thinner/stripper).
- For fiberglass you can use standard �home depot� fiberglass resin and cloth and get great results, but to really do it right you should use a slower setting epoxy, it sticks better, and remains much more flexible after it cures.
#2
08-13-2010, 08:22 AM
Join Date: Jul 2009
Posts: 5,692
Likes: 0
Received 0 Likes
on
0 Posts
- REPAIR IT: Tank Dents
- If it’s shallow just fill it using METAL2METAL(a special aluminum based body filler that won’t crack over time.)
- For deeper ones you’ll need to have the dent lifted by a body shop. they weld on copper studs and gradually lift the dent, then grind the studs off, leaving you a nearly flat surface, ready for the next step.
- FILL IT once ALL the repairs are completed, using a HIGH QUALITY body filler (again, go to the color shop, NOT the hardware store, or auto supply) but any filler that you get at the color shop will work.
Get the best one you can afford (METAL2METAL, or RAGE are the best, but $$$$$)
Now on a hard smooth surface (I like a piece of glass window) mix up the filler and the hardener (follow the directions on the can for the ratio of filler to hardener, except use half as much blue hardener as they state for anything made by evercoat) mix it very very well, until it’s all one uniform color, and using a flexible putty knife, or a spreader, spread it VERY THINLY over the areas that you repaired dents, or where you have weld seams, use ALOT of pressure for the initial stroke, then less for the final strokes, and think “drywall guy”, not “cake froster”. - REMEMBER: WHATEVER YOU PUT ON WILL NEED TO BE MOSTLY SANDED OFF
So get it as thin and as perfectly shaped to the piece as humanly possible, it’ll be less sanding later on, and you get MUCH better results when it’s just a skim coat of filler, and on a motorcycle, a skim coat is all you need. - NOTE FOR WELD ONLY PLASTICS
Before topping with anything: filler, paint, primer yada yada, you have to shoot an ADHESION PROMOTER like bulldog or others, and follow the directions on the product label for how to sand, apply, top coat window, etc,… - Remember when you sand the filler or primer with the bulldog under it, you will probably blow through into bare plastic around the edges, that’s normal.
So before you top with more etch, or primer, you need to shoot the PAP(Plastic Adhesion Promoter) on JUST the bare plastic spots again, and let dry properly.
THEN proceed to add more filler, or shoot primer, or whatever. - NOTE FOR PINHOLES
Sometimes when you sand the filler you will have some pinholes, you can fill these with a GLAZING PUTTY (I like metalglaze from evercoat) which is just runny filler, you mix it up with the hardener just like the filler, and apply a super thin skim coat over the pinholes, which will fill them, then when it cures (10 minutes) sand with 180-220 before sealing/priming. - Once the filler/putty has cured (some can be sanded in less than10 minutes) you need to shape it, or “block” it.
Use 100-150 grit sandpaper (ALWAYS dry sand filler, NEVER EVER WET-SAND FILLER) on a hard block that’s longer than the area you are working on (rubber sanding block, wood, plastic, square bar, etc,…).
Sand in an “X” pattern along the length of the repair area, going back and forth curving your strokes to the shape of the fairing or whatever and sand until you can no longer feel a bump when you run your hand across the repair area.
If you followed the above instructions for not glopping the filler on, this will take minutes, not hours.
Again be careful about oils or waxy things, USE GLOVES! the sanded filler is VERY PORUS, just waiting to soak up the next thing that touches it.
Once the filler is all smoothed, the pieces need to be sealed, but before we start shooting anything. Here’s some
- SHOOTING TIPS
When shooting any of these paints, remember that they cure by evaporation (except the clear coats).
The more you pile on, the longer it takes to cure fully so you can move to the next step.
So don’t hose the thing down, shoot in an organized fashion:
- Start at one end and finish at the other end.
- Shooting everything in the same order for each coat and each layer of paint.
That way you wont get mixed up and shoot more coats than you need to or forget to shoot a piece or whatever.
When you shoot try and overlap each pass by about 50% and move up or across in an organized fashion so you don’t waste paint.
Wasting $3.85 a can paint is no problem, but when you shell out $35+ dollars a can, you’ll appreciate these tips. - ANGLING THE FAN
You’ll notice that high quality spray cans always have a fat fan tip.
Most are the “mini cigar” shape.
If you hold the can 6” away from a piece of paper and shoot a quick shot.
You’ll see a 3” to 4” mini cigar shape fan pattern, usually vertical.
Now look at the panels you are working on.
If you shoot with the can vertical and perpendicular to the surface (needed for proper paint flow) sometimes half the fan pattern shoots out into the air, or an adjacent area (neither is good) or the fan is aimed the wrong way.
If you tip the can, the paint wont flow properly SO using your fingers or a small tweezers, twist just the light colored flat tip on the nipple so the pattern shoots at a different angle.
NOW when you shoot a panel holding the can vertical almost ALL the fan pattern lands on the part, or inside the vent, or whatever.
It’s better use of paint, less waste ($$$$), and almost no over spray on adjacent pieces.
This is why you need to practice on the test panel, to get used to stuff like this. - NOZZLE & CAP care
For this type of painting, you generally use the entire can in one shot (sometimes multiple cans).
So, soaking the caps in thinner isn't needed unless you only use part of the can, and plan on using it again sometime in the near future.
After shooting a coat while waiting for the coat to flash off (dry by evaporation) inverting the can and spraying to clear the cap wastes paint (again these are $20+ a can paints).
Instead get a can of compressed air, like for cleaning keyboards. then remove the cap from the can, blow a couple of shots into the nipple underneath the cap, and then wipe off any remaining paint from the spray tip, re-install the cap, and your ready for the next coat.
This is ESPECIALLY necessary with the AERO-MAX, or U-Pol spray clears as they get gummy very quickly, and if you don't clean it immediately after shooting a coat, it won't spray right unless you soak it and blow it out. - SUPPORTS
I like to hang the pieces using coat hanger hooks, but use bungee cords and some kind of weight to fasten the bottoms as well, so they don’t blow all over when you start shooting.
I usually hang them on the open lip of the garage door (when shooting at home). Then transfer it inside to hooks on the garage rafters for drying/curing time.
You can also use barstools, sawhorses, hat racks, pretty much anything you can hang a fairing on and don’t care if it gets paint on it.
I also like to use those roller stands like for table saws, but I take the roller off, and make a little support to fit inside tail sections, or uppers, and fenders fit lengthwise.
Whatever you choose, just make sure the part is secure, accessible, and you can get to all the areas that need painting. - SEAL IT
Using an ACID ETCH NON SANDING PRIMER/SEALER.
(I like U-Pol #8 Etch spray primer)
These primer/sealers are designed to go over just about any type of bare metal, fiberglass, or PREPPED PLASTIC (has had PAP applied), gripping the surface with acid etching and provides a top-coat able surface that can be directly painted over with NO SANDING NEEDED.
In 25 years I’ve never met anyone that loved to sand things down, so I’m sure most of you will be with me on this.
REMEMBER: this is the foundation layer to your whole paint job, just like with a house, make a crappy foundation, and you get a crappy house, so presuming you have already shot your test panel, ALL THE WAY THOUGH TO THE CLEAR, then start shooting the bike parts.- WARNING!! we put the filler over the bare plastic and metal for a reason. We covered that filler and bare metal with the etch primer to seal that layer off from the layers we are spraying over it.
You CANNOT put body filler OVER acid etch primer!!!
Body fillers use a peroxide based hardener (either BEKP or MEKP) and the ACID in this etch primer will deactivate that peroxide IF you try and put filler OVER etch primer, so obviously don’t.
If the piece still needs some filling and shaping, you need to get ALL THAT DONE BEFORE SHOOTING THE ETCH PRIMER.
Say you shot the etch already, and CRAP! you discover someplace that needs some more filler, no worries, just spray a THIN coat of the high build primer (the step after this one) over JUST THAT SPOT and let cure (kinda like it was an adhesion promoter, and in this case it is), then sand with 180 grit paper to rough it up then spread the filler over the high build primer, and then shape once cured.
The snafu is that filler will stick MUCH better to bare plastic & metal than to primer, so try as hard as you can to get all the filler/shaping work done before shooting the etch primer.
Shoot two good coats of the etch primer, waiting about 15 minutes (at 70 degrees) between each coat (use a timer! don’t guess!).
DO NOT SHOOT MORE THAN TWO COATS!!
just make sure every last bit of each piece is covered, look underneath from below and inside the vents especially the upper surfaces of the inside of the vents, as it’s easy to overlook those spots
Make sure you have an even coating all over, use a flashlight if necessary to see any thin areas.
Let cure overnight (at LEAST 8 hours at 70 degrees.
Add an hour for every five degrees under 70).
Again DO NOT TOUCH WITH YOUR BARE HANDS, always use gloves from now on. - WARNING!! we put the filler over the bare plastic and metal for a reason. We covered that filler and bare metal with the etch primer to seal that layer off from the layers we are spraying over it.
- HIGH BUILD PRIMER
The etch primer is a pretty thin layer.
You’ll probably still see some coarse sanding scratches, and stuff like that.
We’ll use a much thicker building primer called “high build” over the etch primer, and block that flat (that’s sanding, remember?).
This will fill those sanding scratches, and leave a nice smooth, but porous layer to put the color coat on (basecoat).
I like U-Pol #5 high build primer.
This stuff is just amazing for a spray can primer, and it costs like it’s amazing too at nearly $20 a can or so it’s not cheap.
Two or three cans should cover the bike (standard 7 piece sprotbile) and a few test panels so not really that expensive when you see what it’ll do. (or compare to renting compressor, and buying QUARTS of primers)
Shoot the BOTTOMS of the pieces FIRST when the can is full of paint, then later as the can empties, you’ll need to flip the pieces over to shoot the bottoms of stuff, as the can wont have enough paint in it to invert the can.
We need to shoot a nice thick coat of primer all over everywhere we applied the etch, and we are going to shoot more coats.
A coat is one pass over all surfaces with the afore mentioned 50% overlap as above.
For the high build, shoot 2 to 4 coats, letting each coat dry for about 15-30 minutes between coats.
Once all surfaces are covered, let the pieces sit at least overnight.
With a full 24 hours being the preferred cure time.
At 70 degrees, add 2 hours cure time for each 1 degree increment below 70.
DO NOT TRY AND PAINT BELOW 60 DEGREES!
NOTE: sometimes when shooting primer, on the second or third coat, you might notice some pinholes open up.
If you get these at this stage, simply dab your gloved finger into some fresh primer on masking somewhere, and dab the pinhole with your finger until it fills with primer, then let dry for at least 30 minutes before making another pass over the dabbed pinhole.
When you sand in the next step, you will level the “dabs”. - BLOCKING PRIMER USING A GUIDE COAT
Once the primer is fully cured it must be sanded before you can paint over it.
You sand to level out the surface and smooth it, but trying to tell WHEN the surface is level is tough, and on crazy shaped sprotbile pieces where EVERYTHING is round or angled, it’s practically impossible.
So we’ll use what’s called a GUIDE COAT.
All a guide coat is, is a speckled coat of a contrasting color primer, you’ve probably seen it but didn’t know what it was on cars having body work done, or in progress.
The darker color speckles settle into the low spots of the scratches, and pits, and as you sand you start leveling these defects, and as you do, the guide coat starts getting sanded out.
So when you can no longer see the guide coat anywhere, the surface is flat and smooth, and ready to shoot the color coat (basecoat).
Spritz a mist coat of any darker colored SANDABLE primer on all surfaces that you shot the high build, or simply buy guide coat (SEM or U-Pol) at the color shop when you buy your paint ($3 bux a can)
You block sand the high build primer just like you did with the filler.
But you use a much finer grit, what grit you use is determined by what the final color will be:
- use 320 to 400 (wet) for solid colors like red or white or black, and
- 400-600 (wet) for any kind of metallic finish.
Start your sanding like your shooting, in an organized fashion, moving to the next area only when the area your working on is completely done, this way you wont miss anything.
If when sanding you “blow through” to bare plastic or metal, no worries, just complete sanding all the pieces, and then once they are all block sanded smooth shoot another LIGHT coat of the high build,
JUST on the areas of bare plastic or metal (remember the PAP for weld only plastics!), let cure then sand LIGHTLY, and move to the next step.
#3
08-13-2010, 08:23 AM
Join Date: Jul 2009
Posts: 5,692
Likes: 0
Received 0 Likes
on
0 Posts
- Color Coat or Basecoat
Here’s where you just have a ridiculous amount of options, and literally any color you can find in the custom painting world, can be put in a spray can.
So figure out what color you want and either go to a color shop that can make a custom spray can, or order online from one of the many custom spray can suppliers (do an internet search for custom spray cans).
Once you have your cans of basecoat (again 2 or 3 should cover a 7 piece sprotbile), you just need to shoot the bike EXACTLY like you did with the etch, and the high build, starting at one end and finishing at the other, and do this the same way for all coats.
TIPS: “less is actually , less”.
Since the basecoat dries in minutes a common mistake is to just start hosing the thing down, shooting multiple coats and this really is a bad idea.
All the color coat needs to do is cover what’s underneath (called “hiding”), and be an even tone, so when you shoot the clear coat the color doesn’t look blotchy, or “mottled”.
Shoot a coat, then wait 15-20 minutes, and shoot another, then wait another 15-20.
Then check the pieces, looking for any thin spots, or places you missed, if it needs some touch up, shoot those areas, and then wait 15-20 minutes (USE A TIMER! DON’T GUESS!) and check it again.
Once you have hiding, and it’s all an even tone, pack it up and wait till the following day to shoot the clear coat.
AGAIN DO NOT KEEP SHOOTING JUST BECAUSE YOU HAVE HALF A CAN OF PAINT LEFT!!! - CLEARCOAT
Everything usually goes really well UNTIL you get to the clear coat.
Then it all falls apart fast.
With clear when it goes wrong sometimes there’s really nothing to do, except blast it all off and start over.
Ooccasionally you can sand the fully cured clear coat with 400, and re-apply more clear.
This is why shooting that test panel is so damn important, and the one thing almost NO ONE ACTUALLY DOES.
Since you’ve now read over 3,000 words of instructions.
If you only follow ONE of those instructions, shoot that test panel until it comes out as beautiful as you can stand it.
THEN and only then start in on your bike.
This MAY mean buying some of the stuff twice (like the high build and clear) but the difference between a pro painter and every novice I have ever seen, is the pros make mistakes just like anyone else, but they make those mistakes on the test panel and NOT the project.
There are TWO types of clear coats you can get in a spray can that I’ll recommend- one is MOISTURE activated (moisture provides the hardening action) and
- the other is a real honest to goodness 2 part polyurethane clear coat in a special one use can.
A) U-Pol Clear #1 this is a moisture activated clear coat, very high build (it’ll spray thick) and just water clear when fully cured. Shoot this JUST like all the other coats (organized fashion) EXCEPT, the first coat should be a light coat, wait a full 20 minutes, then shoot full wet glossy coats after that (it’ll be THREE coats including the initial “tack” coat)
B) RM AEROMAX urethane clear coat. This is the real deal, an honest to goodness 2 part catalyzed polyurethane clear coat in a special one use spray can. At almost $40 a can, this is not cheap stuff, but if you add up what it would cost you to shoot your bike with a polyurethane clear coat (compressor rental, spray gun, paints AND supplies) it’s actually very cost effective.
Using either of these types of clear coat:- SHOOT A COAT OF CLEAR
That’s ONE even pass over each surface.
For fairings I shoot lengthwise starting at the bottom (only a full can will shoot UP, remember?) and work my way up to the upper surfaces (always with that 50% overlap) then move to the next piece.
For street bikes I like a total of four coats, for race bikes you can get away with only two coats.
BUT!!! YOU MUST WAIT AT LEAST 15 MINUTES BEFORE SHOOTING THE NEXT COAT.
Here's a great trick for determining when the previous coat is ready for the next.
On the masking somewhere (gas cap area?) touch your gloved finger to the clear after shooting and pull it away.
Directly after shooting it will pull away clean with some clear on your finger, and the surface.
After 2 minutes you see "strings" when you pull away.
After about 15-20 minutes it will just be tacky, and will no longer "string".
When it’s no longer “stringing” it's ready for the next coat.
This is assuming a 70 degree painting area, colder will take longer, hotter will be faster, don't paint under 60 degrees or over 85 degrees for best results. - the U-pol will take a few days before it’s hard enough to assemble and ride, but the aeromax clear can be assembled the very next day.
DO NOT WAX EITHER OF THESE FOR AT LEAST 60 DAYS, to give all the trapped solvents in all the multiple layers time to “gas off” (evaporate)
Painting can be one of the most frustrating, tedious, complicated tasks, and at the same time one of the most rewarding.
You’ll probably spend a few hundred painting your bike with these types of paint, but you get nearly professional results, and at less than half the cost of having it shot at a paint shop
It’s really empowering to know this stuff (makes getting deals and slightly blemed bikes a SNAP for you) and it’s also nice to know you took part in more than just the selection of components and assembly of your steed.
When you mention that you used rattle cans for the entire project, most people either won’t believe you, or think you’re a Mozart prodigy with a spray can.
To quote one of my favorite painters (Craig Fraser):
“PEACE, LOVE & ISOCYANATES”.
Ride safe out there.
(thanks again to mike for the awesome reformatting: it really makes this info easier to follow, and refer back to while working on the project)
__________________
Joe Loewinsohn
Plastics Fabricator - 15+years MOTORCYCLE SPECIFIC experience:
fiberglass, carbon fiber, composites, plastic welding, race fabrication, vintage reproduction emblems & badges, etc,...
408-483-0161 for estimates and turn times

#4
08-13-2010, 08:25 AM
Join Date: Jul 2009
Posts: 5,692
Likes: 0
Received 0 Likes
on
0 Posts

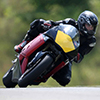
OR THIS:
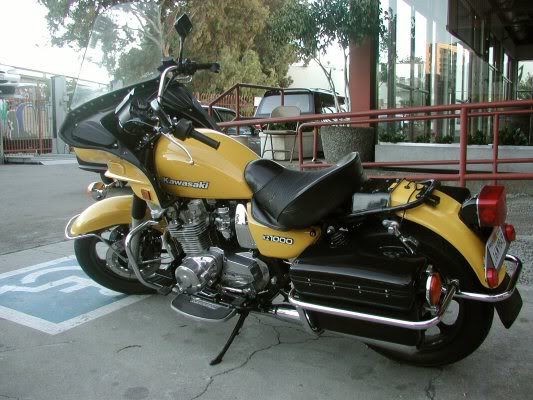
these were BOTH painted with this method and type of paint, the yellow KZ has the aeromax clear, and the montessa has the U-Pol clercoat.
the yellow KZ pic is 5 YEARS after painting, and paul just LOVES that POS so he puts about 25K a year on it IN THE CITY, riding it nearly everyday.

#7
03-04-2011, 04:03 PM
Senior Member
Join Date: Jul 2009
Location: Pittsburgh, PA
Posts: 769
Likes: 0
Received 0 Likes
on
0 Posts
Great write up. I learned a few things and have been painting my own bikes/cars for a few years now.
I do have 2 questions... Do you have any tips for surfaces that when spraying, you cant hit 1 part at better than a 20 degree angle while hitting another at a 90. Things like vents or weird shapes. You end up saturating 1 part, while getting lucky to even get a light coat on the other.
Also, you never sand with anything higher than 600? I generally go up to around 1000 because it felt smoother but is it not necessary?
#8
03-05-2011, 01:32 AM

Senior Member
Join Date: Apr 2008
Location: Northern Michigan
Posts: 2,492
Likes: 0
Received 0 Likes
on
0 Posts
I do have 2 questions... Do you have any tips for surfaces that when spraying, you cant hit 1 part at better than a 20 degree angle while hitting another at a 90. Things like vents or weird shapes. You end up saturating 1 part, while getting lucky to even get a light coat on the other.
Also, you never sand with anything higher than 600? I generally go up to around 1000 because it felt smoother but is it not necessary?
Also, you never sand with anything higher than 600? I generally go up to around 1000 because it felt smoother but is it not necessary?
With painting different surfaces. You really need to keep the gun and an angle that will hit both as you pass over. Tiping the gun to get into areas will usually result in poor coverage. With a vent, you can spray through the backside of the fairing first to make sure you get everything, but the top coat should be as even as possible with your other strokes. You can tip the gun slightly as you pass, but the same distance and speed needs to be consistant. Solid colors its not as bad, but metallics and pearls are extremely important to keep everything as uniform as possible. As long as you have enough flow of paint, everything should be covered just fine. But spray cans may not have the flow of paint to accomplish it as well. you just have to keep you overlap closer with cans versus a spray gun. for example, my gun I use has a 14" wide pattern. I overlap about 2 inches. where as a can will only have about a 5-6 inch pattern. you still have to overlap about 2 inches as well.
Nice write up though. But if you have the compressor and gun, the material cost is actually less. If you plan on doing more than one bike, investing in a compressor and gun will save money over time.
Last edited by justasquid; 03-05-2011 at 01:34 AM.
#9
03-05-2011, 07:40 AM

2011 Ride of the Year
#10
04-07-2011, 06:20 PM

