My very own F3 to 600rr tail build
#1
 03-24-2018, 12:03 PM


Join Date: Feb 2018
Posts: 4
Likes: 0
Received 0 Likes
on
0 Posts


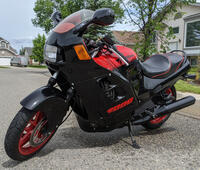
As common as this swap is, most of the pictures users have uploaded are either extinct or there is not very many of them... so here are mines, enjoy!
parts used:
04 cbr600rr rear tail fairing
04 cbr600rr front seat
04 cbr600rr rear seat
04 cbr600rr tail light
generic LED license plate light from eBay
welder
scrap metal from my shop
overal money spent on parts: about $100.00


Lots of tack welding parts in and just eyeballing as you go...
#2
03-25-2018, 05:30 PM
Join Date: Feb 2018
Posts: 4
Likes: 0
Received 0 Likes
on
0 Posts
#3
03-28-2018, 10:19 AM
Super Moderator
You should be able to edit the post. Each image will have show up as a line of gibberish. It'll use square brackets but look something like this:
(IMG)https://file loaction.jpg(/IMG)
Then you can just cut/paste those in whatever order you like
Nice job with the tail swap. It really modernizes the look if the bike
(IMG)https://file loaction.jpg(/IMG)
Then you can just cut/paste those in whatever order you like
Nice job with the tail swap. It really modernizes the look if the bike

Thread
Thread Starter
Forum
Replies
Last Post
llhoulej
How-To: Mechanical
8
03-09-2010 12:34 PM