
600f2/f3, 95. Fuel leak and stubborn starter - sitting 2years!
#11
 02-18-2016, 04:28 PM


Join Date: Feb 2016
Posts: 15
Likes: 0
Received 0 Likes
on
0 Posts
Fantastic, thanks everyone!!
Its a M-plate registration, so likely an F2 (a friend just told me).
Hmm yes the boots and also seals/o-rings for the carbs may be worn or damaged when dismantling right?
This is my main concern, as im not sure i can find the necessary parts to replace them etc etc.
BUT before i do go taking the carbs out or 'partly' anyway... Is there really no other way to try first?
I will try clamping the hose and taking the bike for a blast to see if i can 'push' the crap out of the carbs.
Noone commented on my other queries:
Compressed air blasting through the carbs??
Seafoam??
and is it actually safe to 'clamp' this carb overflow hose (without damage to carbs, due to back-pressure)?
Urgz, i don't have the Honda spark plug tool. I was tearing my garage apart for it earlier ...and access to them aint so easy anyway (i only approached this briefly mind).
Just nice to run this stuff past someone, thanks again for helping me out everybody
Its a M-plate registration, so likely an F2 (a friend just told me).
In all seriousness you most probly have a stuck float or two. If you keep the carb bank together you shouldn`t have to sync the carbs afterwards, you can just pry them out, flip them over and pop the bowls in place without even detaching the throttle cables I`ve done it myself that way. Keep in mind the carb boots have a tendency to harden over time so the carbs might be well stuck and some prying and levering is probably needed. Inspect the boots as they also get brittle and might tear amidst the battle so you might or might not need to replace them
Hmm yes the boots and also seals/o-rings for the carbs may be worn or damaged when dismantling right?
This is my main concern, as im not sure i can find the necessary parts to replace them etc etc.
BUT before i do go taking the carbs out or 'partly' anyway... Is there really no other way to try first?
I will try clamping the hose and taking the bike for a blast to see if i can 'push' the crap out of the carbs.
Noone commented on my other queries:
Compressed air blasting through the carbs??
Seafoam??
and is it actually safe to 'clamp' this carb overflow hose (without damage to carbs, due to back-pressure)?
Urgz, i don't have the Honda spark plug tool. I was tearing my garage apart for it earlier ...and access to them aint so easy anyway (i only approached this briefly mind).
Just nice to run this stuff past someone, thanks again for helping me out everybody
#12
02-18-2016, 09:48 PM

Well, seafoam MIGHT work however the mixing ratio is so small I seriously doubt it. I've seen some pretty nasty stuff in the carb bowl of a few bikes that's been sitting. The passageways in the jets are so miniscule that even a visual inspection doesn't always proof they are actually clean before they've had a blast of carb cleaner. Blowing air through the carb's throat will do nothing to the jets inside the bowls.
I'd advice firmly against clamping the overflow line as that way you'll just flood the carbs, quite possibly stall the engine and specially if you forget to unclamp it there's the risk of hydrolocking the engine if a cylinder gets filled of the seeping gas. Trust me it's just one of those jobs that is eventually a less of a hassle to do right the first time than try to dance around. Besides if your overflow is spitting out stuff then you definitely are looking st a stuck float valve, possibly several, that need first hand attention, probably replacing.
Some say you should replace the float bowl seals every time you open them, I cleaned the carbs of my old F2 at least threee times and never changed them. If they're not rotten or kinked they can be reused. One of the more common seals to fail are the O-rings in the two brown T-pieces that distribute the gas to the carbs, but to get to those you take apart the carb assembly and if that is done they need to be synced afterwards. That also is not hard to do but you need a sync gauge to be able to do it. They do still sell carb rebuild kits but they do tend to be pretty pricey. But if you gotta swap the needle valves it pays itself back to do it right and then be done with it.
I never had the OEM spark tool, I always used just a socket, some extensions and one of those whatsitcalled an elbow gear thingy. And yes no matter what tools swapping the plugs suck a$$.
Last edited by Mattson; 02-18-2016 at 10:20 PM.
#13
02-18-2016, 10:36 PM

Agreed with Mattson concerning the sparkplug tool. I have an OEM one but never used it. I started to once but found it more trouble than it was worth. Now its in my bikes toolbox in case of road emergencies. Like Mattson said, just use some extensions and a socket. Oh yea, be prepared to bite your tongue or say some choice words as you will most likely have some scraped knuckles until you get the hang of it.
#14
02-19-2016, 03:47 AM
Join Date: Feb 2016
Posts: 15
Likes: 0
Received 0 Likes
on
0 Posts
Cheers guys!
Mattson, forgive my ignorance and hesitance on playing with the carbs, its my first time!
Ok, il try a few things first before i attempt at taking them out etc.
1. Il take it for a blast on the straight bit of road nearby.
2. If no luck, Seafoam... someone told me its good practice to put it in anyway if a bike has been sitting around for a while.
3. Get the carbs out, as gently as possible... urgz..
** Hmm can i not *somehow* get Carb Cleaner inside the carbs without taking them out?
via fuel lines etc...
or is this dangerous/not good for the engine?
cheers again
#15
02-19-2016, 04:25 AM
Haha no worries mate we've all been there... I remember being really scared doing it the first time myself.
Well, I suppose you could try the following, however IMO it involves more fiddling than to just pop em off...
-go buy a bottle or two of carb cleaner spray, make sure you get ones with a long straw. If you can get a hold of KENT brand that stuff is really strong but be careful with it, any spatter might for example burn orange spots on your black long sleeve shirt
-locate the drain screws in the carb bowls (and hope whoever did it the last time put em on in the correct order as the ones on the left give to the left and the right ones give to the right, if they are mixed it's impossible to turn the screws)
-open the drain screws with a screwdriver toget the bowls drained, take the drain screws completely out.
-look at the carbs from above. You see four lids with four(?) screws in each. Open the screws to take off the lids, there is a spring under the lid that will try to push it up a little, don't brake the ears from the lids.
Once the lids are off and the springs out you should see four black rubbery thingys. Those are the vacuum diaphrams that suck the sliders up. Carefully pry the sealing edges up from their grooves taking note how they are installed, they kinda fold upside down into the groove. There also is the small loop that surrounds the vacuum port. Once the diagphghramadindgdongs are out of the groove, lift the sliders up.
-there is a needle at the bottom of the slider that goes into a hole at the bottom. The main jet is under that hole. Spray carb cleaner down the holes while making sure most of it exits down the drain screw holes. Also spray carb cleaner into the bowls from the drain screw holes.
-refit sliders,screw in lids and drain screws, hope for the best.
Do take into consideration:
while a momentary contact with carb cleaner does nothing to the rubber seals, prolonged exposure destroys rubber parts making them swell.
Now you might get the main jets cleaned this way and just maybe you get enough carb cleaner into the bowls but I have my doubts if this will free the stuck valves
Whatever crap you might dislodge more than likely remain in the carb bowls possibly clogging your jets before long, and you end up opening them anyway.
That's pretty much the only dance around I can think of, and IMHO it's more of a bother than to do it right...
Last edited by Mattson; 02-19-2016 at 04:32 AM.
#16
02-20-2016, 04:32 PM
Join Date: Feb 2016
Posts: 15
Likes: 0
Received 0 Likes
on
0 Posts
-locate the drain screws in the carb bowls (and hope whoever did it the last time put em on in the correct order as the ones on the left give to the left and the right ones give to the right, if they are mixed it's impossible to turn the screws)
-open the drain screws with a screwdriver toget the bowls drained, take the drain screws completely out.
-look at the carbs from above. You see four lids with four(?) screws in each. Open the screws to take off the lids, there is a spring under the lid that will try to push it up a little, don't brake the ears from the lids.
Once the lids are off and the springs out you should see four black rubbery thingys. Those are the vacuum diaphrams that suck the sliders up. Carefully pry the sealing edges up from their grooves taking note how they are installed, they kinda fold upside down into the groove. There also is the small loop that surrounds the vacuum port. Once the diagphghramadindgdongs are out of the groove, lift the sliders up.
-there is a needle at the bottom of the slider that goes into a hole at the bottom. The main jet is under that hole. Spray carb cleaner down the holes while making sure most of it exits down the drain screw holes. Also spray carb cleaner into the bowls from the drain screw holes.
-refit sliders,screw in lids and drain screws, hope for the best.
Now you might get the main jets cleaned this way and just maybe you get enough carb cleaner into the bowls but I have my doubts if this will free the stuck valves
Wow, nice one mate. Thanks.
I'm not too sure about the lids you mention. You mean the black 'caps' facing towards the front of the bike on each carb?
I dont think you can access those without taking the carbs out anyway!

Hmm on the fuel drain screws, i think theyre all identical right? i took them all out in the beginning to also check the colour on their points and it was pretty yucky!
3 had green crust, but one of them had a suspicious 'brown'!
OK, so since the other day, i took the bike for a nice blast on the nearby straight road, blipping the throttle and also holding it on full revs (redline) to vibrate best i could the crap out of there.... sadly, the leak is still very much there...but it was worth a shot right?! Also, 5L of petrol gone remarkably fast!
After all that, i put some redex fuel cleaner plus fresh gas plus brake/carb cleaner in the tank and idled it whilst clamping the hose (just for about 15secs) to flood that carb... so it could put a bit of extra pressure on inside parts ...therefore maybe dislodging something overnight whilst soaking... just an idea.
Will check it tomorrow.
Sooooo ...If i do remove carbs, i then need to make sure i can get 'original' (new or 2nd hand) parts beforehand right?
Such as new float/s, possibly carb boot/s and various carb seals/o-rings..
I should come up with a nice degreasing dip to soak the carbs in too right? i recall many debating over the best mix.... what would you suggest? diesel mixed with carb cleaner spray??
Other (i think) less relevant stuff:
If i keep all the carbs attached to each other whilst soaking in carb cleaner, i shouldnt need to sync them with the specialist gauge someone mentioned to me, right? ...i dont have any gauges.. i dont even have a voltmeter! ha!

Do i really need compressed air? The same stuff used for Computer/electronics cleaning? Theyre like �14 or $20 a can!
-
#17
02-20-2016, 04:47 PM
Sorry my memory ain`t exactly vivid, it`s years since I sold my F2, I remembered you could open the top lids in place.
The fuel drain SCREWS are identical, the BOWLS are not. Two screws point to the left, two to the right. If the bowls are mixed the screws point inwards.
I don`t believe you`d have to swap your floats. It`s not really a common thing to fail, albeit a possibility. You`d notice if there is fuel inside the floats when you get them in your hand. As said I took my carbs off at least three-four times wothout ever swapping the carb boots, and my bike was a `91 with 100tkm on the meter.
The carb seals (float bowl seals mainly) can be reused if they are not damaged. Do not pry them out of the grooves if they seem OK as they will possibly stretch making them unreusable.
You should not need compressed (canned) air, a compressor would be nice to have but NOT a necessity. Get a can or two of crab cleaner spray, the pressure of the jet will be enough.
If you don`t remove the carbs from each other you shouldn`t need to sync them.
Dude, if you already took the drain screws off and there was enough nastiness to soil the tips of the valves, you REALLY, REALLY should take the carbs off and clean the float bowls, and the jets!
Keep in mind that if you take parts off from the carbs, keep them in INDIVIDUAL bowls so every single part goes back to the exact same carb they came from, for example the main jets in the two center carbs are different (bigger) than the ones in the sides to aid in keeping the center cylinders a little bit cooler.
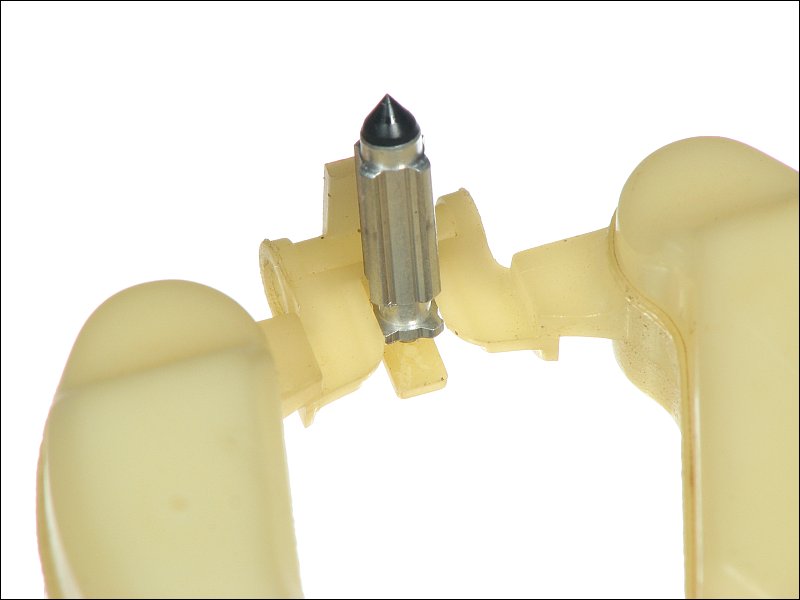
Your problem is this thingumabob here, the float needle valve. This cuts out the fuel flow to the carb bowl once it`s filled enough. The pic is not from a CBR float or valve but they all look more or less the same. If this thing gets gunked up, the tip gets damaged or it gets seized (it`s spring operated) it doesn`t cut the fuel resulting in overflow.
The fuel drain SCREWS are identical, the BOWLS are not. Two screws point to the left, two to the right. If the bowls are mixed the screws point inwards.
I don`t believe you`d have to swap your floats. It`s not really a common thing to fail, albeit a possibility. You`d notice if there is fuel inside the floats when you get them in your hand. As said I took my carbs off at least three-four times wothout ever swapping the carb boots, and my bike was a `91 with 100tkm on the meter.
The carb seals (float bowl seals mainly) can be reused if they are not damaged. Do not pry them out of the grooves if they seem OK as they will possibly stretch making them unreusable.
You should not need compressed (canned) air, a compressor would be nice to have but NOT a necessity. Get a can or two of crab cleaner spray, the pressure of the jet will be enough.
If you don`t remove the carbs from each other you shouldn`t need to sync them.
Dude, if you already took the drain screws off and there was enough nastiness to soil the tips of the valves, you REALLY, REALLY should take the carbs off and clean the float bowls, and the jets!
Keep in mind that if you take parts off from the carbs, keep them in INDIVIDUAL bowls so every single part goes back to the exact same carb they came from, for example the main jets in the two center carbs are different (bigger) than the ones in the sides to aid in keeping the center cylinders a little bit cooler.
Your problem is this thingumabob here, the float needle valve. This cuts out the fuel flow to the carb bowl once it`s filled enough. The pic is not from a CBR float or valve but they all look more or less the same. If this thing gets gunked up, the tip gets damaged or it gets seized (it`s spring operated) it doesn`t cut the fuel resulting in overflow.
Last edited by Mattson; 02-20-2016 at 04:53 PM.
#18
02-22-2016, 12:31 AM
Join Date: Feb 2016
Posts: 15
Likes: 0
Received 0 Likes
on
0 Posts
Ye i was thinking the same thing when i saw the fuel screws condition!
Sound advice, nice one!
I better find a big bottle of acetone to soak stuff in then! ...hmm i wonder if i can soak the carbs in the acetone without taking them apart completely.... might be rubber parts in there hidden away right?
Il give it my best shot and get back to ya later!
-cheers
Sound advice, nice one!
I better find a big bottle of acetone to soak stuff in then! ...hmm i wonder if i can soak the carbs in the acetone without taking them apart completely.... might be rubber parts in there hidden away right?
Il give it my best shot and get back to ya later!
-cheers
#19
03-18-2016, 06:27 PM
Join Date: Feb 2016
Posts: 15
Likes: 0
Received 0 Likes
on
0 Posts
Your problem is this thingumabob here, the float needle valve. This cuts out the fuel flow to the carb bowl once it`s filled enough. The pic is not from a CBR float or valve but they all look more or less the same. If this thing gets gunked up, the tip gets damaged or it gets seized (it`s spring operated) it doesn`t cut the fuel resulting in overflow.
hi guys... finally got back to sorting the bike. (life distractions here)
right....
I got the carbs off eventually (had to borrow a crowbar from a friend to get them off!!) ...anyways, carb no. 1 and 3 were nasty inside, but needle valves seem ok... so i dont know why carbs are flooding! ....soo i will still go ahead and clean them!
unfortunately the screws on the float bowls and diaphrams were overtightened/old so when i tried to open them the soft metal just melted/came away... so il have to buy new screws all-round, and also an air filter as it fell apart when i checked it.
1. ive got the metal parts (3 jet bits for each carb) soaking in carb cleaner for 2days now, and the rest (floats n pin-valves) in fresh petrol.
2. the carb body ive actually left it in 8L of cola and lemon juice.... apparently this is a good cleaner and obv wont affect rubber parts.
3. I will then remove the carb body from there and use carb cleaner on important metal parts...
4. Then i wasnt sure if the carb cleaner will evaporate off enough, so i was then going to soak the carb body in hot water w strong washing up liquid, for a night.
...then change the water for PLAIN water to flush any contaminants out.
...air dry for a couple days or more.
...reassemble carbs and put back on bike (praying no problems here).
Hope my procedure of cleaning is ok.
i do have pics, but i think you guys understand everything hehe!
il report back with results shortly!
ERRR can i ask, i loosened the 4 diaphragm caps only, but didnt open them yet.... is it ok to leave them alone generally? (i dont want to risk getting them out/damaging them).
Oh, and can i apply carb cleaner to these?? (i think it would harm the plastic surely?)
cheers muchos!
Last edited by blinky; 03-18-2016 at 06:28 PM. Reason: correction
#20
03-21-2016, 01:39 PM

Didnt read all the replys but same thing happened to me had to replace o rings on the carbs. The little ones that are located where the fuel goes in. Theres four, hace to carefully take carbs off then slide them a little of the screws just enough to seperate and pull the plastic piece off.. just watch you dont lose any springs.