Whats this little key like thing with new OEM CCT
#11
 05-10-2010, 08:55 AM


Join Date: Apr 2010
Posts: 12
Likes: 0
Received 0 Likes
on
0 Posts
lol, with the right tools and some patience (key word - patience) it went pretty good, not really all that difficult. here is a copy (cached, cause the sight was down) of a good instruc with pics.
Ok here is my 1st post on CBRWorld.net.... hope this helps you guys out. Any other questions about F4i's or CBR's just ask.
I did another CCT this weekend and thought id give my how-to with some pics to help describe it.
NOTE: Im not responsible if any mistakes are made, always consult with your dealership if you are not sure about something.
Tools:
I use a 1/4 inch extension with a 45 degree attachment. On the end of that I have a socket that will hold the 5mm alan key. I also wrap the alan key with tape onto the socket so it wont come out of it and drop somewhere in the bike.

Step 1:
Important: Have your bike on some stands where the wheel will not move. Have the bike in Neutral when performing this and do not move the chain or wheel.
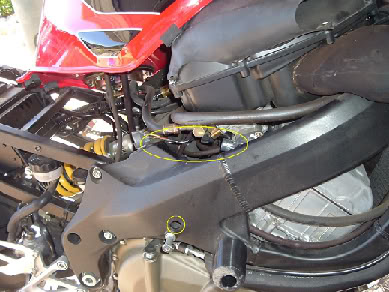
Remove the right fairing and air intake cover. Lift the tank and just rest it on the air box so it is out of the way.
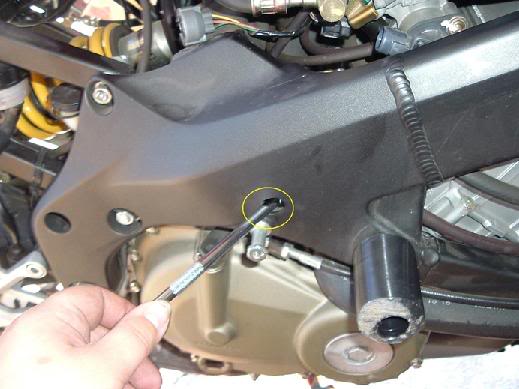
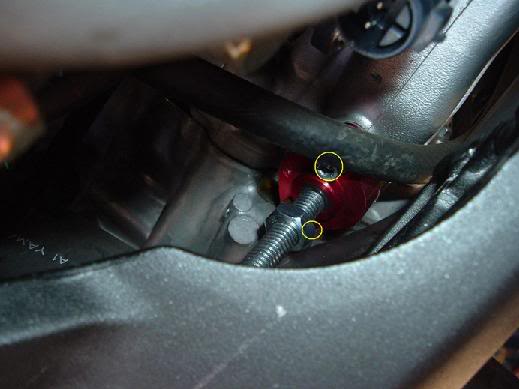
The big yellow circle is where you will need to do most of the work at. Its between the airbox and the frame. The little yellow circle is where you put the tool through the frame at an angle to get to the bottom bolt holding the CCT on.
Step 2:
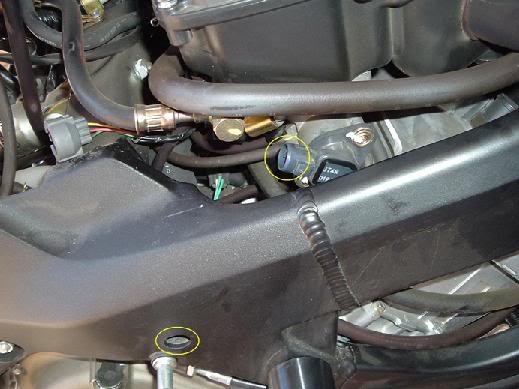
Unplug this part of the harness so you can get to the CCT, dont forget to plug this back in when youre all done or your bike will sound and feel like its running on 2 cylinders.
Here is another shot of where the hole in the frame is to get to the bottom bolt.
Step 3:
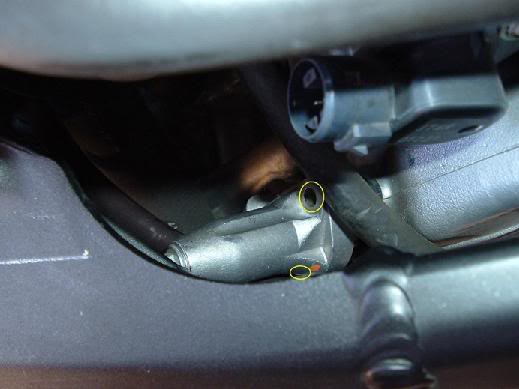
Here is the automatic Cam Chain Tensioner. You can see where the top bolt was and right below that is the bottom bolt.
Step 4:
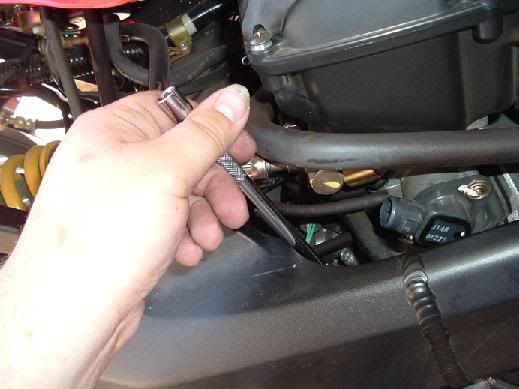
Here is the angle that you will use to get the top bolt off. Be patient and use your finger to guide the alan key into the bolt, once on and snug you can attach the ratchet to the extension and start turning. NOTE: Make sure you are using a 5mm metric alan key, if not the standard one WILL strip the bolt and then youre in major trouble.
Step 5:
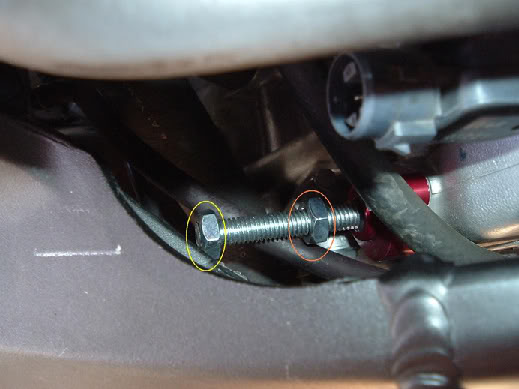
Here is the angle that you will use to get the bottom bolt off. Same thing here, use your finger to guide the alan key into the bolt, once on and snug you can attach the ratchet to the extension and start turning.
Step 6:
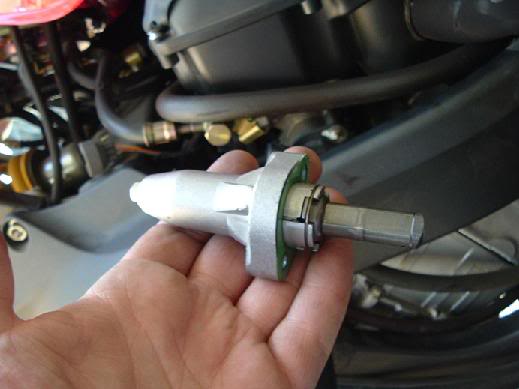
Once the bolts are out go ahead and pull the CCT out. This is what it should look like. NOTE: Notice that the stock gasket came off with this one. If it didnt come off with it, or has part of it still stuck to the engine, you will need to scrape that off so the new gasket will seal correctly.
Step 7:
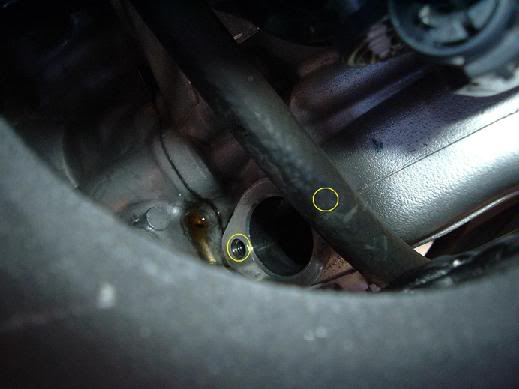
Here is the hole where the CCT was.
Step 8:
Back the Tension bolt all the way out and have the middle bolt about halfway. Make sure the rubber ring is about halfway too because if its sealed in the CCT already its hard to tighten the tensioner bolt.
I use some gasket seal to hold the gasket on to the CCT.
This is the APE Manual CCT from APE:
http://www.cbrzone.com/sprockets.html
You can order this from them by going to the website. Make sure you get the gasket.
Step 9:
Here is the manual CCT connected to the bike. Use the same techniques to put this on as you used to take the automatic CCT off.
Step 10:
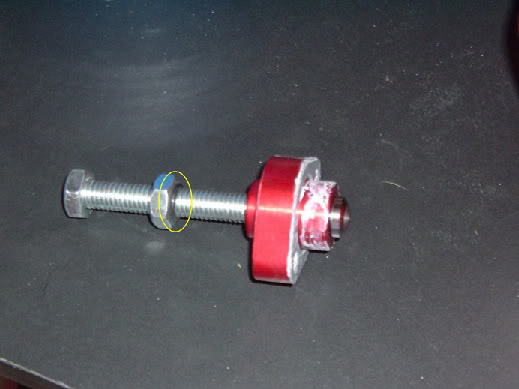
Tighten the "yellow" tensioner bolt with your hand or a tool until you feel it start to get a little snug. I then back it out a 1/4 of a turn and start the bike. Hold the bolt so it wont back out from vibration. You should notice that the noise is gone when revving the engine. If you hear a "pinging" sound it could be too tight, back it out some more. If you hear the normal CCT "cling cling" sound tighten some. This step could take a few tries getting to the correct tension, but once you have it in the right spot it should sound smooth all the way.
Once you have found the right tension, tighten the locking nut. This part could frustrate you but just take your time with an open end wrench. I also use some type of lock-tite to help.
Once this has been done youre good to go, put your bike back together and take it for a test run.
GOOD LUCK
~JDUB~
UPDATE:
Very important!
A very technical and intellegent source stated if the bike is older or the cam chain is really lose: Before you start, you have to get the crank positioned to TDC on #1.
JDUB
Ok here is my 1st post on CBRWorld.net.... hope this helps you guys out. Any other questions about F4i's or CBR's just ask.
I did another CCT this weekend and thought id give my how-to with some pics to help describe it.
NOTE: Im not responsible if any mistakes are made, always consult with your dealership if you are not sure about something.
Tools:
I use a 1/4 inch extension with a 45 degree attachment. On the end of that I have a socket that will hold the 5mm alan key. I also wrap the alan key with tape onto the socket so it wont come out of it and drop somewhere in the bike.
Step 1:
Important: Have your bike on some stands where the wheel will not move. Have the bike in Neutral when performing this and do not move the chain or wheel.
Remove the right fairing and air intake cover. Lift the tank and just rest it on the air box so it is out of the way.
The big yellow circle is where you will need to do most of the work at. Its between the airbox and the frame. The little yellow circle is where you put the tool through the frame at an angle to get to the bottom bolt holding the CCT on.
Step 2:
Unplug this part of the harness so you can get to the CCT, dont forget to plug this back in when youre all done or your bike will sound and feel like its running on 2 cylinders.
Here is another shot of where the hole in the frame is to get to the bottom bolt.
Step 3:
Here is the automatic Cam Chain Tensioner. You can see where the top bolt was and right below that is the bottom bolt.
Step 4:
Here is the angle that you will use to get the top bolt off. Be patient and use your finger to guide the alan key into the bolt, once on and snug you can attach the ratchet to the extension and start turning. NOTE: Make sure you are using a 5mm metric alan key, if not the standard one WILL strip the bolt and then youre in major trouble.
Step 5:
Here is the angle that you will use to get the bottom bolt off. Same thing here, use your finger to guide the alan key into the bolt, once on and snug you can attach the ratchet to the extension and start turning.
Step 6:
Once the bolts are out go ahead and pull the CCT out. This is what it should look like. NOTE: Notice that the stock gasket came off with this one. If it didnt come off with it, or has part of it still stuck to the engine, you will need to scrape that off so the new gasket will seal correctly.
Step 7:
Here is the hole where the CCT was.
Step 8:
Back the Tension bolt all the way out and have the middle bolt about halfway. Make sure the rubber ring is about halfway too because if its sealed in the CCT already its hard to tighten the tensioner bolt.
I use some gasket seal to hold the gasket on to the CCT.
This is the APE Manual CCT from APE:
http://www.cbrzone.com/sprockets.html
You can order this from them by going to the website. Make sure you get the gasket.
Step 9:
Here is the manual CCT connected to the bike. Use the same techniques to put this on as you used to take the automatic CCT off.
Step 10:
Tighten the "yellow" tensioner bolt with your hand or a tool until you feel it start to get a little snug. I then back it out a 1/4 of a turn and start the bike. Hold the bolt so it wont back out from vibration. You should notice that the noise is gone when revving the engine. If you hear a "pinging" sound it could be too tight, back it out some more. If you hear the normal CCT "cling cling" sound tighten some. This step could take a few tries getting to the correct tension, but once you have it in the right spot it should sound smooth all the way.
Once you have found the right tension, tighten the locking nut. This part could frustrate you but just take your time with an open end wrench. I also use some type of lock-tite to help.
Once this has been done youre good to go, put your bike back together and take it for a test run.
GOOD LUCK
~JDUB~
UPDATE:
Very important!
A very technical and intellegent source stated if the bike is older or the cam chain is really lose: Before you start, you have to get the crank positioned to TDC on #1.
JDUB
#12
05-10-2010, 09:46 AM

Senior Member
Join Date: Jun 2008
Location: middle TN
Posts: 418
Likes: 0
Received 0 Likes
on
0 Posts
Just for the record, APE recommends 3/8" slack between the cams. After installation, rotate engine by hand through a few revolutions and check slack again. I realize that's a monumental task on today's sportbikes due to room. But if you're OCD about camchain slack (and I am) it's good way to know it's right. Nice write up!!!
#13
05-10-2010, 01:27 PM
Join Date: Apr 2010
Posts: 12
Likes: 0
Received 0 Likes
on
0 Posts
Just for the record, its not my write up. Its one I found here: http://www.bayarearidersforum.com/fo...threadid=81780
when I was looking for how to change it out.
when I was looking for how to change it out.
#14
05-10-2010, 03:20 PM
Senior Member
Join Date: Jun 2008
Location: middle TN
Posts: 418
Likes: 0
Received 0 Likes
on
0 Posts
#15
05-11-2010, 10:07 AM
Join Date: Apr 2010
Posts: 12
Likes: 0
Received 0 Likes
on
0 Posts
i didn't take it that way, sorry if my post "sounded" like that. i just didn't want people to think it was my write up. I actually didn't use the APE one. I just replaced the OEM one, so i don't know anything about the APE specs. its tight enough getting in there let alone trying to adjust the APE one.
#16
05-11-2010, 03:59 PM
Senior Member
Join Date: Jun 2008
Location: middle TN
Posts: 418
Likes: 0
Received 0 Likes
on
0 Posts

Thread
Thread Starter
Forum
Replies
Last Post
Hondaspeedster
New Member Area
5
04-12-2011 01:10 PM