My GSXR tail swap
#1
 09-17-2011, 08:38 PM


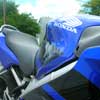
Got to work on my K5 GSXR tail swap today. I have seen others use the GSXR tail on 929s and such bikes, being very pleased with the results. Since I didn't like either the stock F4 or F4i tails, I decided to give the GSXR tail a shot on my F4.
Initial thought (knowing nothing is this easy) was to just use a K5 tail and drivers seat, hoping it would just "sit right" and "look right"...... yeah..... sure..... and I'm going to win the lottery tonight....
Right off I realized the F4 subframe isn't going to work under the K5 tail as it's too wide and runs at the wrong angles. I'll go get some aluminum 1"x1" Monday and weld up a new subframe.
Next I didn't like the huge gap between the K5 seat/tail and the fuel tank. The K5 tail tapers to a very sharp point and this pointed area does not fit around the fuel tank. So I hacked the stock F4 seat off right behind the driver's portion and over the next couple of hours I swapped back and forth between it and the K5 seat. Cut a bit here, cut a bit there, refit, cut again. Finally I came to the realization that the best thing to to was rip the foam off the F4 seat and just use it for mockup. Perfect fit and looks sharp.
At this point I will have to make a kind of "hybrid" seat pan (the hard support structure that is under the foam) that has the front "winged" section of the F4 and then transitions into the wide/shallow K4 rear section. I'm currently thinking I'll cut the F4 and K5 seat pans and JB weld them together to make a pattern. Once this pattern is fitted correctly, I'll use it as a "mold" and make a fiberglass piece reinforced on the bottom with aluminum sheet.
Here are the pictures of where I got today.

#5
09-18-2011, 12:10 AM

Super Moderator and Official Welcome Crew Yeti
#7
09-22-2011, 03:31 PM
More pictures of the build. I knew I was going to have to modify the stock subframe, however once I got into it I realized the subframe was bent (not surprised since the previous owner had dropped it a few times) and was going to require massive modifications beyond straightening. So it made more since to just toss the stock piece and build a new one.
I was able to make rather nice (hardly any crimping/buckling) bends in 3/4 x 3/4 alumium tubing by using a mapgas torch (have oxy/cetylene but didn't need it for this). Just heated the tube and slowly worked my way along till I had the required curve. This was done due to the GSXR tail requiring a narrower subframe at the front. I plan to keep the pointed joint as it falls right under the "butt" section of the seat so when tied to the bottom rails, it will provide good seat support.
The bottom rails will remain straight and I will run straight sections back from the curves once they are inside the tail. Then I'll have to make brace plates to connect the upper and lower rails so the subframe is boxed.
By using 3/4 x 3/4 and being very conservative with material, I hope to remain equal if not lighter than the stock subframe. That might not be possible, but, it's a goal and goals are fun.

Thread
Thread Starter
Forum
Replies
Last Post