
How To Replace Your Exhaust System - CBR 600F3


Thread Starter
|
Super Moderator
Joined: Aug 2006
Posts: 5,304
Likes: 512
From: South Florida, USA
How to replace the exhaust system on your CBR 600F3
Without getting into the why's of wanting to replace your exhaust, this is a how to on replacing the entire system. Now, this particular project is going FROM a full aftermarket system TO a factory system with a Slip-on. I'm not going to go into why I'm going in this direction and not the other. All I'll say is that when we purchased the bike a couple of years ago, it had a full V&H system and we (my wife and I) were never really happy with it or it's performance. If you're thinking about tackling this job, then I'm going to assume that you know how to remove the fairings, so I'll not be covering that.
Tools Needed and Time
Figure on needing about half to three quarters of a day to complete it. Not that it's that difficult, it's just that there will be some things that always come up unexpectedly. For me, there was a bolt missing for mounting the factory exhaust under the engine, and I left my drill at work.
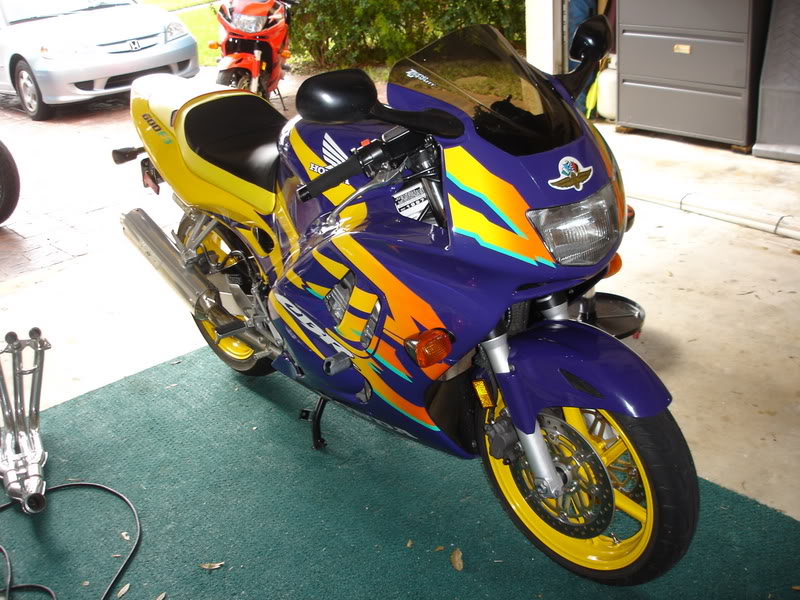
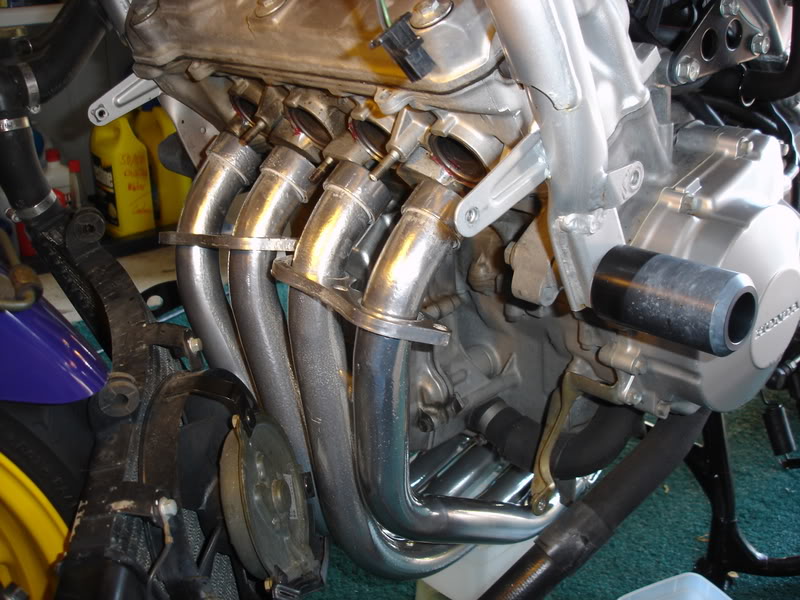
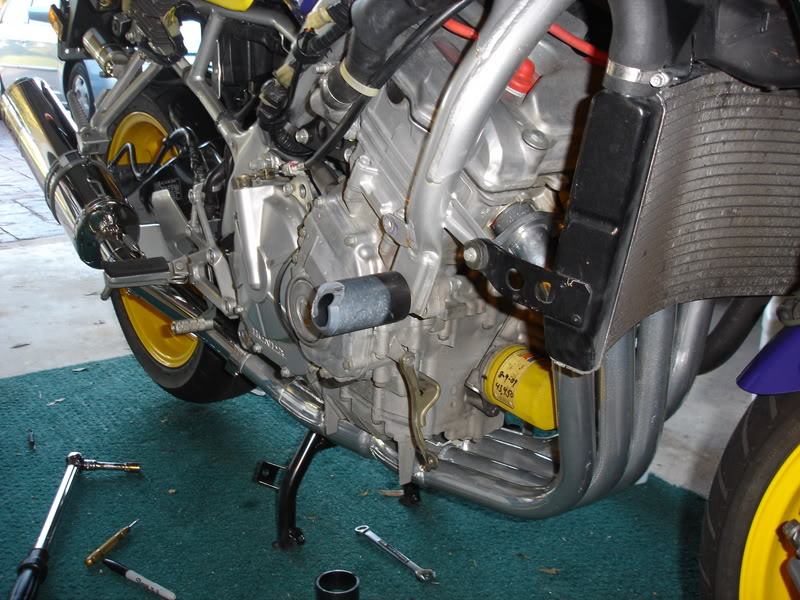
Basically, you're going to need to get most of the fairing off. Start by placing the bike up on a rear paddock stand or if you've got the center stand you can use that. I didn't use the front one because it's easier if you can still turn the front wheel from side to side while working on it. This is how it looks to start with.

Remove the Upper, Lower and Rear fairings. After removal, you're going to want to get the radiator out of the way. You don't need to drain it or anything like that, but it needs to be moved down and out of the way so you can get to the 6 header bolts that attach the headers to the cylinder head.
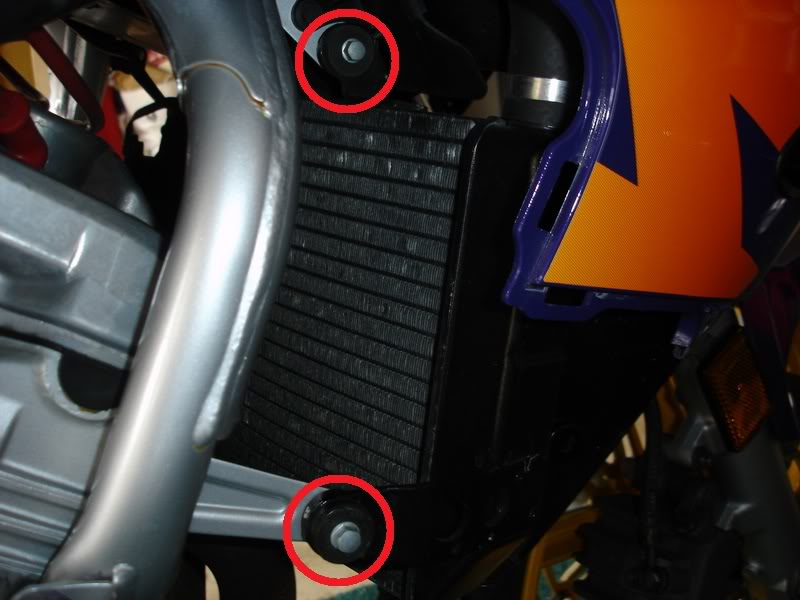
Remove the two 8mm bolts on the right side holding the radiator in place. There is also a place up by the radiator cap where it's hooked. No tools are required to unhook it. (I didn't take a photo of the hook, but it's self explanitory)
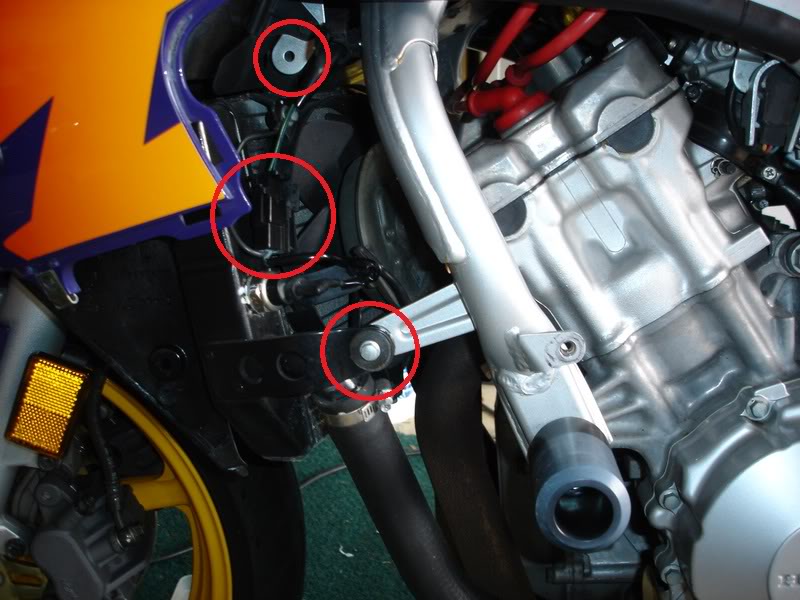
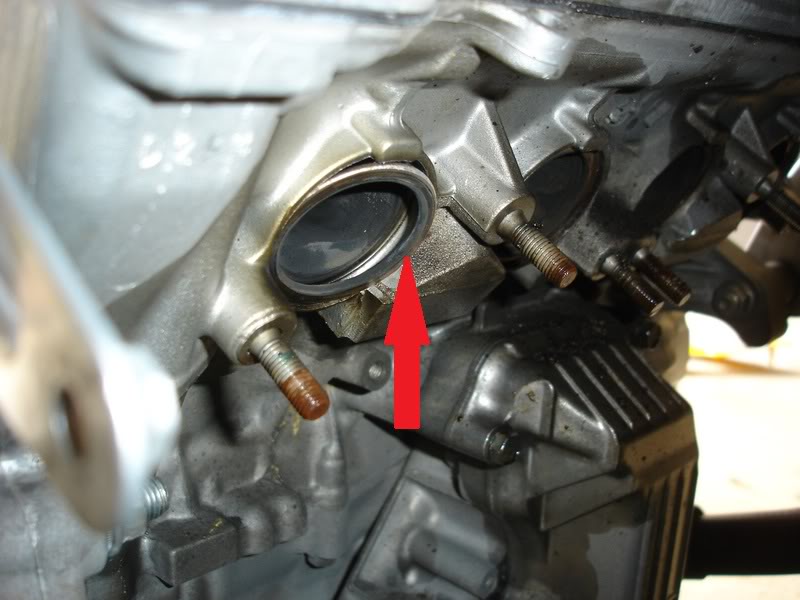
On the left side, there is one 8mm bolt and one electrical connector that needs to be unplugged. After removing these two remaining items, the radiator will slide about 1" to the right and then you can lower it down. The upper circle shows where the radiator just slides off a pin. It's not bolted here.
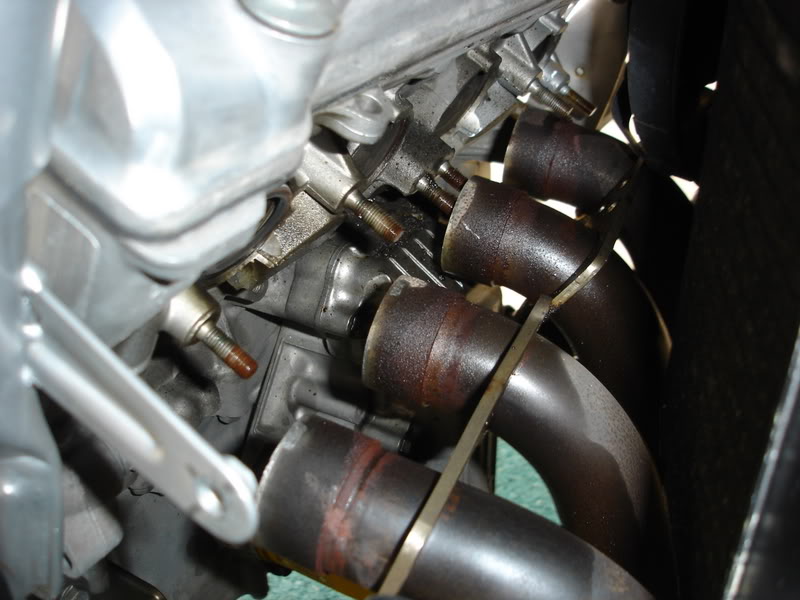
After lowering the radiator, it will look something like this. I'd suggest putting a cloth between the radiator and the front fender to prevent scratching. At this point you're going to want to put a liberal amount of Liquid Wrench on the header bolts. They've probably been there a while and with time and the elements, they can be pretty tough to remove. The goal is to remove the nuts from the studs, leaving the studs in the cylinder head. If the studs unscrew from the head, don't worry, it's not the end of the world. You can remove the nut from the stud and then put the stud back into the head.
Mid way between the front and rear, under the engine is a bolt that supports the exhaust system. Since I'm removing an aftermarket one, it's not used. If you're removing your factory exhaust, then you'll need to remove it.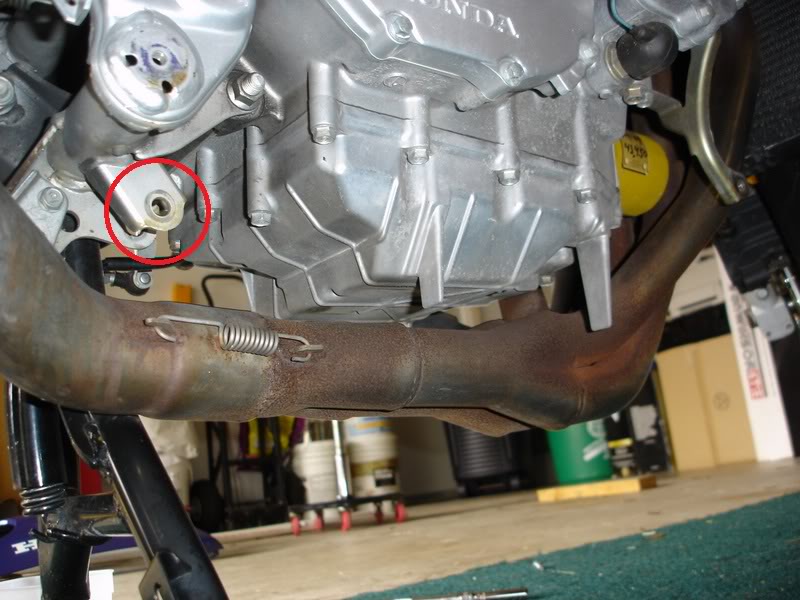
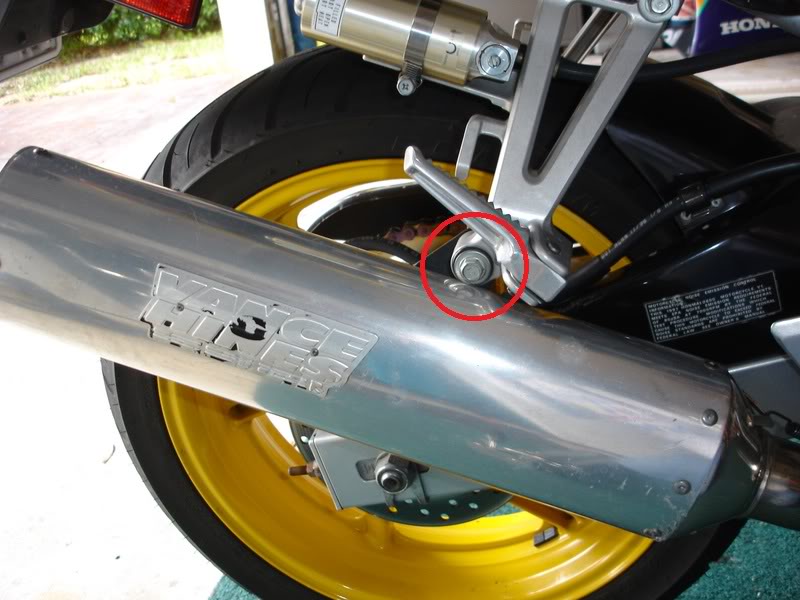
There is also the muffler hanger bolt. I'd remove this one last. When you remove this one, the entire exhaust system will be able to move slightly forward and then the headers will fall off the studs in the front. They drop suddenly so be prepared.
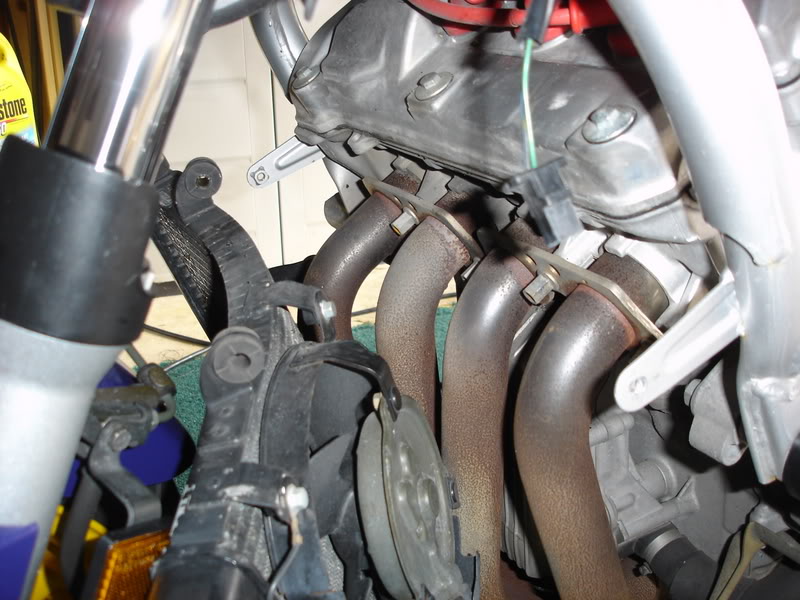
This is the view with the headers removed while they were sitting on the ground after they fell off. Like I said, the fall suddenly.
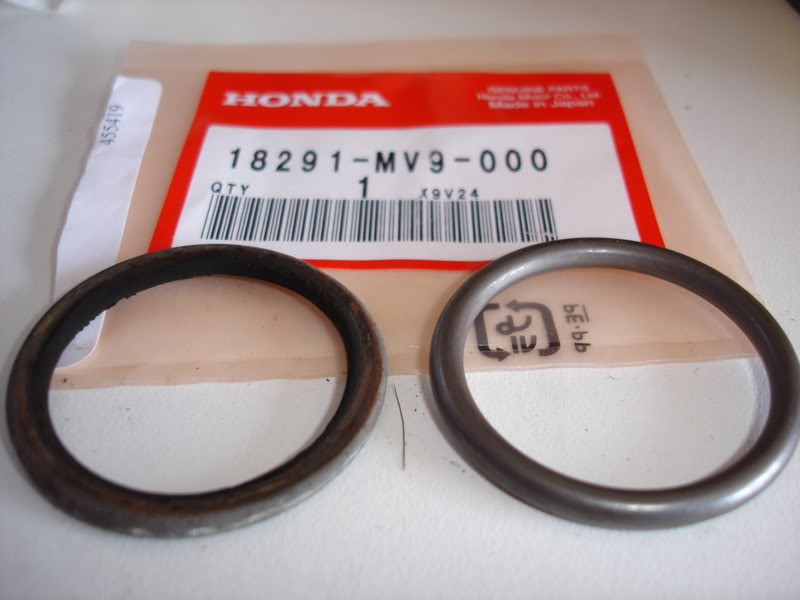
I highly recommend replacing the exhaust header gaskets. They're designed to crush to make a seal between the head and headers as you torque them down. They're only $3 each. Here are the old gaskets.
If you compare the old and new, you get an idea of how they crush down during installation. (the new on is on the right )
Preparation for Installation
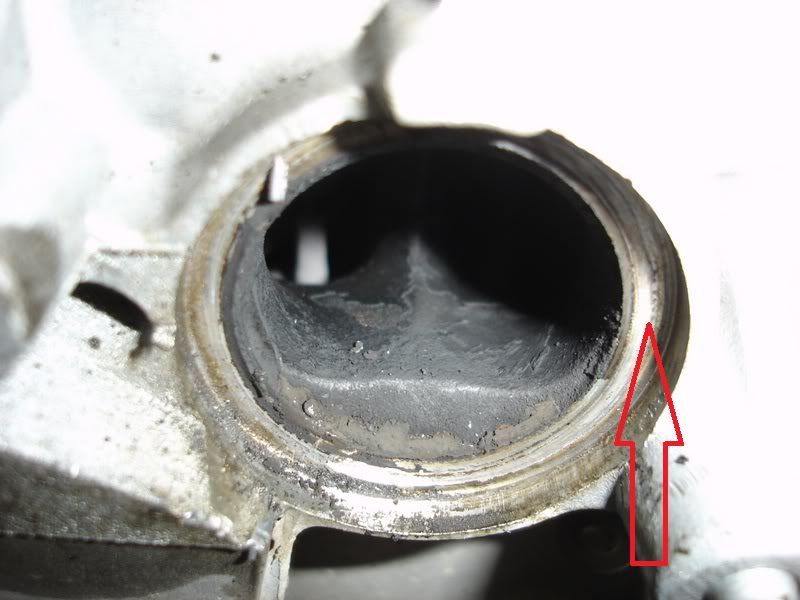
Something you're going to want to do is clean the area where the new gasksts go in. There's going to be a small amount of carbon and other debris on the surface where the gaskets go. Use a ScotchBrite pad to remove any build-up from that area. You want it to be as clean as possible to prevent exhaust leaks. Also clean the threads of the studs as well.
Installation
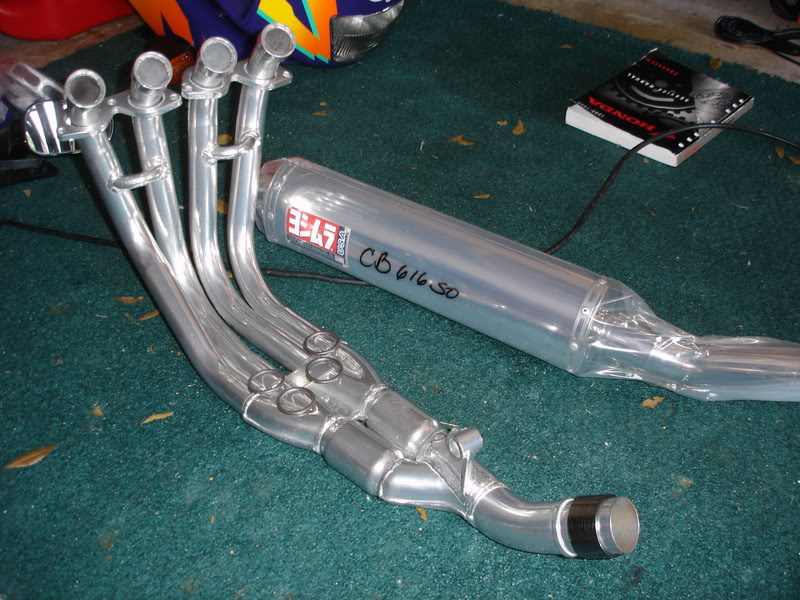
This is what I'm installing. The headers are factory ones that I got off ebay for about $30. I then had them Ceramic Coated for protection and asthetic reasons. It cost about $175 to get this done. The Slip-On is a Yoshimura Stainless RS-3 Oval.

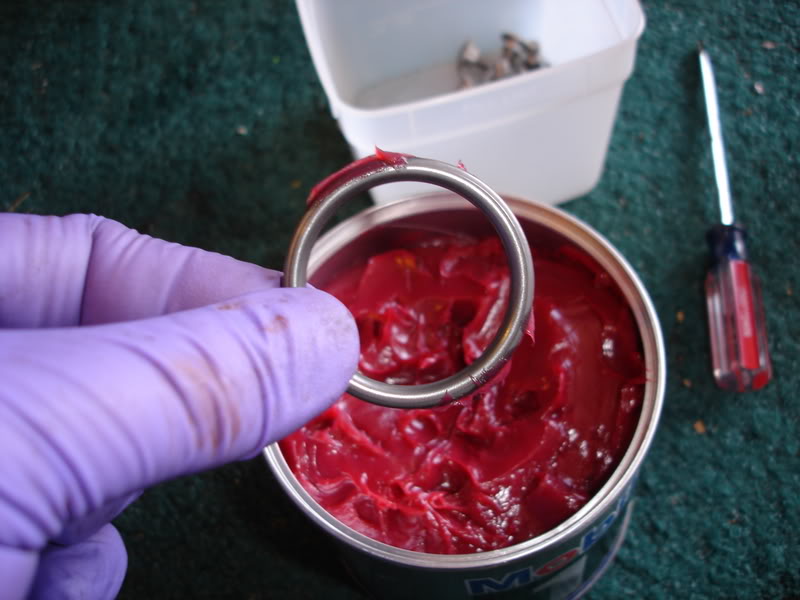
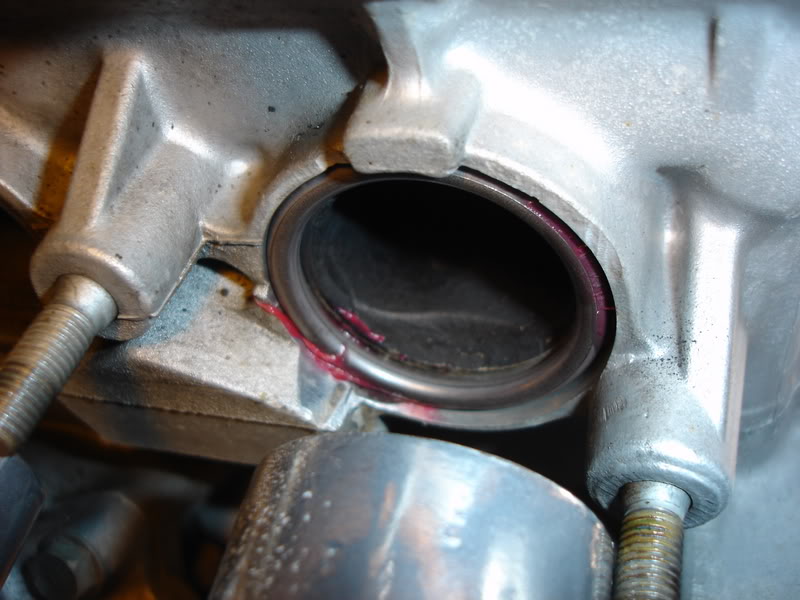
First off, you need to install the new gaskets. The problem is that the location where the go is leaning forward. There is nothing to hold them in place while you try to align the headers. The trick is to put a small amount of grease on opposite sides of the gasket. This will hold them in place while you mount the headers. Not that it matters, but I'm using Mobil-1 Synthetic grease.
It holds them in nicely.
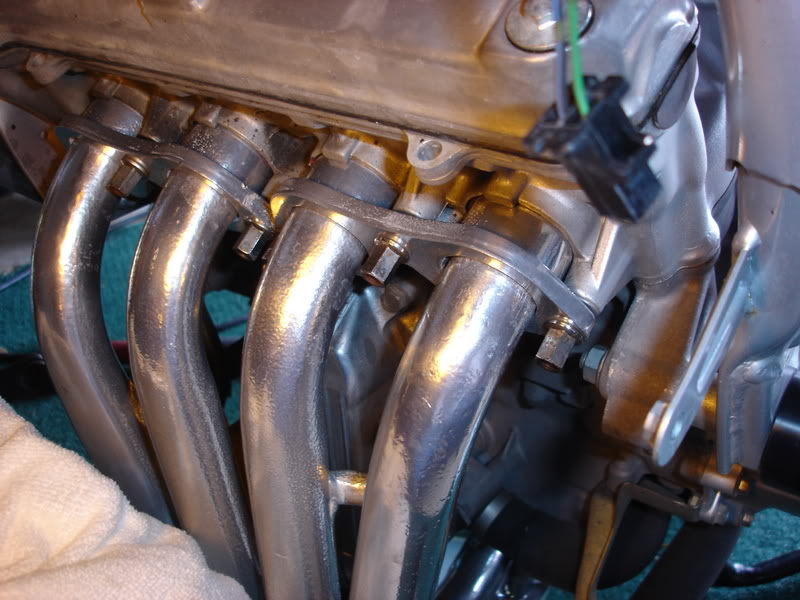
It ends up looking like this after being torqued down to 14' lbs.
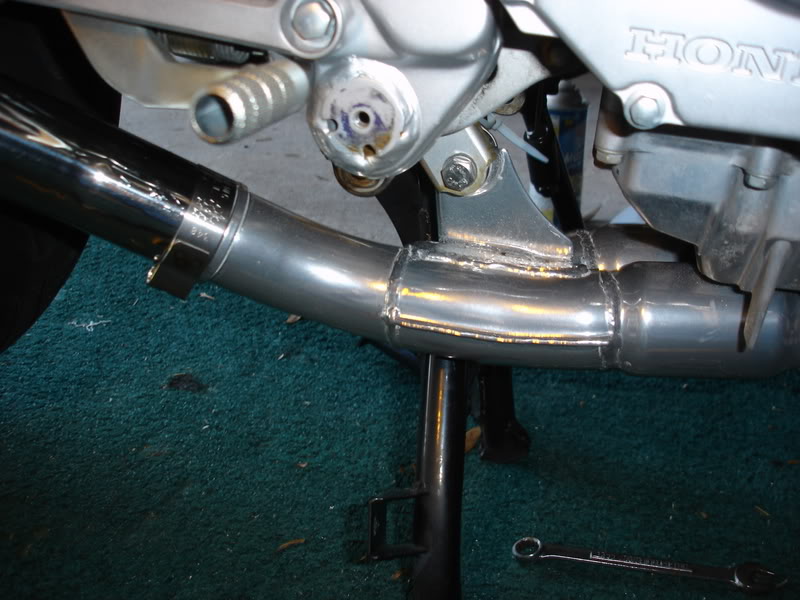
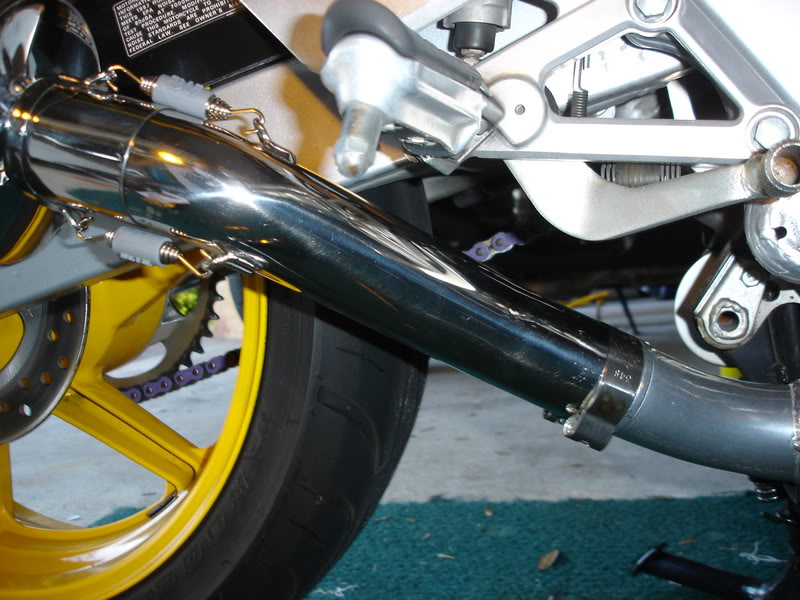
This is the hanger bolt that wasn't on the aftermarket system. I had to go to the hardware store and pick up. I purchased stainless steel hardware so it would withstand the elements. The installation instructions that come with this Slip-on have you drill a hole in the factory exhaust in the center of an opening in the new muffler where the pipe clamp goes. You insert a rivit that's included with the muffler and then put the clamp on, which you can see here in the photo.
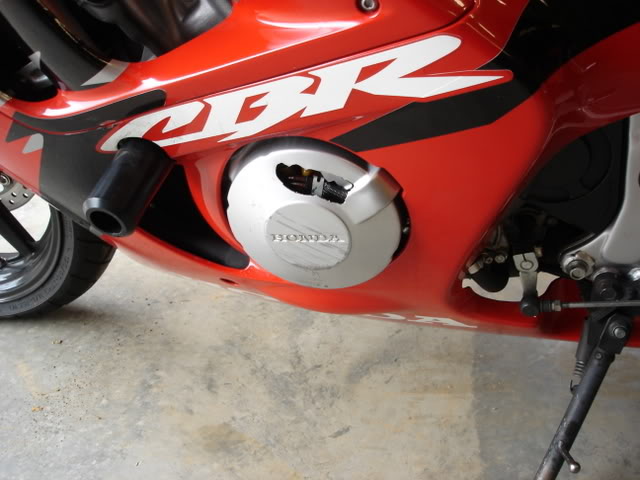
Here the Slip-On is in place looking spectacular.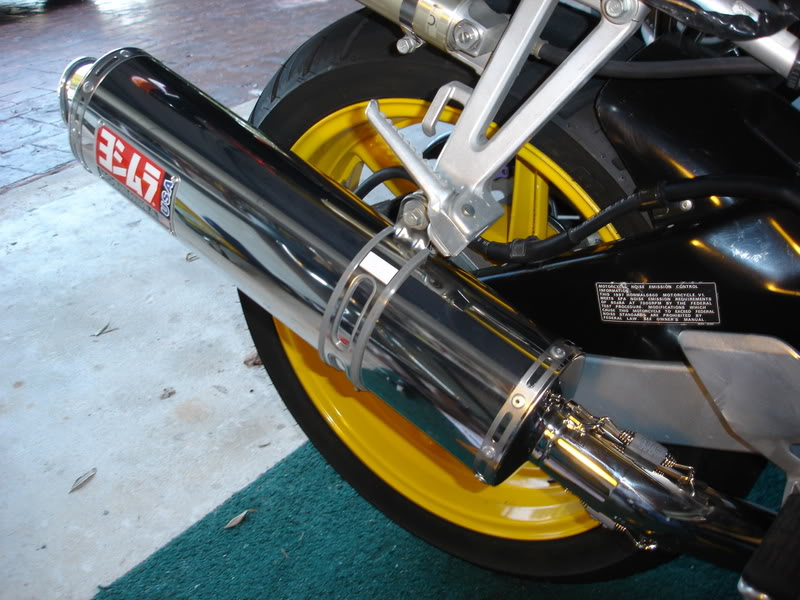
Once you've got the Slip-On installed you put the radiator back up in place and put the three 8mm bolts back in place.

Well, other than putting the fairings back on, that's pretty much all there is to replacing your exhaust system. I've got 2 YouTube vids from before and after. She was a little tough to get started in the before video. Showing signs of a dirty starter switch, but that's another How To. I'll attach them after they've completed uploading.
Here's the before video with V&H
http://www.youtube.com/watch?v=DVKaLKbISW8
Here's the after with the Yoshimura
http://www.youtube.com/watch?v=Oo39eJZBDRU
Good luck on your installation.
Without getting into the why's of wanting to replace your exhaust, this is a how to on replacing the entire system. Now, this particular project is going FROM a full aftermarket system TO a factory system with a Slip-on. I'm not going to go into why I'm going in this direction and not the other. All I'll say is that when we purchased the bike a couple of years ago, it had a full V&H system and we (my wife and I) were never really happy with it or it's performance. If you're thinking about tackling this job, then I'm going to assume that you know how to remove the fairings, so I'll not be covering that.
Tools Needed and Time
Figure on needing about half to three quarters of a day to complete it. Not that it's that difficult, it's just that there will be some things that always come up unexpectedly. For me, there was a bolt missing for mounting the factory exhaust under the engine, and I left my drill at work.
- Variety of sockets - 8mm, 10mm, 12mm
- Screwdrivers
- Allen wrenches - 5mm, 4mm
- Torque wrench
- Drill with 3/16 bit
- Can of liquid wrench
- Grease
- ScotchBrite pad
- Positive Attitude
Basically, you're going to need to get most of the fairing off. Start by placing the bike up on a rear paddock stand or if you've got the center stand you can use that. I didn't use the front one because it's easier if you can still turn the front wheel from side to side while working on it. This is how it looks to start with.
Remove the Upper, Lower and Rear fairings. After removal, you're going to want to get the radiator out of the way. You don't need to drain it or anything like that, but it needs to be moved down and out of the way so you can get to the 6 header bolts that attach the headers to the cylinder head.
Remove the two 8mm bolts on the right side holding the radiator in place. There is also a place up by the radiator cap where it's hooked. No tools are required to unhook it. (I didn't take a photo of the hook, but it's self explanitory)
On the left side, there is one 8mm bolt and one electrical connector that needs to be unplugged. After removing these two remaining items, the radiator will slide about 1" to the right and then you can lower it down. The upper circle shows where the radiator just slides off a pin. It's not bolted here.
After lowering the radiator, it will look something like this. I'd suggest putting a cloth between the radiator and the front fender to prevent scratching. At this point you're going to want to put a liberal amount of Liquid Wrench on the header bolts. They've probably been there a while and with time and the elements, they can be pretty tough to remove. The goal is to remove the nuts from the studs, leaving the studs in the cylinder head. If the studs unscrew from the head, don't worry, it's not the end of the world. You can remove the nut from the stud and then put the stud back into the head.
Mid way between the front and rear, under the engine is a bolt that supports the exhaust system. Since I'm removing an aftermarket one, it's not used. If you're removing your factory exhaust, then you'll need to remove it.
There is also the muffler hanger bolt. I'd remove this one last. When you remove this one, the entire exhaust system will be able to move slightly forward and then the headers will fall off the studs in the front. They drop suddenly so be prepared.
This is the view with the headers removed while they were sitting on the ground after they fell off. Like I said, the fall suddenly.
I highly recommend replacing the exhaust header gaskets. They're designed to crush to make a seal between the head and headers as you torque them down. They're only $3 each. Here are the old gaskets.
If you compare the old and new, you get an idea of how they crush down during installation. (the new on is on the right )
Preparation for Installation
Something you're going to want to do is clean the area where the new gasksts go in. There's going to be a small amount of carbon and other debris on the surface where the gaskets go. Use a ScotchBrite pad to remove any build-up from that area. You want it to be as clean as possible to prevent exhaust leaks. Also clean the threads of the studs as well.
Installation
This is what I'm installing. The headers are factory ones that I got off ebay for about $30. I then had them Ceramic Coated for protection and asthetic reasons. It cost about $175 to get this done. The Slip-On is a Yoshimura Stainless RS-3 Oval.
First off, you need to install the new gaskets. The problem is that the location where the go is leaning forward. There is nothing to hold them in place while you try to align the headers. The trick is to put a small amount of grease on opposite sides of the gasket. This will hold them in place while you mount the headers. Not that it matters, but I'm using Mobil-1 Synthetic grease.
It holds them in nicely.
It ends up looking like this after being torqued down to 14' lbs.
This is the hanger bolt that wasn't on the aftermarket system. I had to go to the hardware store and pick up. I purchased stainless steel hardware so it would withstand the elements. The installation instructions that come with this Slip-on have you drill a hole in the factory exhaust in the center of an opening in the new muffler where the pipe clamp goes. You insert a rivit that's included with the muffler and then put the clamp on, which you can see here in the photo.
Here the Slip-On is in place looking spectacular.
Once you've got the Slip-On installed you put the radiator back up in place and put the three 8mm bolts back in place.
Well, other than putting the fairings back on, that's pretty much all there is to replacing your exhaust system. I've got 2 YouTube vids from before and after. She was a little tough to get started in the before video. Showing signs of a dirty starter switch, but that's another How To. I'll attach them after they've completed uploading.
Here's the before video with V&H
http://www.youtube.com/watch?v=DVKaLKbISW8
Here's the after with the Yoshimura
http://www.youtube.com/watch?v=Oo39eJZBDRU
Good luck on your installation.
Last edited by IDoDirt; Feb 14, 2010 at 06:08 PM. Reason: Added YouTube Links

Senior Member
Joined: Jul 2009
Posts: 4,471
Likes: 4
From: West Philly, PA!
Heh, your wife needs a new frame slider.
Dude, can we hire you to clean a bike? Hell I'll ride down to Florida, pay whatever you like and play mechanic's helper. That bike's engine and frame are cleaner than my kitchen table
Dude, can we hire you to clean a bike? Hell I'll ride down to Florida, pay whatever you like and play mechanic's helper. That bike's engine and frame are cleaner than my kitchen table
Thread Starter
|
Super Moderator
Joined: Aug 2006
Posts: 5,304
Likes: 512
From: South Florida, USA

Senior Member
Joined: Jul 2009
Posts: 4,471
Likes: 4
From: West Philly, PA!

Yes, I'm competitve


Senior Member
Joined: Sep 2009
Posts: 242
Likes: 1
From: FL
in that picture you have what looks to be the piece im missing!! what is the gasket deal you have on the end of the header pipes where the mid pipe slips on and clamps down? the yoshi rs-3 pipe i got needs something just like that for the mid pipe, i have an exhaust leak until i figure it out...
Thread Starter
|
Super Moderator
Joined: Aug 2006
Posts: 5,304
Likes: 512
From: South Florida, USA

in that picture you have what looks to be the piece im missing!! what is the gasket deal you have on the end of the header pipes where the mid pipe slips on and clamps down? the yoshi rs-3 pipe i got needs something just like that for the mid pipe, i have an exhaust leak until i figure it out...
Senior Member
Joined: Sep 2009
Posts: 242
Likes: 1
From: FL
That is the factory gasket that I mistakenly thought I needed. I figured that the Yoshimura would need it to attach to the factory header. It did not need it, in fact it wouldn't fit on the factory header pipe with it. I left it off. You should just make sure that your mid pipe is slid all the way up to the stop. You can see the clamp is over the rivet and up against the stop on the factory pipe. Also make sure it's torqued down to spec, 9' lbs.

also i dont know if its the length of the midpipe or what, but does your canister sit up against the swingarm?