
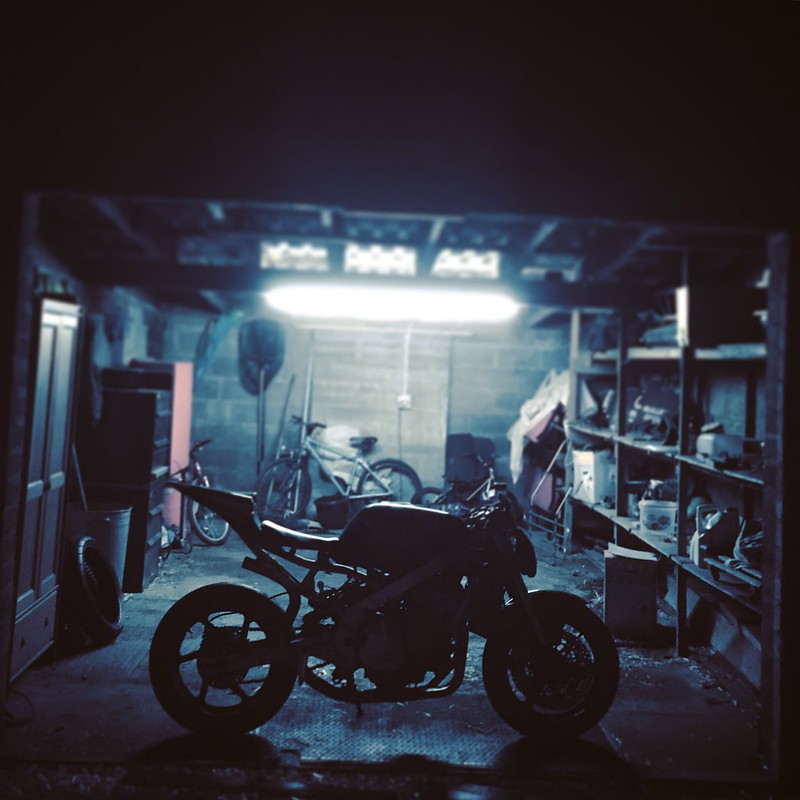
build time! P=


Thread Starter
|
Senior Member
Joined: Dec 2013
Posts: 247
Likes: 11
From: Scotland
safer not saying haha but yeah for sure man. i guess the positive is that it's giving me the time to get things right and not just rush to get it finished. need to stop juggling projects to keep resources focused on one thing at a time and make life a bit easier. easier said than done though right haha
Thread Starter
|
Senior Member
Joined: Dec 2013
Posts: 247
Likes: 11
From: Scotland
wee update.
tails well on its way, but lesson learned, it's difficult trying to get things straight when you don't have a straight edge, the tank doesn't seem to sit perfectly true, the subframe which was never perfect from the factory is 20yr old, it's probably been dropped at some point in its life and you've already cut and bent it. lots of trial and error. apparently in the factory their manufacturing tolerance is up to 5mm when fabricating which is quite a bit i reckon.
in the pics the rear wheel isn't straight, the tank isn't quite true either or it could be that the subframe is slightly off to one side, it's marginal and wont be seen once the tails straight but it makes it difficult to get things straight.
if i were to do this again i'd use this method for a single seat or race tail but for retaining pillion seat function i'd just buy a goddamn overpriced subframe, currently about �250 for an rr7 subframe in the uk... almost worth the time saving but still way too expensive.
ordered up the remaining parts for the swingarm swap too. ii'll post the bits up once i've confirmed compatibility.
^ that was the first attempt. good lines but i just couldnt get the seat and tail to work quite right. not going to post all the trial and error but thats a cool pic.
Last edited by iamhiding; Feb 8, 2018 at 08:10 AM.


Super Moderator
Joined: Oct 2013
Posts: 596
Likes: 21
From: Calgary, Canada
Looking good. Fabricate vs purchase is a question old as time - for what it's worth, I wouldn't sweat it too much so long as you can get wheel alignment
It's pretty unlikely that anyone would ever notice
It's pretty unlikely that anyone would ever notice
Thread Starter
|
Senior Member
Joined: Dec 2013
Posts: 247
Likes: 11
From: Scotland
it's kind of oldschool having an undertail exhaust routed that way, seems to be a like it or hate it kinda thing but i dig it. think it's going to interfere with having the battery under the seat without some fabrication though and possibly the rear brake line. see what happens. initially i'll just use a normal link and can or do an under engine can.
Thread Starter
|
Senior Member
Joined: Dec 2013
Posts: 247
Likes: 11
From: Scotland
ain't it the truth haha i'm all for fabricating in theory but if i could weld rather than just tack it up and wasn't using a gasless mig it would be a bit more feasible, it's crazy time consuming! to be fair it's my first proper tail swap, gotta learn one way or another.
Thread Starter
|
Senior Member
Joined: Dec 2013
Posts: 247
Likes: 11
From: Scotland
upon further looking the the tip of the tail is significantly offset to the left. if you look at the head on pic you'll see it's just that little bit off to the right. i'll need to investigate it further but i suspect the whole subframe is just that little bit off to one side.
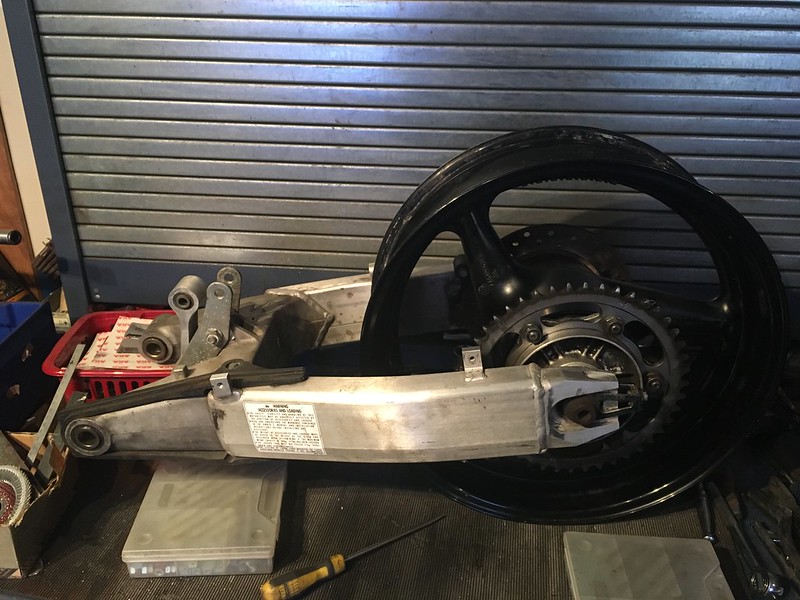
anyway here is the swingarm bits for when the tails done.
99-00 F4 alloy swingarm, shock linkage and brake carrier. brake carrier uses the same 90mm bolt spacing as the f3 etc should be about 1kg lighter than the f3 steel arm.
2006 F4i rear wheel, sprocket carrier axle and spacers. the later f4i wheels are slightly lighter than the f4/early f4i i've read but likely slightly heavier than f3 wheel due to being 17x5.5 rather then 17x5.0, the 180 tyre will add weight too f4i is a good visual match to the 929 3 spoke front. i'll miss the 5 spoke look but at least it's consistent now.
the missing part of the puzzle is going to be getting a sleeve made up to reduce the swingarm pivot down to match the f3 bolt and cutting enough of the swingarm down to squeeze it in the f3 frame and getting the chain run straight.
looks damn meaty vs the f3 arm! i think you could very easily make this arm work with the f3 wheel as the parts fiche shows many parts being the same as f4.
Thread Starter
|
Senior Member
Joined: Dec 2013
Posts: 247
Likes: 11
From: Scotland
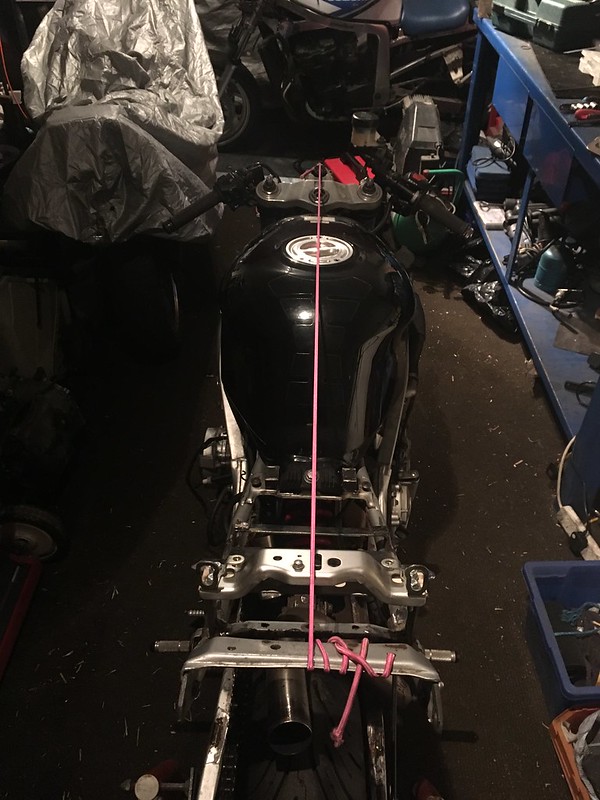
so... bikes been moved workshop several times, been distracted with other projects and stuck waiting on people. just life getting in the way, you's know the score. but here we go some progress pics of the tail. lost access to my old flickr and ive lost a bunch of photos too. turns out its a nightmare to post from a mobile too but finally have computer access. the build continues.
found someone else with the time to help finish up the welding/fabricating after i tacked it all up, tail is finally mounted properly, batterybox made and fitted, electrics tray fitted, alloy undertray v1 made up.
this post is more a photo dump

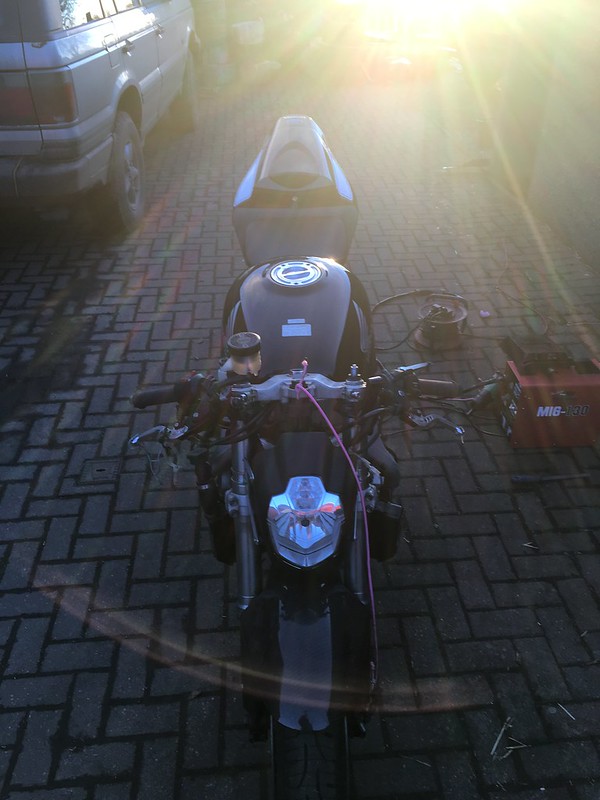
soooo. lightweight battery in a very heavy little steel box. since changed plans and wont be using the box or planned location. its tedious stashing batteries on these bikes.
battery is 700 grams! hoping to get the bike around 180-185 kg wet weight.


^ you can just make out my battery box in the factory location here but it just doesnt look right being so exposed.


^ prototype to see how it was going to work. tail and subframe shape proved to be difficult to work with but trial and error. integrated brake light looks savage though.

top electrics tray. not the same tray seen from the bottom of the tail.

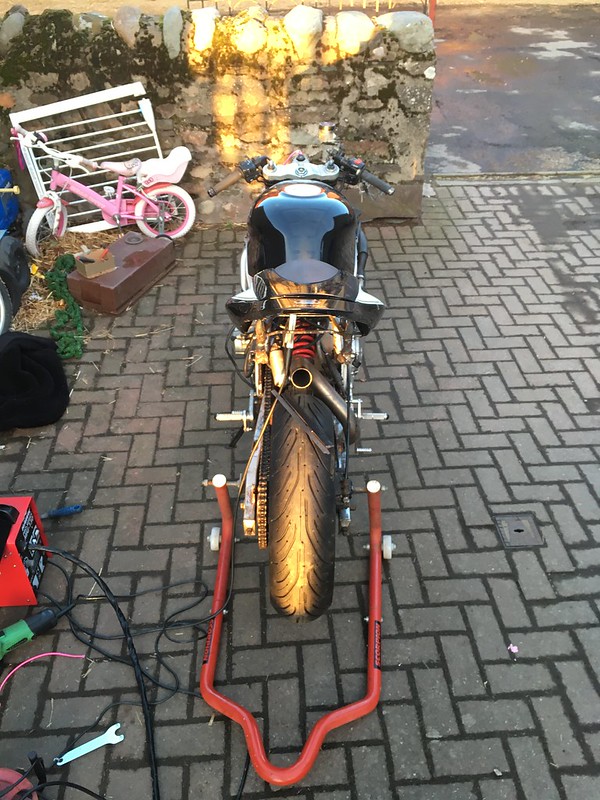
seat angle an overlap in relation to the tail was a particularly tricky thing to get right.

not a flattering angle but its on... the right shape, things are pretty lined up and its straight. the taile angle looks extreme but the bars are quite low being under the top yoke but it flows very well with the bike shape.
a sea of brackets and a world of tweaking things. move one thing... have to adjust another to suit. I did the prototyping to get everything sitting as id like it and tacked it in place, thats where my welding ability ends and im hella grateful for a friend welding it in fully and spending the time to chase out the finer details. anyone who's attempted a tail swap this way whilst radically changing the subframe and retaining passenger carrying ability will appreciate just how much work it is. for more involved swaps like this... i highly recommend using the appropriate subframe or cutting it all off and starting from scratch. if it were a basic race tail deal without having to think about functionality of certain things this wouldve been a piece of cake.
so.
got an electrics tray sitting on the top spar. going to lower it to the bottom of the top spar and itll allow me to mount the battery in the tail. didnt want to put the weight up high but its only 700g and it looks weird mounted in factory location with an open subframe.
v1 alloy undertray will do for now but im going to fabricate one from abs for weight savings and fit it to the bottom of the top spar rather than the bottom spar and open the subframe area up more. wont need it to protect the battery as the battery is moving too.
need to fabrcate infill panels for the tank/seat gap but that wont stop me getting it on the road for now.
need to make a front seat hook to slide under the tank to stop it lifting up easy.
some tweaks to make yet but provisionally the tail swap is functional!
found someone else with the time to help finish up the welding/fabricating after i tacked it all up, tail is finally mounted properly, batterybox made and fitted, electrics tray fitted, alloy undertray v1 made up.
this post is more a photo dump
soooo. lightweight battery in a very heavy little steel box. since changed plans and wont be using the box or planned location. its tedious stashing batteries on these bikes.
battery is 700 grams! hoping to get the bike around 180-185 kg wet weight.
^ you can just make out my battery box in the factory location here but it just doesnt look right being so exposed.
^ prototype to see how it was going to work. tail and subframe shape proved to be difficult to work with but trial and error. integrated brake light looks savage though.
top electrics tray. not the same tray seen from the bottom of the tail.
seat angle an overlap in relation to the tail was a particularly tricky thing to get right.
not a flattering angle but its on... the right shape, things are pretty lined up and its straight. the taile angle looks extreme but the bars are quite low being under the top yoke but it flows very well with the bike shape.
a sea of brackets and a world of tweaking things. move one thing... have to adjust another to suit. I did the prototyping to get everything sitting as id like it and tacked it in place, thats where my welding ability ends and im hella grateful for a friend welding it in fully and spending the time to chase out the finer details. anyone who's attempted a tail swap this way whilst radically changing the subframe and retaining passenger carrying ability will appreciate just how much work it is. for more involved swaps like this... i highly recommend using the appropriate subframe or cutting it all off and starting from scratch. if it were a basic race tail deal without having to think about functionality of certain things this wouldve been a piece of cake.
so.
got an electrics tray sitting on the top spar. going to lower it to the bottom of the top spar and itll allow me to mount the battery in the tail. didnt want to put the weight up high but its only 700g and it looks weird mounted in factory location with an open subframe.
v1 alloy undertray will do for now but im going to fabricate one from abs for weight savings and fit it to the bottom of the top spar rather than the bottom spar and open the subframe area up more. wont need it to protect the battery as the battery is moving too.
need to fabrcate infill panels for the tank/seat gap but that wont stop me getting it on the road for now.
need to make a front seat hook to slide under the tank to stop it lifting up easy.
some tweaks to make yet but provisionally the tail swap is functional!
Last edited by iamhiding; Apr 30, 2021 at 01:29 PM.
Thread Starter
|
Senior Member
Joined: Dec 2013
Posts: 247
Likes: 11
From: Scotland

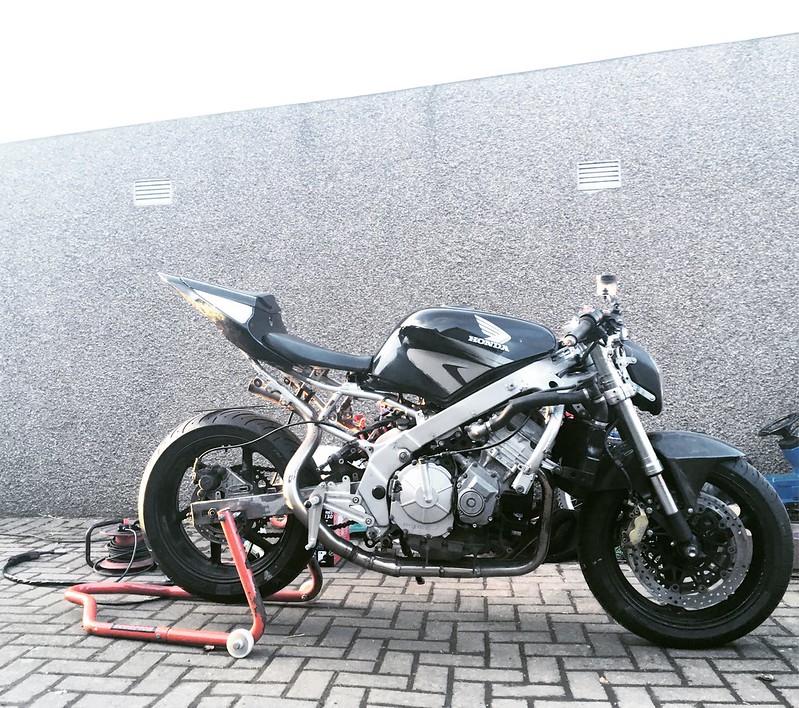
as it currently sits. photo angle makes the rear look mega angled though. quickly doodled in the tank/seat infill just to see and as for the exhaust, its just a filler. ill be running a skinny under engine or under rearset can. decided against doing an undertail exhaust for two reasons. heat near the battery firstly and secondly it would add weight and that weight would be high up.
current state of affairs is that i've got a gsxr11 to finish up first to clear some space and a f2/900rr engine swapped bike that im finishing up for someone and then i can get this fighter finished.
the to do list:
some tail tweaks to do, paint subframe and relocate battery.
forks need rebuilt and a preload adjuster replaced.
some adjustments to my wiring loom.
install indicators and a number plate.
upright renthal bar conversion and braided lines.
fit a speedo.
f4 swingarm / lighter f4i wheel swap
install emc shock.
all the parts are sitting minus speedo which was robbed for a mental scrambler/fighter build.
i think thats it. the only difficult part is going to be getting the chainrun right in the swingarm, f4i sprocket carrier doesnt have much meat to machine down and theres only so far you can space the factory front sprocket without custom sprockets and hassle so going to get a bit creative once ive got the numbers on paper, good thing is that i can easily enough make the f3 rear wheel work with the f4 swinger short term if i need to. my swingarm is shot or id just rock it short term that and the cost of swingarms has skyrocketed recently... even crusty old nonsense is unreal. anyway ill get to that in due course. cant believe this project was started in winter 2014!? but this is the year itll get finished.
