'93 F2 Mods - Phase 1
#11
 04-06-2012, 09:49 AM


Now this is where things go a little South...
I'm riding on a moderately twisty street in my city, and while beginning to round a kind of tight, decreasing radius bend, some @$$clown in a big old Suburban, with dark tinted windows and music blaring, changes lanes into me as I'm passing him - no signal, of course - and pushes me wide while forcing me to brake and stand the bike up a little.
Now, if it wasn't post-winter, where there is still sand in the gutters, and a foot or so out into the lane, I probably would have squeaked around him just fine, but once my front tire hit the sand, I lost the front and low-sided, sliding along in the sandy gutter.
The douchebag did not stop - I doubt he was attentive enough to even notice what he had done.
With armored mesh jacket, AlpineStars leather gloves with a significant gauntlet, Verge street boots with hard sliders on the side, and of course, my helmet, I was mostly fine, but did lose a good patch of flesh on my left outer calf and knee.
Now, being who I am, and being obsessed about my bike, I went from sliding behind the bike in the gutter, to rushing up to it to check the extent of the damage, meanwhile my shredded jeans and very bloody left leg would have to wait.
#12
04-06-2012, 10:06 AM
I WAS relieved that I didn't go down on the right side, and damage the practically brand new exhaust, but I was ticked off, nonetheless, being that this bike was pretty much perfect, and now I had fairing damage.
It really wasn't super bad - the truth is, if you were 20 - 25 ft away from the bike, it was almost unrecognizeable - the stator cover was intact, but it was significantly rashed.
After examining the damage, I got on to ride it home (I was only about a mile and a half from home), and realized, as the rushing air begin to hit my open wounds on my left leg, that IT FRIGGING HURT!!!
My girlfriend flipped when she saw me walk in the door.
I went through a lot of bandages and ointments in the next couple of months, but all healed fine, and now it was time to use this as an excuse for more work on the bike!
Last edited by JNSRacing; 04-06-2012 at 02:19 PM.
#13
04-06-2012, 10:52 AM
So the fairings were not totally destroyed, but, the bottom line is this: for them to be completely restored to perfect, it would require some plastic repair, entirely new paint on some pieces, and several replacement factory decals - which are VERY expensive, almost rivalling the cost of the fairings themselves.
Now, I still have these fairings, and one day I just might restore them to perfect, with new paint and brand new decals, but at this time I chose to replace the fairings with a kit - I found a style that I REALLY liked, from Hong Kong, which was right at $500 shipped, and had a paint scheme that has modernized the look of the bike quite a bit - I'll have a LOT more to say about those fairings soon.
I actually received the kit, at my door, in less than three weeks from the time of my order, which quite surprised me.
They looked magnificent, but I learned very quickly that the paint job could use several more coats of clear - the pieces have to be handled very carefully, as they mark really easy - I really should have had the whole kit clear-coated more before installation, but I wanted to limit the additional time and money spent on the fairings, since the kit is so cheap - I kind of look at them as somewhat "disposable".
I also learned that the fitment is poor to fair in some spots, fair to good in others, and very good in very few spots - also, what little hardware they sent, was not useable - I had to cut the rivets to remove the quick-turn connectors, where the inspection panel installs on the side farings, and drill holes and rivet these bits onto the new fairings, and then carefully remove the quick-turn screws from the old inspection panels, and install them on the new ones.
The screws they sent to secure the front/inner fairing bits to the main side fairings were too small for the threads, which sucks big time, being that those threads in the plastic are cut as metric sheet metal screw threads, and screws that match that are very hard to find in US hardware stores, for some reason.
More on all the fairing issues later.
Last edited by JNSRacing; 06-21-2012 at 02:36 PM.
#14
04-06-2012, 11:15 AM
One thing I neglected to mention at the beginning, is that the bike uses a very, very, very, little bit of oil - the original owner relayed this to the second owner (my boss at the time), who relayed to me that it needed about a half a quart added every couple of months - the original owner thought it was burning oil.
Well, it was! But not in the cylinders, it was leaking from somewhere and getting on the headers, and burning there, as well as making a mess inside the fairings that you couldn't really see.
I wasn't really HAPPY about the bike using oil, though it was using very little, and wasn't a deal-breaker at all - but I was thrilled to know that it was not an internal issue, and the problem was solved for about $10.
So, the bike is mostly stripped down, for installation of the new fairings and heavy-duty stator cover, and I removed the fuel tank and some dust covers, using a fuel supply hanging from my garage joists so that I could run the motor and scour for the oil leak.
I don't know what service would have taken place in under 4000 miles, that would have required someone to remove the cylinder head cover, but I discovered after the enging heated up, and oil pressure rose, that there was the tiniest bit of oil coming from under one of the cylinder head cover bolts - some idiot had failed to replace the rubber-coated metal seal washer under that bolt.
When the fan kicked on, it sucked the oil forward, and down the front of the motor and headers - but like I said, $10 and a little work - no big deal.
In this picture, you can see the oily headers, and the oily grime on the leading edge of the front-most engine cradle portion of the frame - also visible, is the new NRC engine cover.
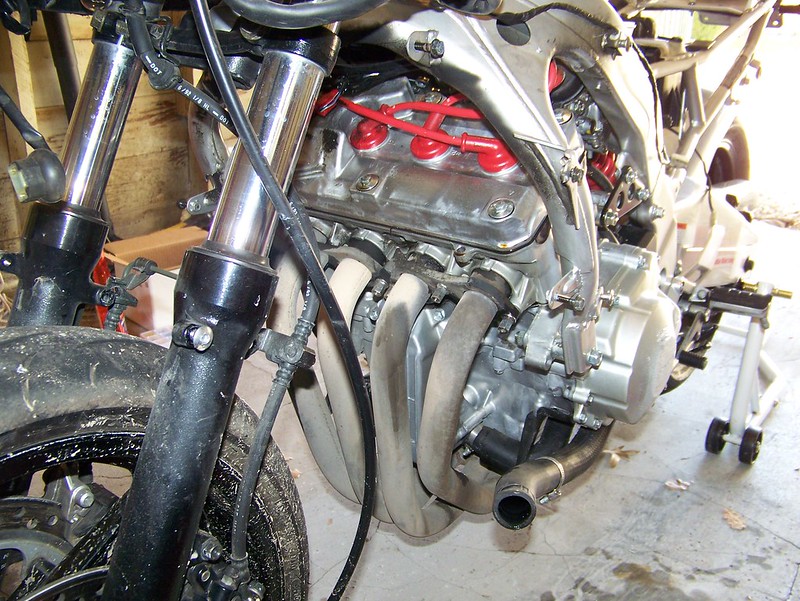
At least the oil on the headers helps to prevent rust, right?!?
Well, it was! But not in the cylinders, it was leaking from somewhere and getting on the headers, and burning there, as well as making a mess inside the fairings that you couldn't really see.
I wasn't really HAPPY about the bike using oil, though it was using very little, and wasn't a deal-breaker at all - but I was thrilled to know that it was not an internal issue, and the problem was solved for about $10.
So, the bike is mostly stripped down, for installation of the new fairings and heavy-duty stator cover, and I removed the fuel tank and some dust covers, using a fuel supply hanging from my garage joists so that I could run the motor and scour for the oil leak.
I don't know what service would have taken place in under 4000 miles, that would have required someone to remove the cylinder head cover, but I discovered after the enging heated up, and oil pressure rose, that there was the tiniest bit of oil coming from under one of the cylinder head cover bolts - some idiot had failed to replace the rubber-coated metal seal washer under that bolt.
When the fan kicked on, it sucked the oil forward, and down the front of the motor and headers - but like I said, $10 and a little work - no big deal.
In this picture, you can see the oily headers, and the oily grime on the leading edge of the front-most engine cradle portion of the frame - also visible, is the new NRC engine cover.
At least the oil on the headers helps to prevent rust, right?!?
Last edited by JNSRacing; 04-06-2012 at 03:04 PM.

#16
04-06-2012, 11:46 AM
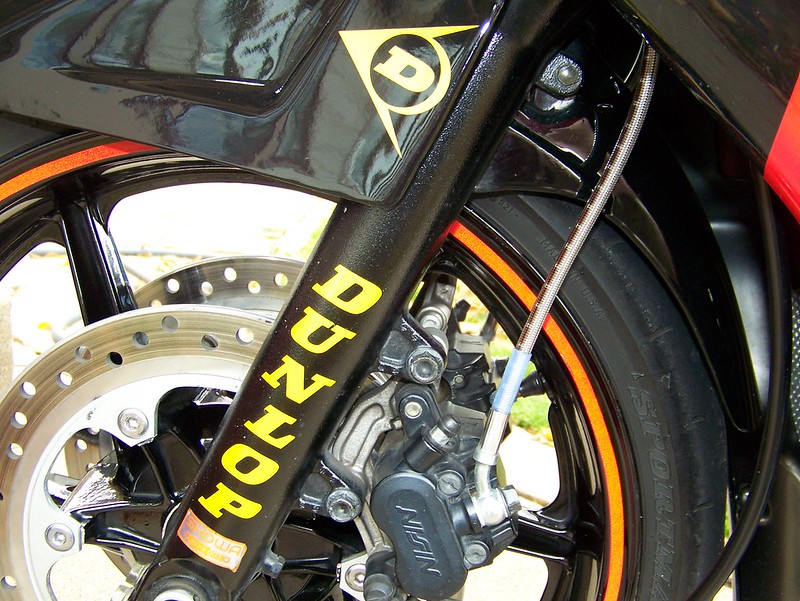
The replacement of the brake resevoir cap was just for a little bit of "bling" factor (it actually was a few grams heavier than the original unit), but the braided stainless steel brake lines were for form AND function.
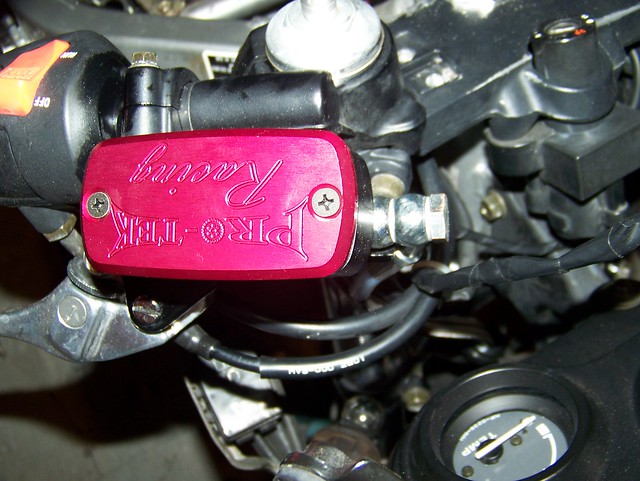
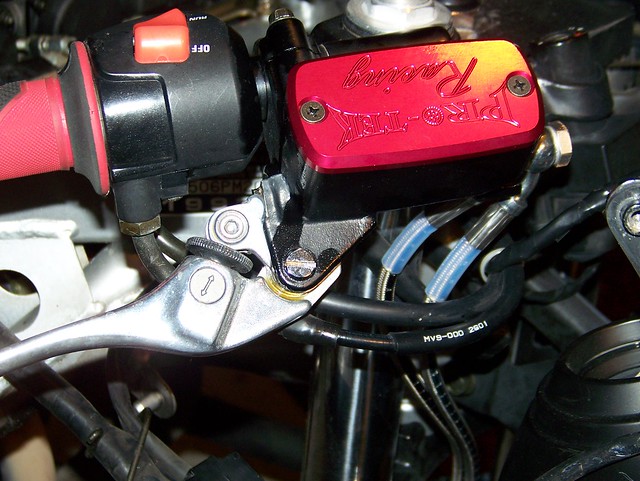
Reflectors go bye-bye - another look at the new brake lines.
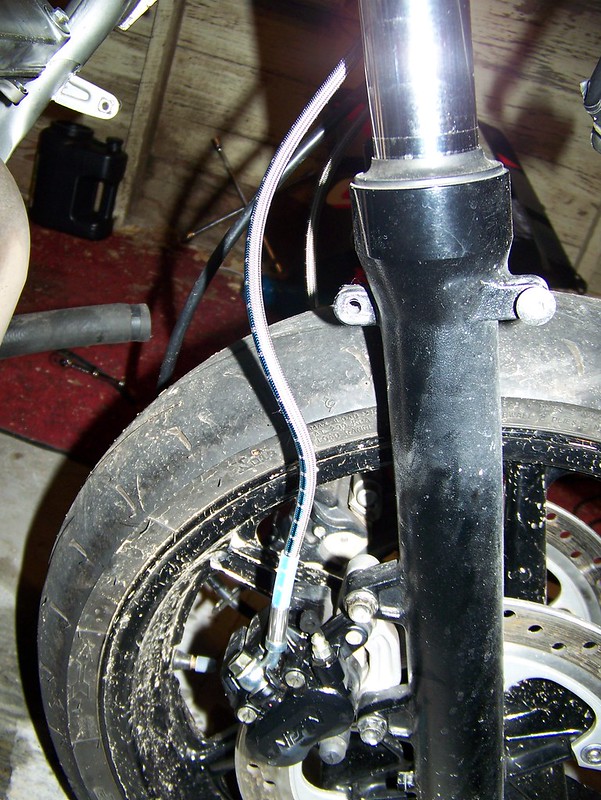
Here's another shot of the braided lines, along with the new fender, Dunlop decals, and the red reflective rim strip that replaces the plastic reflectors, and gives it a more racy look.
Reflectors go bye-bye - another look at the new brake lines.
Here's another shot of the braided lines, along with the new fender, Dunlop decals, and the red reflective rim strip that replaces the plastic reflectors, and gives it a more racy look.
Last edited by JNSRacing; 04-06-2012 at 11:54 AM.
#17
04-06-2012, 01:31 PM
To install the extended faux-carbon fiber frame sliders, I would need to cut a hole in the new fairings, and since the new fairings are lighter weight, have a very sensitive finish, and are more flimsy and prone to breaks, I was nervous about this.
Also, since these mount using an extended length of the front motor mount bolt, I wanted to devise a way to precisely determine where to cut on the fairings.
I took the original motor mount bolt, used some thin strips of duct tape to hold a thumb tack to the center of the bolt's threaded end, mounted the fairings, heated the tack, and pushed the bolt through the motor mounts in the reverse direction, so the heated tack point would leave a little "dot" shaped depression on the inside of the fairings - this provided a marking for a small hole to be drilled, which could be used for the pilot bit on my hole cutter.

Then I used the hole cutter going from the outside in, to reduce paint and decal flaking while cutting.
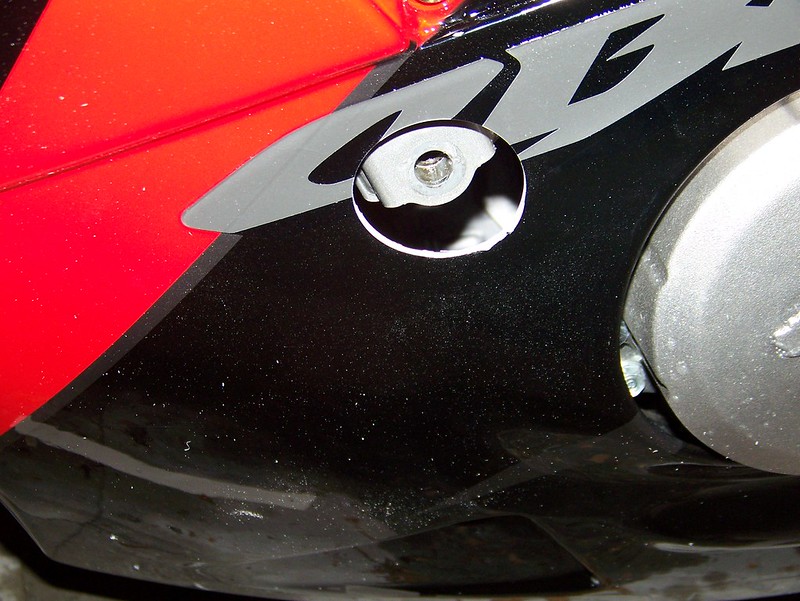
And finally installed the sliders, torquing the bolts appropriately.
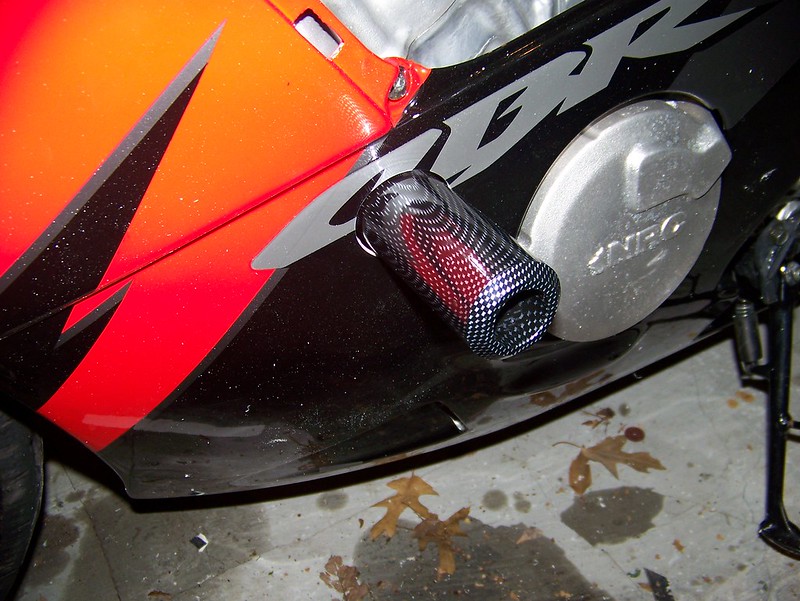
Here's a better shot, with the inspection panels installed, and the plastic debris all cleaned off. Note that the flash in these pics makes the red graphics on the fairings, and the red rim strips, look like a kind of "sun burst orange", or something like that - it's more of a "cherry" red, in actuality, which will be obvious in later pics.

Also, since these mount using an extended length of the front motor mount bolt, I wanted to devise a way to precisely determine where to cut on the fairings.
I took the original motor mount bolt, used some thin strips of duct tape to hold a thumb tack to the center of the bolt's threaded end, mounted the fairings, heated the tack, and pushed the bolt through the motor mounts in the reverse direction, so the heated tack point would leave a little "dot" shaped depression on the inside of the fairings - this provided a marking for a small hole to be drilled, which could be used for the pilot bit on my hole cutter.
Then I used the hole cutter going from the outside in, to reduce paint and decal flaking while cutting.
And finally installed the sliders, torquing the bolts appropriately.
Here's a better shot, with the inspection panels installed, and the plastic debris all cleaned off. Note that the flash in these pics makes the red graphics on the fairings, and the red rim strips, look like a kind of "sun burst orange", or something like that - it's more of a "cherry" red, in actuality, which will be obvious in later pics.
#18
04-06-2012, 02:00 PM
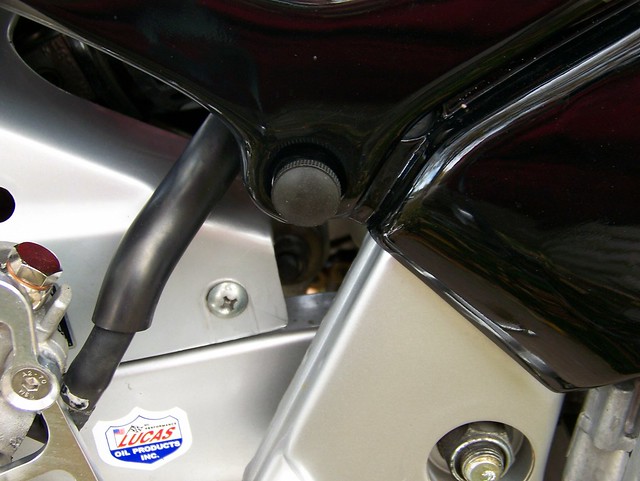
At the place where the tail/side farings connect to the receiver on the main side fairings, the factory body work uses a little plastic 1/2 turn locknut to hold it on, that you can turn with anything from a coin, to your ignition key, to a screwdriver. I saw no real easy way to transfer these bits to the new fairings, not to mention that I wanted to leave them on the originals, in case I sell them, or restore and install them again. So I just put a small short bolt facing outward, through the main fairing, securing it there using a very thin nut and washer, which left a about a 1/4 inch or so of threads sticking through the hole I drilled in the tail/side fairing pieces.
I then used a couple of "appliance access door" nuts to secure the tail/side fairing pieces on.
It looks pretty good, in my opinion, and allows me to unscrew these little "*****" and remove the side/tail fairings without needing any kind of tool.
I then used a couple of "appliance access door" nuts to secure the tail/side fairing pieces on.
It looks pretty good, in my opinion, and allows me to unscrew these little "*****" and remove the side/tail fairings without needing any kind of tool.
Last edited by JNSRacing; 02-27-2013 at 03:33 PM.
#19
04-06-2012, 04:51 PM
Now it's time to give extensive comments about the fairings - good and bad.
Good: Very cheap compared to OEM (though you kinda' get what you pay for); nice graphic options; lighter weight - they WILL work if you've got enough skills (and the right tools) to make it happen.
Bad: Finish is very sensitive to scratches; material is more prone to breakage, due to to being thinner and lighter; fitment is poor, for the most part, and requires lots of extra work and some light fabrication; most of the shafts, with tabs that insert into rubber grommets, broke off, and had to be epoxied back on; pretty much EVERY hole had to be drilled out, to some extent, in order for the parts to line up right; the small, center, tail fairing, that sits above the tail light, comes with friggin' holes for grab bars, which mainly only European models came with (you can request them without the holes, but you would not know to do so, unless you heard about it from someone else); the tabbed shafts at the rear of the side/tail fairings was too small, and wouldn't stay snug - the ones at the front were too long, and too big in diameter, causing the front part of that fairing to flare out, and not line up with the rest - I had to add plastic material to the rear tabs, and reshape a new end for the rubber grommets, after the material hardened, and had to cut the front tabs almost half an inch shorter, and use my Dremel to carefully decrease the shaft diameter, and once again reshape the end for the grommets; blah, blah, blah.
Bottom line: If you are looking for something to just bolt right up, OEM is your ONLY option, unless you get lucky - I have heard testimonies from guys that DID get lucky with their kit, and they were able to just slap 'em on and go, but the question is: can you afford to spend around $500 at a time, hoping you'll get a set like that, after waiting anywhere from 3 weeks to 2 months for them to arrive?
Most of the comments I've read have been bad, with lots of complaints regarding fitment and finish.
If you're mechanically inclined, good with tools, and can use some ingenuity to think around problems - go for it - they're SO cheap.
These fairings made me want to kill at moments , but after a lot of simple work ("simple" being relative), they look pretty good, and only someone LOOKING for flaws, would find any, and it would take some close examination.
Good: Very cheap compared to OEM (though you kinda' get what you pay for); nice graphic options; lighter weight - they WILL work if you've got enough skills (and the right tools) to make it happen.
Bad: Finish is very sensitive to scratches; material is more prone to breakage, due to to being thinner and lighter; fitment is poor, for the most part, and requires lots of extra work and some light fabrication; most of the shafts, with tabs that insert into rubber grommets, broke off, and had to be epoxied back on; pretty much EVERY hole had to be drilled out, to some extent, in order for the parts to line up right; the small, center, tail fairing, that sits above the tail light, comes with friggin' holes for grab bars, which mainly only European models came with (you can request them without the holes, but you would not know to do so, unless you heard about it from someone else); the tabbed shafts at the rear of the side/tail fairings was too small, and wouldn't stay snug - the ones at the front were too long, and too big in diameter, causing the front part of that fairing to flare out, and not line up with the rest - I had to add plastic material to the rear tabs, and reshape a new end for the rubber grommets, after the material hardened, and had to cut the front tabs almost half an inch shorter, and use my Dremel to carefully decrease the shaft diameter, and once again reshape the end for the grommets; blah, blah, blah.
Bottom line: If you are looking for something to just bolt right up, OEM is your ONLY option, unless you get lucky - I have heard testimonies from guys that DID get lucky with their kit, and they were able to just slap 'em on and go, but the question is: can you afford to spend around $500 at a time, hoping you'll get a set like that, after waiting anywhere from 3 weeks to 2 months for them to arrive?
Most of the comments I've read have been bad, with lots of complaints regarding fitment and finish.
If you're mechanically inclined, good with tools, and can use some ingenuity to think around problems - go for it - they're SO cheap.
These fairings made me want to kill at moments
Last edited by JNSRacing; 04-06-2012 at 09:07 PM.
#20
04-06-2012, 04:58 PM

 .
.
