Spring Break 88' 1000f resurrection a Success! Plenty of pictures
#1
 04-09-2017, 01:51 PM


Join Date: Feb 2017
Posts: 12
Likes: 0
Received 0 Likes
on
0 Posts
Hi folks, I joined around the time I purchased her but due to school hadn't been able to get around to it. During my spring break, after amassing parts, I dove into the resurrection and brought the ol' girl back to life. 1988 cbr1000f, last registered in 2006, 70,000 miles on the clock and now, still ticking.
[IMG]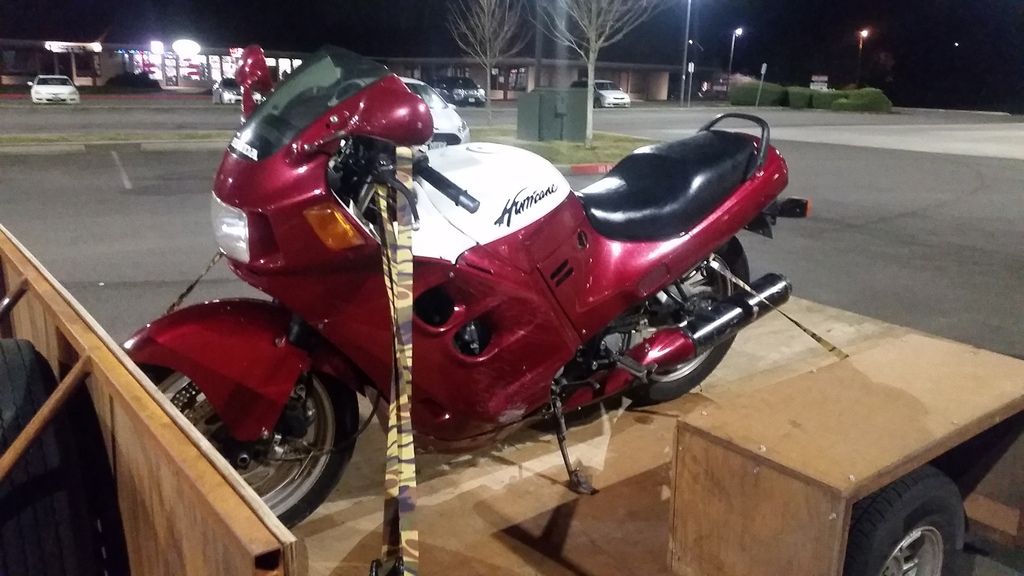 [/IMG]
[IMG] [/IMG]
When I picked her up. Fairly good shape, been repainted before, been on it's side at some point. Pretty clean overall, new tires on it (relatively, no cracking still soft, still have the little "fingers" all over) no rust in the tank. been sitting in a heated garage. Purchased for 800 bucks.
[IMG]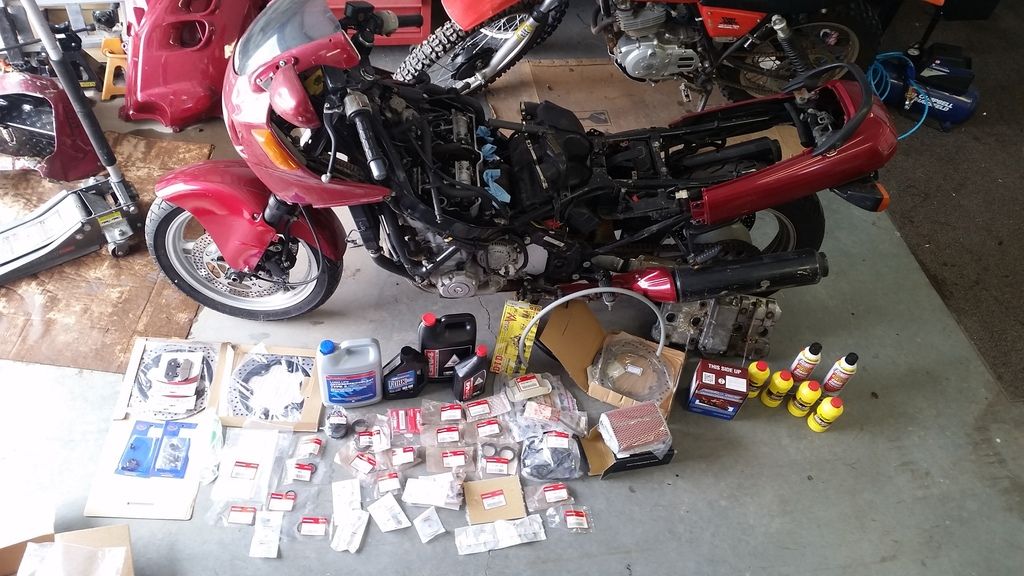 [/IMG]
[IMG] [/IMG]
The Goods!! Parts to replace include: Factory service manual, new rotors front and back, new brake pads front and back, oem honda brake seals, honda oil filter, Honda oil, Honda type 2 coolant for a coolant flush( silicate and borate free, cheaper than coolant from the motorcycle shop. I paid 18 for the gallon), fork seals, new fork bushings and internals, cylinder head cover gasket, air filter, new D.I.D o-ring chain and JT sprockets, all new wheel bearings, carb rebuild kits, battery, radiator cap, plugs, slave cylinder rebuild, master cylinder rebuilds, new petcock and misc other items.
[IMG]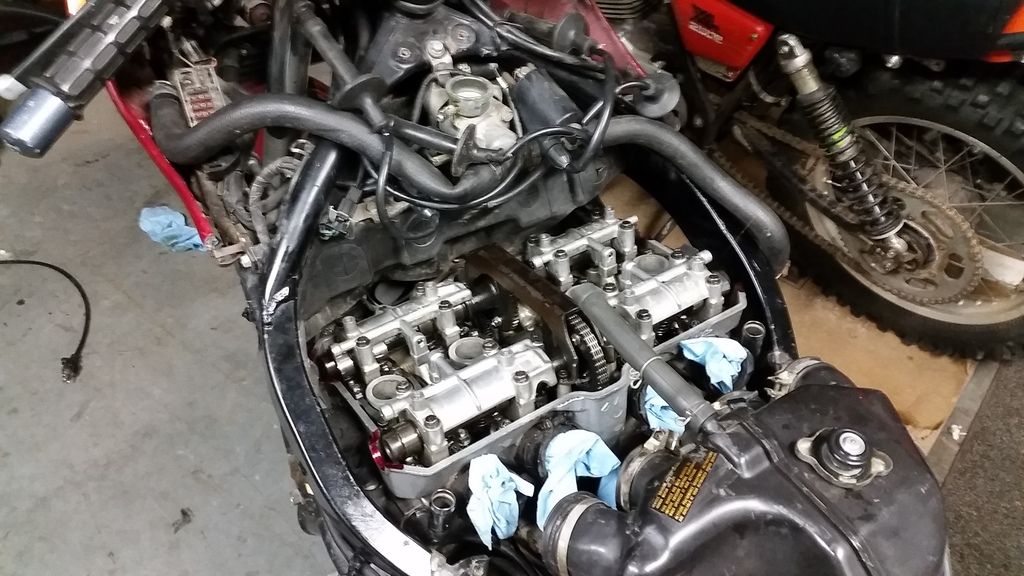 [/IMG]
First thing I did was adjust the valves. This bike has alot of miles on it, just at 70k. Upon pulling the cover I was pleasantly surprised to find the cams looking immaculate. No scoring on any lobes whatsoever, hardly any wear marks. No sludge buildup under the cover or up top anywhere, someone kept up on oil changes. Also noted was the fact that someone had upgraded the cam chain tensioner, Sweet!! I was able to score the oem honda tappet adjusting tools mentioned in the service manual off of ebay for 60 bucks. I couldn't imagine adjusting them any other way, some of those suckers are in tight spaces!
Next up were rebuilding the carbs. WHAT A TIME CONSUMING TASK!! I completely stripped them down and meticulously went over everything. There was plenty of gunk in the bowls from sitting so dang long.
[IMG]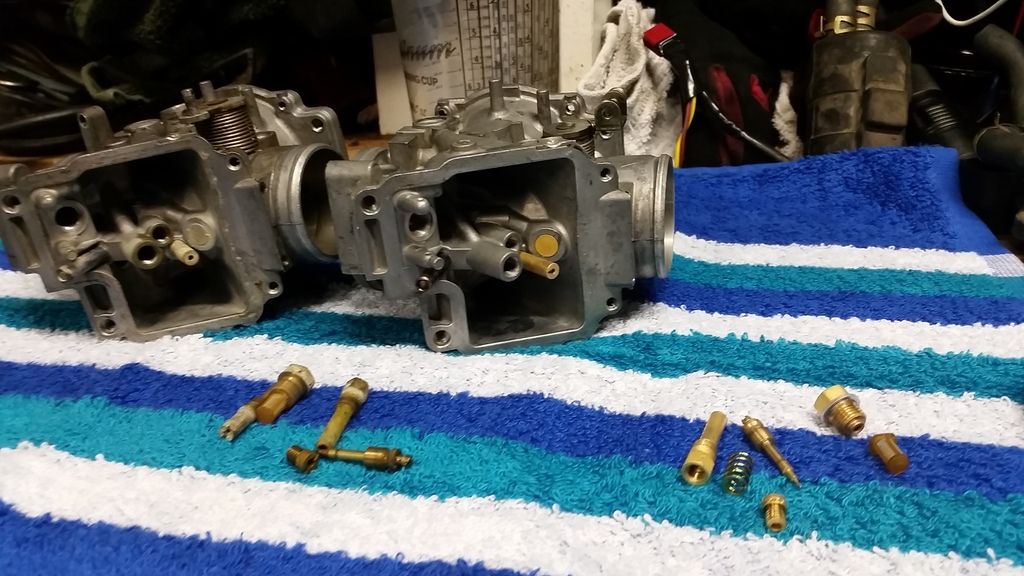 [/IMG]
The carb and bits on the left are before soaking and the ones on the right are after soaking in carb solution.
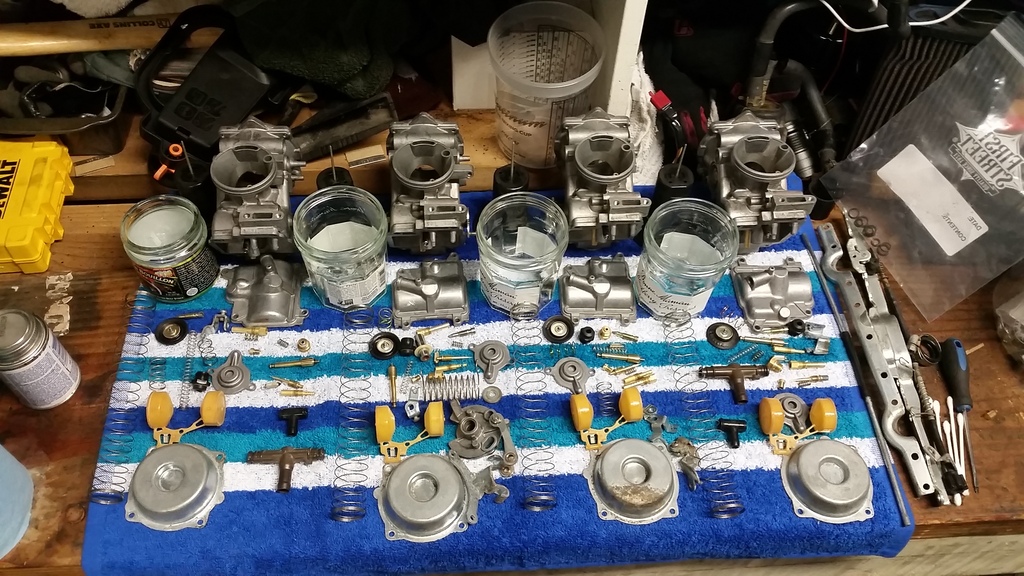
Everything cleaned and ready for assembly. SO MANY LITTLE PARTS!!!
[IMG]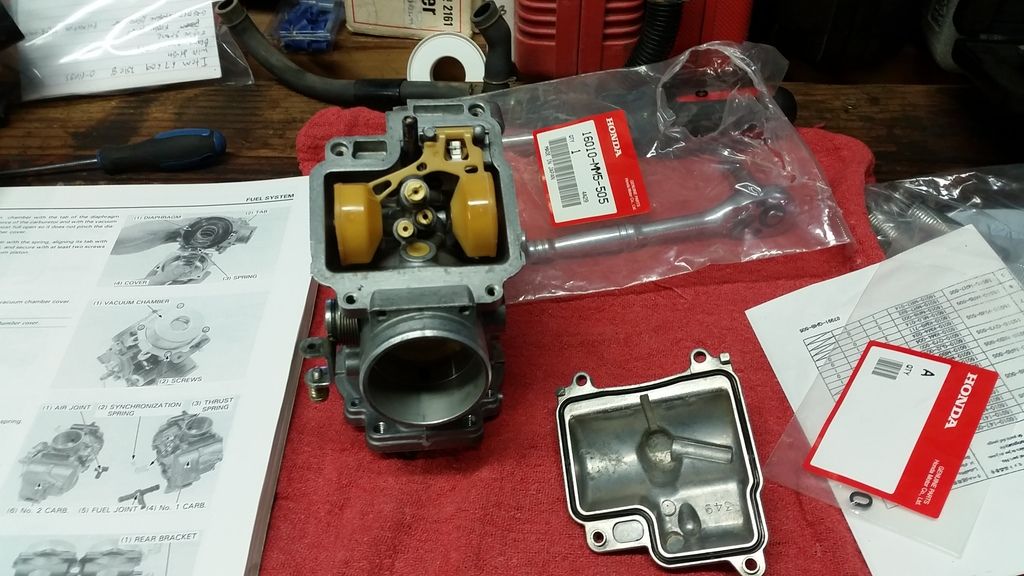 [/IMG]
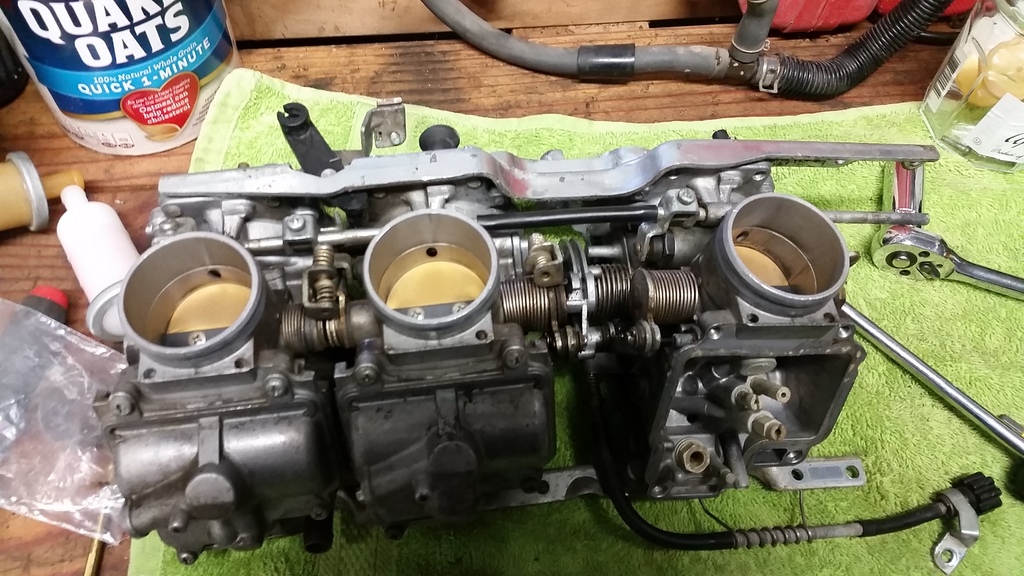
Re assembly with oem honda gaskets and the trusty shop manual
[IMG] [/IMG]
Carbs back together. I wanted to use new fuel line and honda hasn't made the oem molded rubber ones for years. So I bought the correct diameter and used springs of the right diameter to prevent the tube from collapsing on itself for sharp bends. I also used this method for fuel lines running from the tank to pump.
Next I flushed the coolant system and happily noted the bright green incredibly clean coolant that flowed from the system. No sines of corrosion on the insides of this bike! I then changed the spark plugs and ran into issues with the number 3 plug wire cap not wanting to stay seated on the plug. I bought new plug caps but wanted to retain the stock plug boots.
[IMG]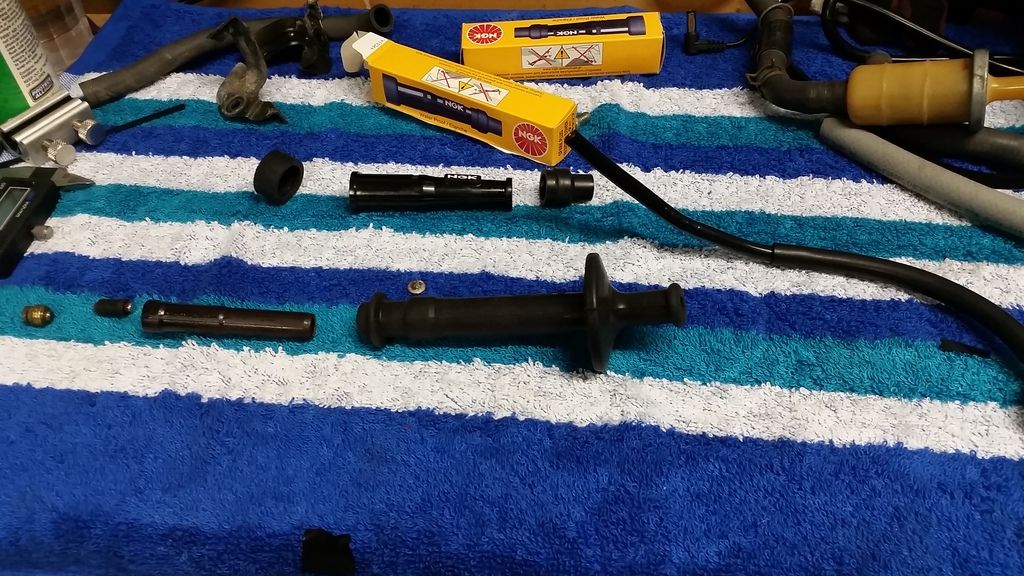 [/IMG]
I was able to unscrew the inside part of the oem plug cap that the plug snaps into. the snap ring was rusted away. I couldn't find a replacement ring so I bought new caps from the local MC shop. I then pushed the coil wire through the oem cap and snipped the end since it has a soldered on piece. I was able to save the rubber surround and pushed out all the oem components. The new ngk plug caps are a bit bigger but with the help of some lube and an air compressor I was able to fit the NGK cap in the original rubber boot.
[IMG]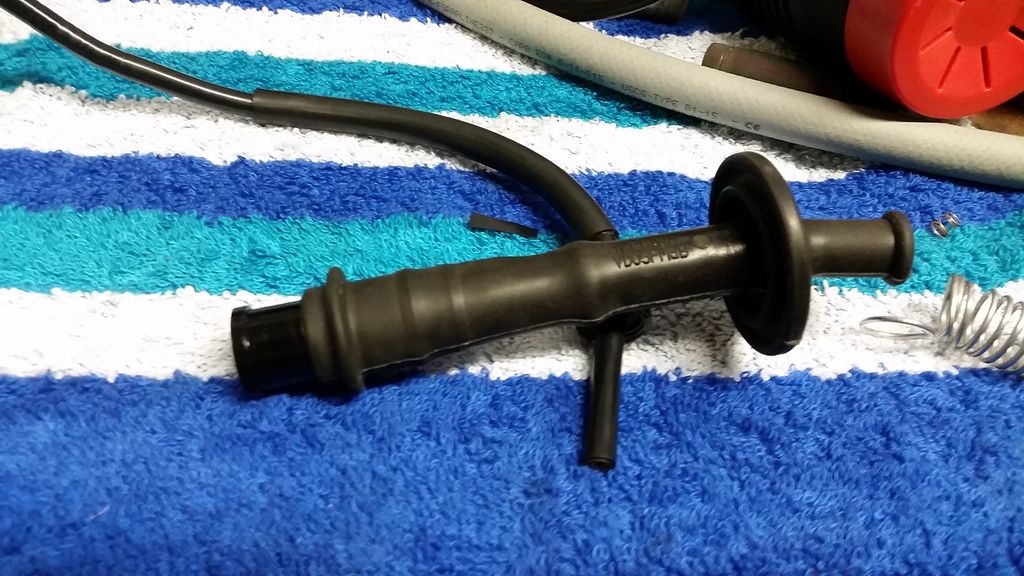 [/IMG]
Here it is almost all the way inserted into the old boot
[IMG]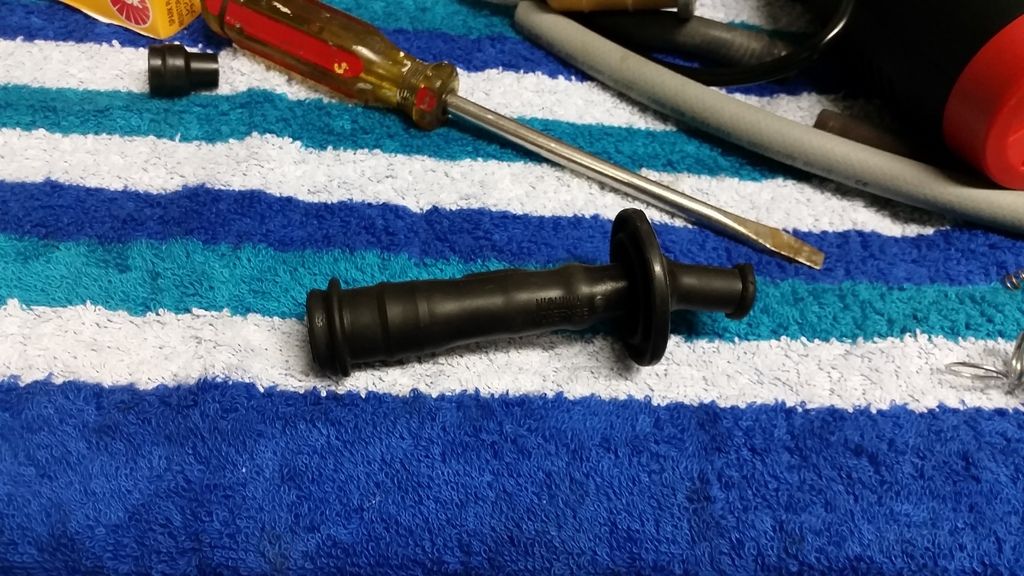 [/IMG]
And here it is fully inserted. Even though it is a bigger dimension now, it still fits perfectly over the plug. The new cap is twist on so just insert the wire through the end and twist until fully secured. Onward!!
[IMG]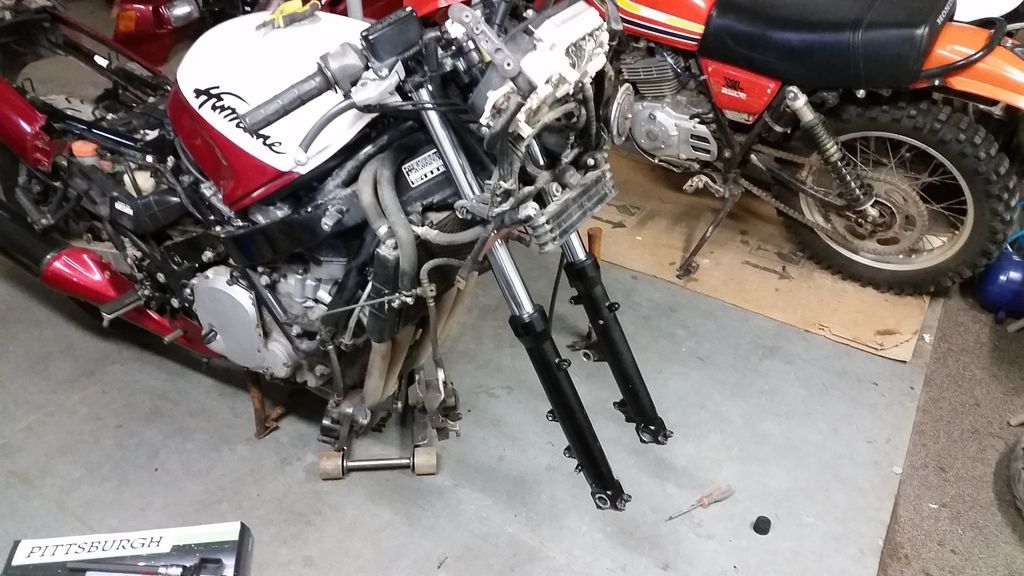 [/IMG]
Time for the front end rebuild. This picture shows it mostly stripped down. The front end is getting new rotors, brake pads, front forks completely rebuild, calipers completely rebuilt, and master cylinders completely rebuilt.
[IMG] [/IMG]
This picture shows all the hardwork of removing sludge and cleaning tubes completed. Now to install the new bushings, piston rings, and anti-dive seals as well as oem honda fork seals and dust seals. The manual calls for ATF, but I went for 10wt fork oil.
While atleast the Previous owner(S) kept up on oil changes, they lacked in other areas. Exhibit A, Brakes. These original rotors after 70k miles had the worst grooves i'd ever seen!
[IMG]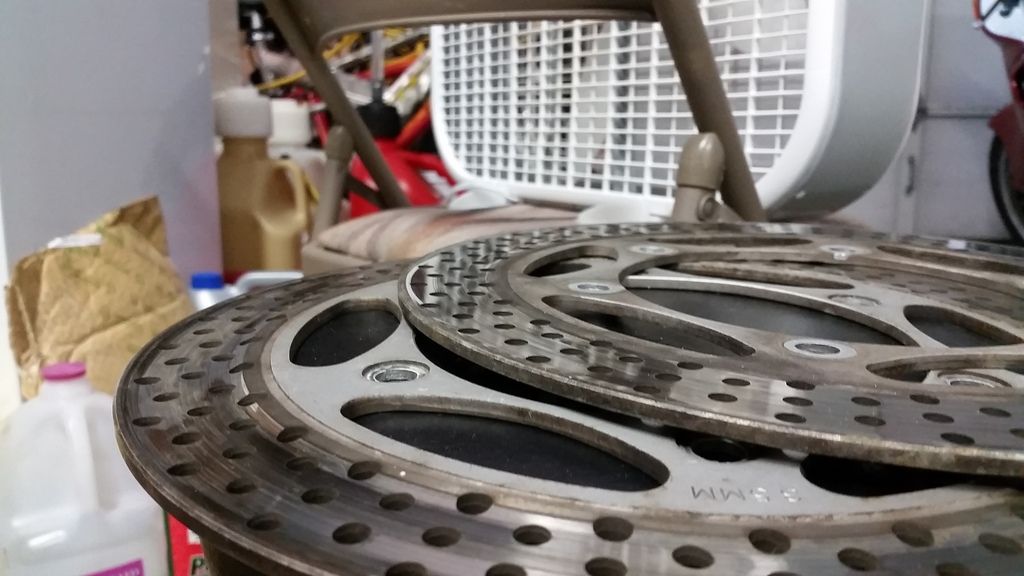 [/IMG]
The pictures don't do it justice. Honda hasn't made rotors in years for this bike. EBC makes a rotor, they're 150 a piece and I really wanted to stay as close to the stock look as I could. I found a set out of china for 120bucks for the pair. Being from china I was skeptical but the price point, especially for a college student, was on point. Plus the seller had like 99.9% approval rating for thousands of transactions. I ordered a set, got them suprisingly within a couple weeks from china, and was super impressed with quality!!
[IMG]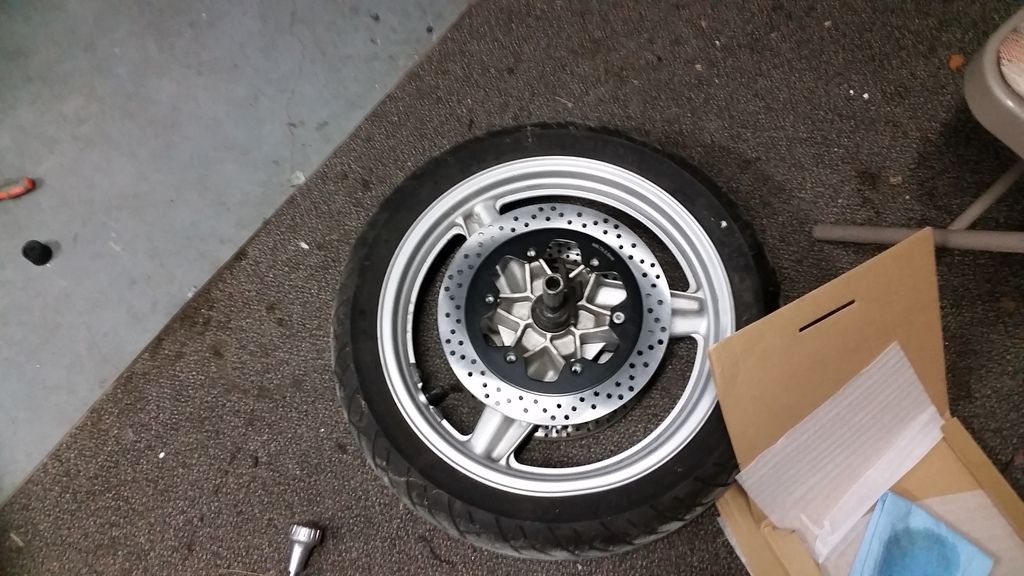 [/IMG]
Bolt holes lined up beautifully, rotor was nice and flat, even has the Min thickness etched into it! for $120 for the pair, worth the gamble.
When I bought the bike I was given a set of these
[IMG]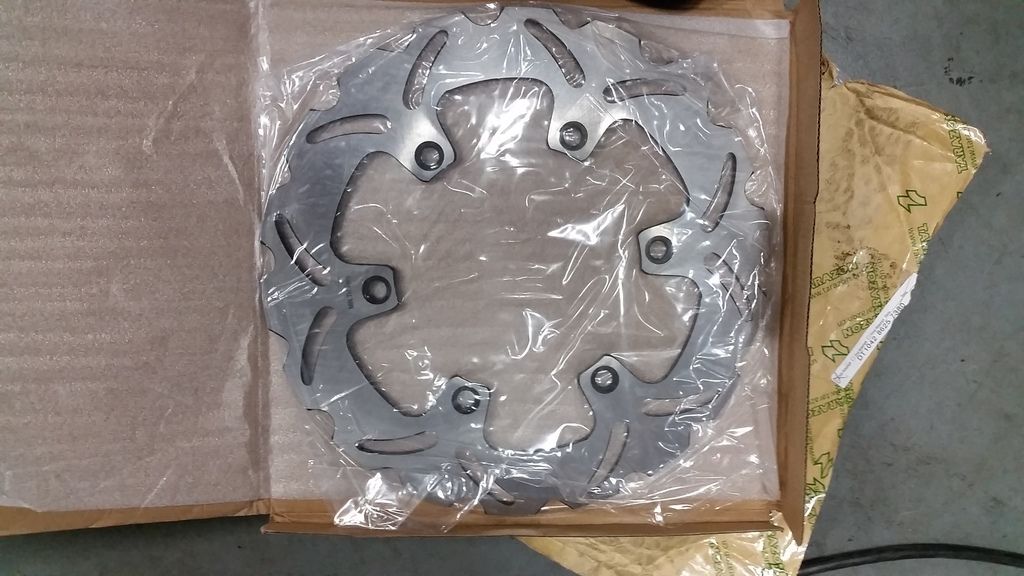 [/IMG]
But I don't like the style and don't want them. If any of you hurricane guys want some rotors, hit me up and we can work out a deal. comes with brake pads too.
[IMG]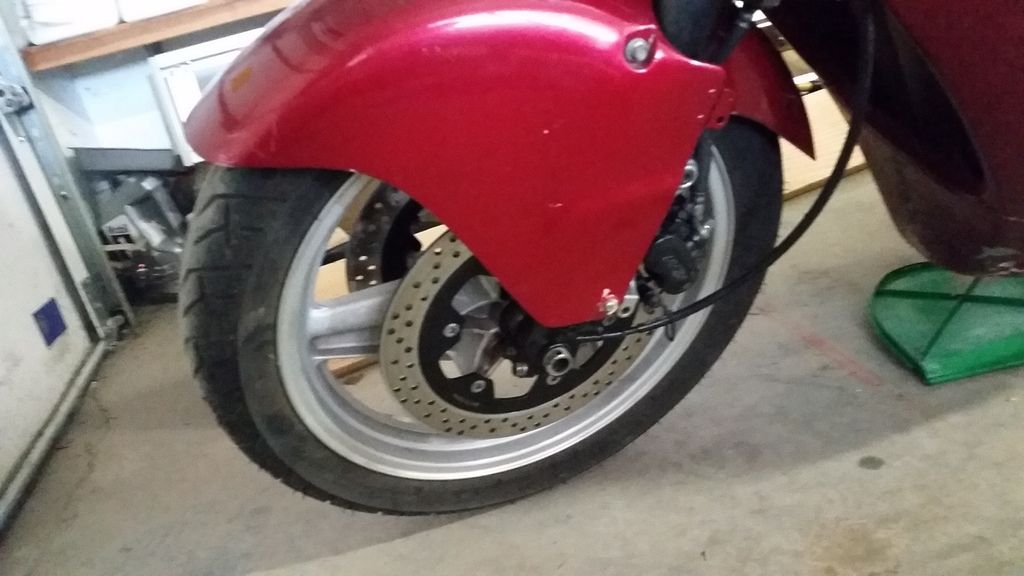 [/IMG]
Front re-assembled with Chinese rotor.
Anyway, I also rebuild the calipers which was much needed. one of them was frozen meaning this bike only had one working set on the front. no wonder it was hard to push around and one rotor was severely grooved compared to the other! I coupled the new rotors with sixity organic semi-metallic brake pads off ebay. front and back as a set were only $14. Now, I want to say I did plenty of research. I didn't want kevlar/ceramic carbon pads of anykind. Those pads are fine for the track where they get hot enough to grab, but on the street they are useless for me. Lots of people run EBC HH pads and while they stop great they are also super hard on rotors. I read plenty of people on various forums talking about rapid rotor wear. For me, I'm not a racer, and semi-metallic organic pads offer the stopping power and wear properties I seek. Sixity makes all sorts of pads for all sorts of bikes and after researching them I decided they were worth the risk, especially at 14 bucks for 6 pads. I know usually you get what you pay for, but honestly these pads are great! I've got 320 miles on them so far, no squeaking, no weird sounds, and have done everything I've asked of them. Onwards!
The rear received much the same treatment. [IMG]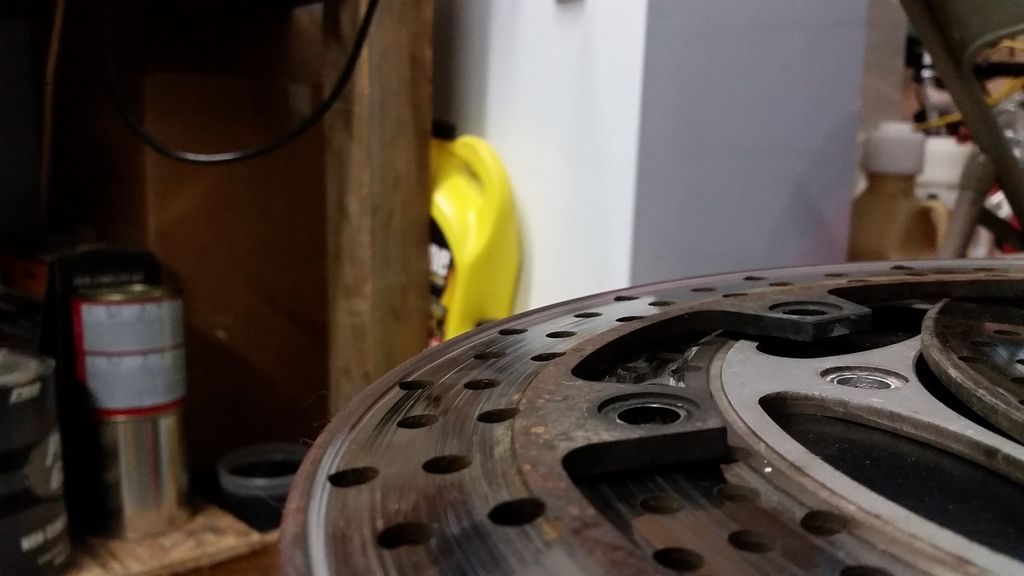 [/IMG]
It seems this bikes PO's were heavily rear brake biased. Its worn more than the front! So I installed a New badly needed rotor, rebuilt the rear caliper, and also installed new sprockets and chain. Since D.I.D is among the best, I opted for their x-ring chain and sprocket kit from JT sprockets. And by the looks of it, she needed them bad! While I was in that area I rebuilt the clutch slave cylinder which had failed at some point and leaked all of its fluid out.
[IMG] [/IMG]
After replacing all the fuel lines, and the leaky petcock, I managed to get her to spring back to life. I hooked up my vacuum guage set and started in on dialing her in. All the guages worked beautifully, she hit operating temp but never got hot while idling, I had feared the dreaded timing chain issues but upon seeing the upgraded tensioner in the top was reassured by no evidence of chain slap or rattle. Once dialed in with no evidence of bogs or anything I loaded her on the trailer and took her to the dmv for registration. My first voyage was that same friday riding her around town. Everything performed wonderfully!!! so, after spending the entire spring break meticulously resurrecting this beast, I decided to ride her the 110 miles back to my parents house to go ride with my dad.
[IMG]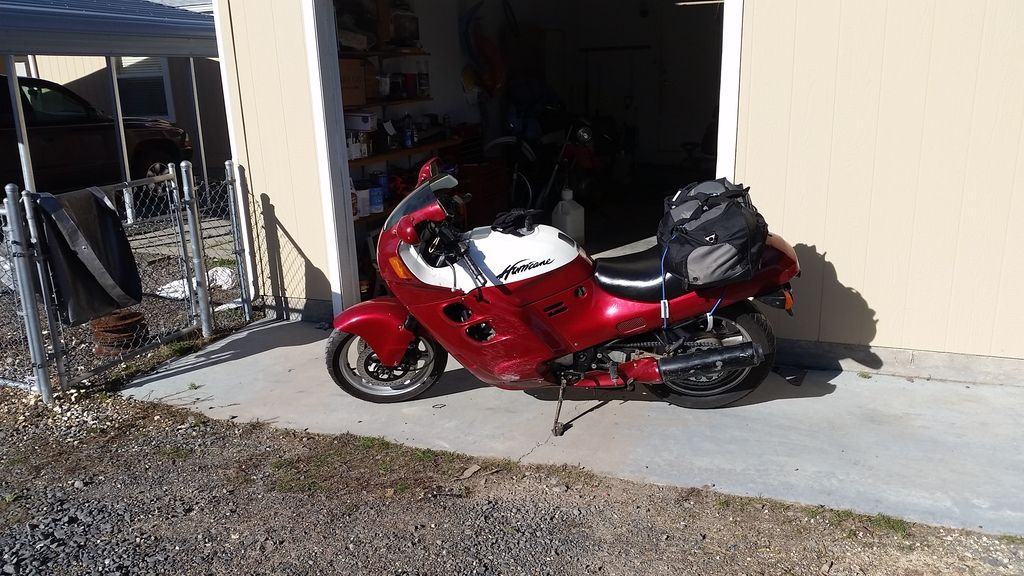 [/IMG]
Here she is with my duffel back strapped on and ready to go.
[IMG]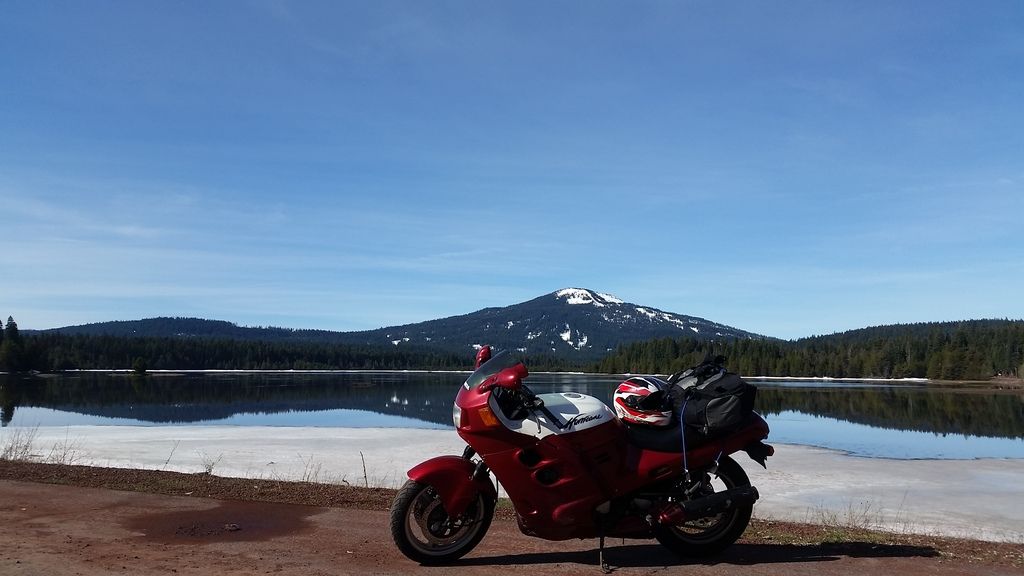 [/IMG]
stopped along the way to enjoy some scenery
I did 320 miles that weekend with not a single issue. I was pleasantly impressed with the nature of this bike. it was super comfy to ride with no sore butt even after several hours in the seat. It was super smooth and the suspension was amazing. The power is very prevalent but incredibly manageable. My review is biased of course, as the only streetbikes i've owned all come from the 1970's. I'd always wanted an 80's sport bike and couldn't resist snagging this one when it popped up. She's survived this long and I plan to at least get her to 100k. Looking forward I will be completely repainting and restoring her cosmetically. I've purchased a fairing off ebay that was in mint condition I will used to make a fiberglass plug for so I can keep making fairings and some other components. That will be later in the summer so until then its time to just enjoy her being back on the road. Thanks for checking out my build!
[IMG]
 [/IMG]
[IMG]
 [/IMG]
When I picked her up. Fairly good shape, been repainted before, been on it's side at some point. Pretty clean overall, new tires on it (relatively, no cracking still soft, still have the little "fingers" all over) no rust in the tank. been sitting in a heated garage. Purchased for 800 bucks.
[IMG]
 [/IMG]
[IMG]
 [/IMG]
The Goods!! Parts to replace include: Factory service manual, new rotors front and back, new brake pads front and back, oem honda brake seals, honda oil filter, Honda oil, Honda type 2 coolant for a coolant flush( silicate and borate free, cheaper than coolant from the motorcycle shop. I paid 18 for the gallon), fork seals, new fork bushings and internals, cylinder head cover gasket, air filter, new D.I.D o-ring chain and JT sprockets, all new wheel bearings, carb rebuild kits, battery, radiator cap, plugs, slave cylinder rebuild, master cylinder rebuilds, new petcock and misc other items.
[IMG]
 [/IMG]
First thing I did was adjust the valves. This bike has alot of miles on it, just at 70k. Upon pulling the cover I was pleasantly surprised to find the cams looking immaculate. No scoring on any lobes whatsoever, hardly any wear marks. No sludge buildup under the cover or up top anywhere, someone kept up on oil changes. Also noted was the fact that someone had upgraded the cam chain tensioner, Sweet!! I was able to score the oem honda tappet adjusting tools mentioned in the service manual off of ebay for 60 bucks. I couldn't imagine adjusting them any other way, some of those suckers are in tight spaces!
Next up were rebuilding the carbs. WHAT A TIME CONSUMING TASK!! I completely stripped them down and meticulously went over everything. There was plenty of gunk in the bowls from sitting so dang long.

[IMG]
 [/IMG]
The carb and bits on the left are before soaking and the ones on the right are after soaking in carb solution.

Everything cleaned and ready for assembly. SO MANY LITTLE PARTS!!!
[IMG]
 [/IMG]
Re assembly with oem honda gaskets and the trusty shop manual
[IMG]
 [/IMG]
Carbs back together. I wanted to use new fuel line and honda hasn't made the oem molded rubber ones for years. So I bought the correct diameter and used springs of the right diameter to prevent the tube from collapsing on itself for sharp bends. I also used this method for fuel lines running from the tank to pump.
Next I flushed the coolant system and happily noted the bright green incredibly clean coolant that flowed from the system. No sines of corrosion on the insides of this bike! I then changed the spark plugs and ran into issues with the number 3 plug wire cap not wanting to stay seated on the plug. I bought new plug caps but wanted to retain the stock plug boots.
[IMG]
 [/IMG]
I was able to unscrew the inside part of the oem plug cap that the plug snaps into. the snap ring was rusted away. I couldn't find a replacement ring so I bought new caps from the local MC shop. I then pushed the coil wire through the oem cap and snipped the end since it has a soldered on piece. I was able to save the rubber surround and pushed out all the oem components. The new ngk plug caps are a bit bigger but with the help of some lube and an air compressor I was able to fit the NGK cap in the original rubber boot.
[IMG]
 [/IMG]
Here it is almost all the way inserted into the old boot
[IMG]
 [/IMG]
And here it is fully inserted. Even though it is a bigger dimension now, it still fits perfectly over the plug. The new cap is twist on so just insert the wire through the end and twist until fully secured. Onward!!
[IMG]
 [/IMG]
Time for the front end rebuild. This picture shows it mostly stripped down. The front end is getting new rotors, brake pads, front forks completely rebuild, calipers completely rebuilt, and master cylinders completely rebuilt.
[IMG]
 [/IMG]
This picture shows all the hardwork of removing sludge and cleaning tubes completed. Now to install the new bushings, piston rings, and anti-dive seals as well as oem honda fork seals and dust seals. The manual calls for ATF, but I went for 10wt fork oil.
While atleast the Previous owner(S) kept up on oil changes, they lacked in other areas. Exhibit A, Brakes. These original rotors after 70k miles had the worst grooves i'd ever seen!
[IMG]
 [/IMG]
The pictures don't do it justice. Honda hasn't made rotors in years for this bike. EBC makes a rotor, they're 150 a piece and I really wanted to stay as close to the stock look as I could. I found a set out of china for 120bucks for the pair. Being from china I was skeptical but the price point, especially for a college student, was on point. Plus the seller had like 99.9% approval rating for thousands of transactions. I ordered a set, got them suprisingly within a couple weeks from china, and was super impressed with quality!!
[IMG]
 [/IMG]
Bolt holes lined up beautifully, rotor was nice and flat, even has the Min thickness etched into it! for $120 for the pair, worth the gamble.
When I bought the bike I was given a set of these
[IMG]
 [/IMG]
But I don't like the style and don't want them. If any of you hurricane guys want some rotors, hit me up and we can work out a deal. comes with brake pads too.
[IMG]
 [/IMG]
Front re-assembled with Chinese rotor.
Anyway, I also rebuild the calipers which was much needed. one of them was frozen meaning this bike only had one working set on the front. no wonder it was hard to push around and one rotor was severely grooved compared to the other! I coupled the new rotors with sixity organic semi-metallic brake pads off ebay. front and back as a set were only $14. Now, I want to say I did plenty of research. I didn't want kevlar/ceramic carbon pads of anykind. Those pads are fine for the track where they get hot enough to grab, but on the street they are useless for me. Lots of people run EBC HH pads and while they stop great they are also super hard on rotors. I read plenty of people on various forums talking about rapid rotor wear. For me, I'm not a racer, and semi-metallic organic pads offer the stopping power and wear properties I seek. Sixity makes all sorts of pads for all sorts of bikes and after researching them I decided they were worth the risk, especially at 14 bucks for 6 pads. I know usually you get what you pay for, but honestly these pads are great! I've got 320 miles on them so far, no squeaking, no weird sounds, and have done everything I've asked of them. Onwards!
The rear received much the same treatment. [IMG]
 [/IMG]
It seems this bikes PO's were heavily rear brake biased. Its worn more than the front! So I installed a New badly needed rotor, rebuilt the rear caliper, and also installed new sprockets and chain. Since D.I.D is among the best, I opted for their x-ring chain and sprocket kit from JT sprockets. And by the looks of it, she needed them bad! While I was in that area I rebuilt the clutch slave cylinder which had failed at some point and leaked all of its fluid out.
[IMG]
 [/IMG]
After replacing all the fuel lines, and the leaky petcock, I managed to get her to spring back to life. I hooked up my vacuum guage set and started in on dialing her in. All the guages worked beautifully, she hit operating temp but never got hot while idling, I had feared the dreaded timing chain issues but upon seeing the upgraded tensioner in the top was reassured by no evidence of chain slap or rattle. Once dialed in with no evidence of bogs or anything I loaded her on the trailer and took her to the dmv for registration. My first voyage was that same friday riding her around town. Everything performed wonderfully!!! so, after spending the entire spring break meticulously resurrecting this beast, I decided to ride her the 110 miles back to my parents house to go ride with my dad.
[IMG]
 [/IMG]
Here she is with my duffel back strapped on and ready to go.
[IMG]
 [/IMG]
stopped along the way to enjoy some scenery
I did 320 miles that weekend with not a single issue. I was pleasantly impressed with the nature of this bike. it was super comfy to ride with no sore butt even after several hours in the seat. It was super smooth and the suspension was amazing. The power is very prevalent but incredibly manageable. My review is biased of course, as the only streetbikes i've owned all come from the 1970's. I'd always wanted an 80's sport bike and couldn't resist snagging this one when it popped up. She's survived this long and I plan to at least get her to 100k. Looking forward I will be completely repainting and restoring her cosmetically. I've purchased a fairing off ebay that was in mint condition I will used to make a fiberglass plug for so I can keep making fairings and some other components. That will be later in the summer so until then its time to just enjoy her being back on the road. Thanks for checking out my build!

#3
04-09-2017, 04:36 PM

Senior Member
#4
04-09-2017, 06:48 PM

#5
04-14-2017, 06:23 PM

Thread
Thread Starter
Forum
Replies
Last Post