f4i fighter
#1
 06-04-2016, 07:05 PM


Join Date: May 2015
Posts: 105
Likes: 0
Received 0 Likes
on
0 Posts
figured i'd start a build thread.
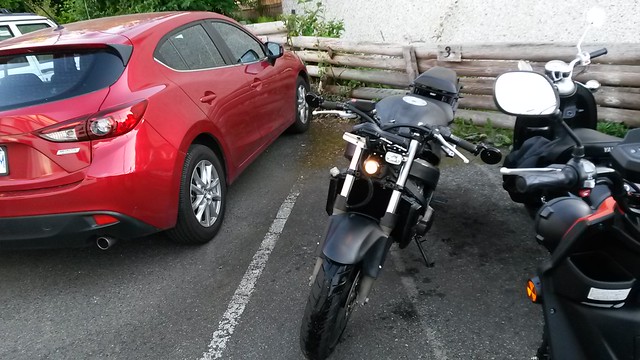
i love my f4i. my fairings are in 'alright' shape, but my rattle can job has gone for ****.
i know the f4i isn't an ideal platform for a fighter, but i think im going to go for it. also riding our FZ09 demo bikes at work, im starting to really go for the high bar naked bike thing.
so i'm going to slice 'er up and go for a naked bike.
i have two main goals right now
1. build it step by step but keep it rideable during each stage of the build
2. frame mounted headlights. countersteering driving my headlights towards the sidewalk as i turn a corner might drive me a bit crazy.
wish me luck
#2
06-05-2016, 05:20 PM

#3
06-05-2016, 11:11 PM
Join Date: May 2015
Posts: 105
Likes: 0
Received 0 Likes
on
0 Posts
fz09 is a really well balanced awesome bike, im a big fan. it's like somewhere between an R1 and a triumph triple maybe. the huge bars let you dump it into any lean angle instantly, but its so tame and predictable. the powerband is insane. you can power wheelie effortlessly in 4th on the highway, no clutch.
anyways enough yammering, lets start the beater f4i street fighter ameture hour **** show.
day one
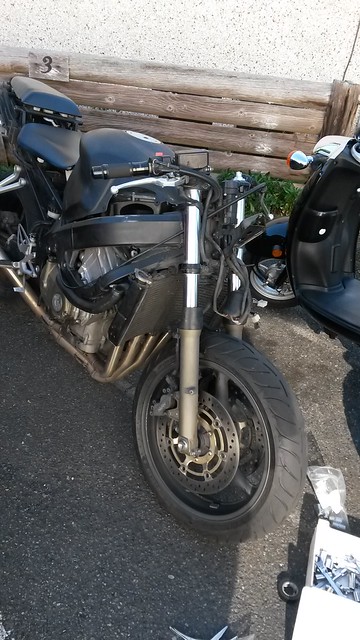
i started with the hardest and most critical part, the front end..
first the contemplating stage
i started by stripping it down, looking all the wiring over, and staring at it for an hour or two scratching my head. i have no idea where to begin.
i learned how to bypass the tipover switch, and how the headlight circuit works.
then i remember... im a horrible.. terrible... hack of a fabricator. i have a drill, a set of files, and a dremel, and i do not own a measuring stick.
starting to chicken out as im having trouble visualizing the end result, and i start having visions of crookedly cut hunks of scrap metal holding my bike together. i decide not to slice up the stock components just in case.
 20160604_174954 by Steve, on Flickr
i saw all those acrebis cyclops builds online, and i even ordered one in to look at, but once it was in my hands i realized how much of a peice of total crap it was, and how incompatible with my vague goals it was.
but the IDEA of cyborg projector crazy lights really strikes a chord with me.
i picked up an assortment of little automotive fog and projector lights on clearance and from stuff laying around the shop and took 'em home.
there were these tiny black hella projectors that have been discontinued for years, 55 watts a hit. they're cheaply made but from a distance, really nice. buddy at the auto parts store sold me the pair for 40 bucks.
so i tried to do a vertical stack on the stock fairing stay, but inverted. you know, like almost every cyborg streetfighter, but instead of with a nice fabricated bracket, with the stock steel hunk of crap.
crammed the signals in there too....... dont know how the wrench fit...
stand back and take a look....
..
...
..
 20160604_193919 by Steve, on Flickr
yeah... fail.
then i remember i need to plan a way to mount the gauges,.
a quick test revealed that the projectors are really weak too, not bad for a low beam, but no good. also, blue is ground and black is power, what the hell, hella? blew a few fuses before i figured that crap out.
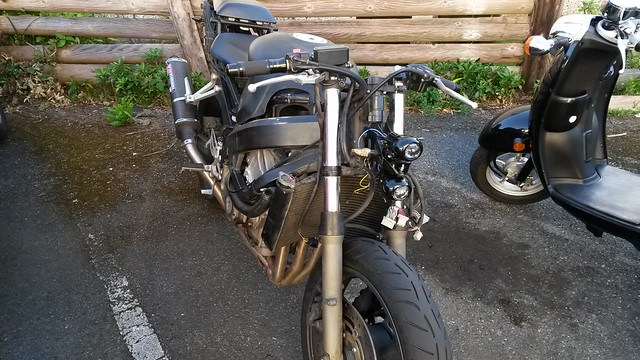
next experiment, i flipped the fairing stay back over and attempted to hack the stock cast gauge/mirror/windshield mount. it failed because the casting was too rough on the bottom to mount lights to.
threw it out and found a hunk of scrap aluminum (used to be a cruiser windshield stay). it's totally wrong for the job, not symmetrical, but somehow, i like how it looks on there... can't explain why.
kept one projector on the bottom. now we're getting somewhere
 20160605_093620 by Steve, on Flickr
fast forward a bit, projector for low beam, small 55w H3 fog light in the corner for high beam? kinda weird but im liking it so far.
chopped wiring and buried it in front of the airbox, harness is still stock except for the headlight harness is completely redone. routed everything under the front of the tank. it's a bit ugly, might make a cover.
hacked the ends off the ram air snorkels to make side snorkels. the f4i sounds sooo much better without the ram air and resonators. she screams.
 20160605_202335 by Steve, on Flickr
headlight test
 20160605_202419 by Steve, on Flickr
 20160605_202409 by Steve, on Flickr
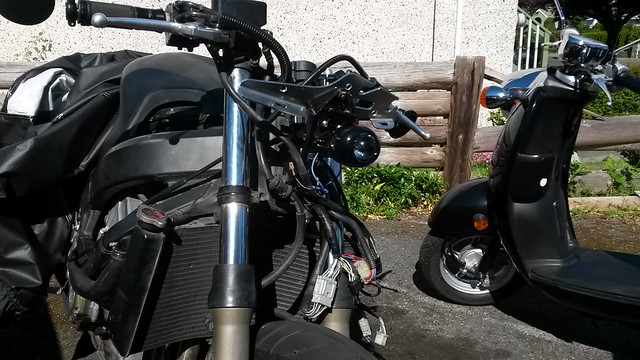
still haven't figured out signals, but im thinking those little LED rings that go around the fork legs.
after that, im going to chop it right after the seat. sawing the tail will be 'no turning back' time, as i haven't actually modified anything yet, i could still go back to stock.
i MIGHT re-use the stock taillight just for nostalgia. i have a chinese made black hugger coming in the mail in a few weeks that should help out with that.
 20160605_202432 by Steve, on Flickr
anyways enough yammering, lets start the beater f4i street fighter ameture hour **** show.
day one
i started with the hardest and most critical part, the front end..
first the contemplating stage
i started by stripping it down, looking all the wiring over, and staring at it for an hour or two scratching my head. i have no idea where to begin.
i learned how to bypass the tipover switch, and how the headlight circuit works.
then i remember... im a horrible.. terrible... hack of a fabricator. i have a drill, a set of files, and a dremel, and i do not own a measuring stick.
starting to chicken out as im having trouble visualizing the end result, and i start having visions of crookedly cut hunks of scrap metal holding my bike together. i decide not to slice up the stock components just in case.
20160604_174954 by Steve, on Flickri saw all those acrebis cyclops builds online, and i even ordered one in to look at, but once it was in my hands i realized how much of a peice of total crap it was, and how incompatible with my vague goals it was.
but the IDEA of cyborg projector crazy lights really strikes a chord with me.
i picked up an assortment of little automotive fog and projector lights on clearance and from stuff laying around the shop and took 'em home.
there were these tiny black hella projectors that have been discontinued for years, 55 watts a hit. they're cheaply made but from a distance, really nice. buddy at the auto parts store sold me the pair for 40 bucks.
so i tried to do a vertical stack on the stock fairing stay, but inverted. you know, like almost every cyborg streetfighter, but instead of with a nice fabricated bracket, with the stock steel hunk of crap.
crammed the signals in there too....... dont know how the wrench fit...
stand back and take a look....
..
...
..
20160604_193919 by Steve, on Flickryeah... fail.
then i remember i need to plan a way to mount the gauges,.
a quick test revealed that the projectors are really weak too, not bad for a low beam, but no good. also, blue is ground and black is power, what the hell, hella? blew a few fuses before i figured that crap out.
next experiment, i flipped the fairing stay back over and attempted to hack the stock cast gauge/mirror/windshield mount. it failed because the casting was too rough on the bottom to mount lights to.
threw it out and found a hunk of scrap aluminum (used to be a cruiser windshield stay). it's totally wrong for the job, not symmetrical, but somehow, i like how it looks on there... can't explain why.
kept one projector on the bottom. now we're getting somewhere
20160605_093620 by Steve, on Flickrfast forward a bit, projector for low beam, small 55w H3 fog light in the corner for high beam? kinda weird but im liking it so far.
chopped wiring and buried it in front of the airbox, harness is still stock except for the headlight harness is completely redone. routed everything under the front of the tank. it's a bit ugly, might make a cover.
hacked the ends off the ram air snorkels to make side snorkels. the f4i sounds sooo much better without the ram air and resonators. she screams.
20160605_202335 by Steve, on Flickrheadlight test
20160605_202419 by Steve, on Flickr20160605_202409 by Steve, on Flickrstill haven't figured out signals, but im thinking those little LED rings that go around the fork legs.
after that, im going to chop it right after the seat. sawing the tail will be 'no turning back' time, as i haven't actually modified anything yet, i could still go back to stock.
i MIGHT re-use the stock taillight just for nostalgia. i have a chinese made black hugger coming in the mail in a few weeks that should help out with that.
20160605_202432 by Steve, on Flickr
#4
06-14-2016, 10:56 PM
Join Date: May 2015
Posts: 105
Likes: 0
Received 0 Likes
on
0 Posts
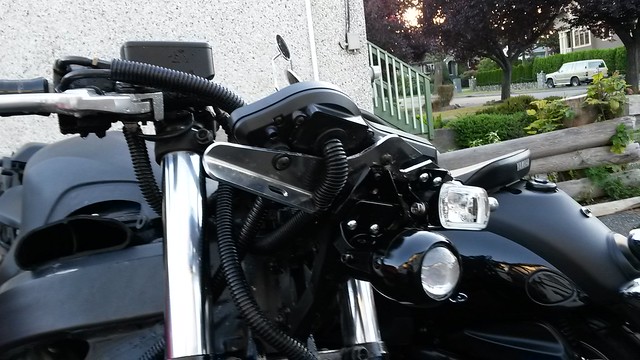
i redid the light n gauge panel in a piece of aluminum that i painted matte black
the projector fog light i was using for my low beam ended up being kinda messed up. it got so hot that it smoked the paint off while commuting to work. you could hear raindrops fizzling as they touched it.
so i threw a quad LED monster on there as my low beam. 16 watts but 1200+ lumens in a really heavy aluminum housing. this is good since i mounted a second high beam, im running 120 watts of high beam.. the savings from the LED will probably make my battery survive
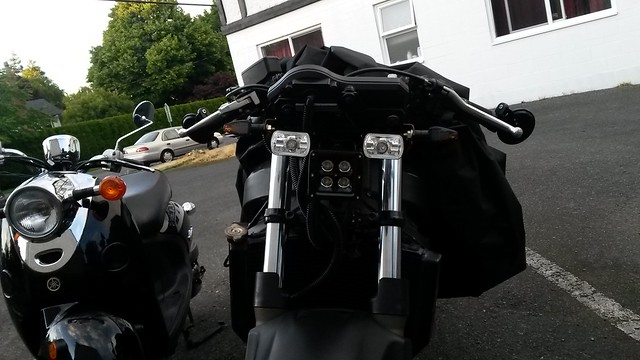 20160614_204303 by Steve, on Flickr
now i can start working on selling all my fairings, headlight, rear seat, blah blah to fund the rest of the build
tail chop is definitely next
the projector fog light i was using for my low beam ended up being kinda messed up. it got so hot that it smoked the paint off while commuting to work. you could hear raindrops fizzling as they touched it.
so i threw a quad LED monster on there as my low beam. 16 watts but 1200+ lumens in a really heavy aluminum housing. this is good since i mounted a second high beam, im running 120 watts of high beam.. the savings from the LED will probably make my battery survive
20160614_204303 by Steve, on Flickrnow i can start working on selling all my fairings, headlight, rear seat, blah blah to fund the rest of the build
tail chop is definitely next
#6
06-16-2016, 08:58 AM
Join Date: May 2015
Posts: 105
Likes: 0
Received 0 Likes
on
0 Posts
defintely going for a short tail im just not sure how far to go with it yet. i might not cut it right at the rear seat.
tail fairing idea is right out, but i might put black aluminum plate on both sides of the subframe just so i don't have plain square tube there.
we'll see how she goes once i have a saw in my hand.
tail fairing idea is right out, but i might put black aluminum plate on both sides of the subframe just so i don't have plain square tube there.
we'll see how she goes once i have a saw in my hand.
#7
06-17-2016, 10:53 PM
Join Date: May 2015
Posts: 105
Likes: 0
Received 0 Likes
on
0 Posts
been riding it a lot this week trying to get used to it being naked and make sure my headlight holds up.
cons, that f4i trunk is nice to have. i'll miss it. maybe i can hack a small storage compartment into my subframe. the droning intake noise is also a bit intense, but i can rev past it.
pros, my average coolant temperature in town dropped huge. was 109c before, and now is 80c. that's huge.
got a lot together for tail parts today... mostly obsolete stuff really cheap from some of my suppliers at work. i have signals, brake light, plate holder all planned out
so far i haven't even busted out a hundred bucks for parts on this build
i think im going to hit 'er with the grinder tomorrow. i might need to get a few beers in me first. wish me luck.
as far as tail electronics go, i have a reg rec, two relays, two horns, and a techlusion fuel controller to hide somewhere. shouldn't be too bad. will try to keep the stock battery and box in place if possible.
#8
06-18-2016, 05:50 PM
Join Date: May 2015
Posts: 105
Likes: 0
Received 0 Likes
on
0 Posts
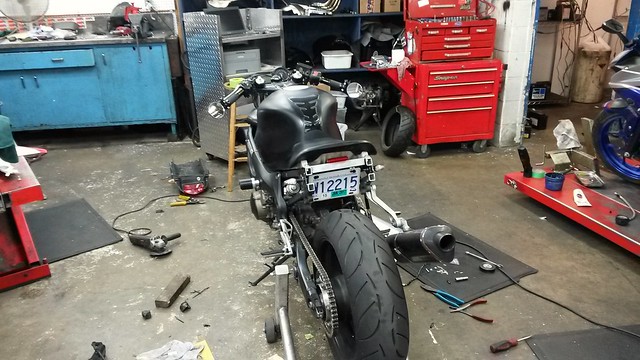
well i hit it with the angle grinder, then couple hours of head scratching and hiding wiring turned it into this...
 2016-06-18_03-43-21 by Steve, on Flickr
once i find end caps that fit for the subframe and paint the aluminum and skirt the back of the seat (or at least paint that white plastic black), i think it'll look ok.
my plate mount ended up being really nice, the bottom of the plate actually rests on the battery box, forming a full fender
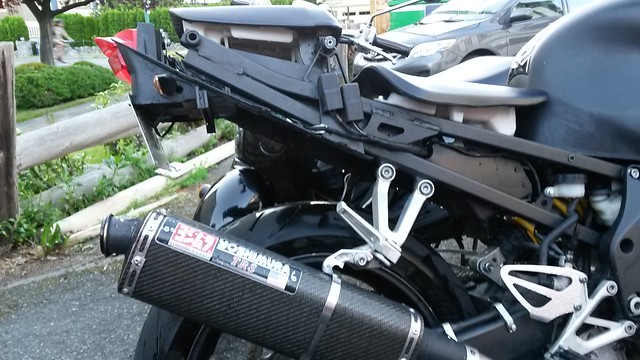
now the exhaust is way out to lunch, im not too sure what to do with it. i cant just straight pipe this thing, my neighbours will kill me.
2016-06-18_03-43-21 by Steve, on Flickronce i find end caps that fit for the subframe and paint the aluminum and skirt the back of the seat (or at least paint that white plastic black), i think it'll look ok.
my plate mount ended up being really nice, the bottom of the plate actually rests on the battery box, forming a full fender
now the exhaust is way out to lunch, im not too sure what to do with it. i cant just straight pipe this thing, my neighbours will kill me.
#9
06-19-2016, 06:32 AM
Cut that can down!
Drill out rivets.
Pull end cap out.
Mark how short you want it
Sawzall the can down.
Line end cap up
Drill pilot holes for new rivets
Rivet it
Done
(If you do it from the front of the can, the Yosh tag will still be there)
Drill out rivets.
Pull end cap out.
Mark how short you want it
Sawzall the can down.
Line end cap up
Drill pilot holes for new rivets
Rivet it
Done
(If you do it from the front of the can, the Yosh tag will still be there)
Last edited by Conrice; 06-19-2016 at 06:35 AM.
#10
06-19-2016, 09:25 AM
Join Date: May 2015
Posts: 105
Likes: 0
Received 0 Likes
on
0 Posts

