How To: Replace your Automatic Cam Chain Tensioner
#1
 12-20-2009, 03:10 PM


This is a How To for Replacing your Automatic Cam Chain Tensioner.
The tensioner on the F3's is not one of the oil filed hydraulic type of tensioner's. It's a simple spring wound device that automatically increases the tension on your cam chain as it wears during it's life. Over time the springs inside don't have enough force to hold the plunger out as well as it used to. Remember that these devices have been in our bikes for at least 11 years. Time takes it's toll. Many people would have you put in a manual tensioner, but I like the set and forget type of install. I don't mind paying $45 for a new tensioner every 50K miles or 11 years, whichever comes first.
Symptoms:
Generally you're going to hear a rattling noise from the right side of your bike near the cylinders. You'll usually hear this when starting from a cold start and often times it will go away as the engine warms up, but not always. I guess that if you left it to making that noise for a long enough time (years maybe) you could run the risk of the chain coming off the sprockets, or jumping teeth, however I think that is way down there on the list of probabilities. Mostly you replace it because you're getting tired of hearing that noise when you start your engine and your friends are giving you that "look".
Time Involved: Less than 1 hour
Parts
14520-MBZ-K01 Lifter, Tensioner
14523-MAL-A00 Gasket, Tensioner Holder
Tools Needed
5mm Allen Wrench
8mm Socket Wrench
8mm Box End Wrench
12mm Socket Wrench
14mm Socket Wrench
Special Tool (home made for winding up the tensioner spring)
Scotch Brite Pad
Where to start
Start by removing the right service panel, the right rear cowl (below the seat), and the lower cowling. It goes from looking like this.
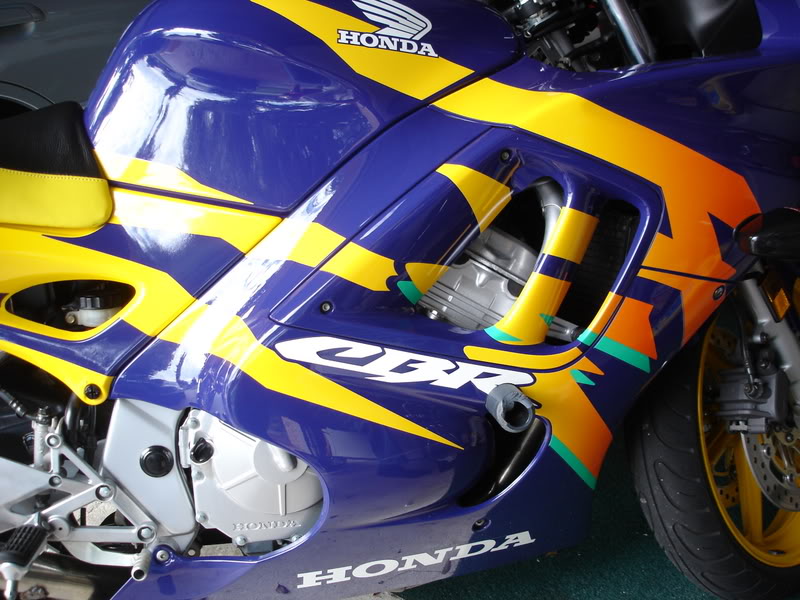
To looking like this.
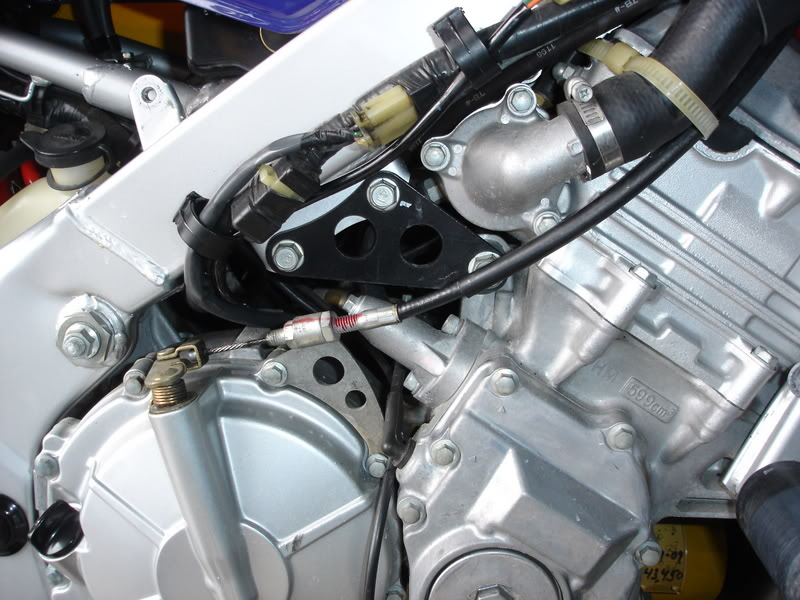
After removing your lower cowling, you're going to want to remove the lower Clutch Cable bracket, and the Right Engine Hanger bracket. (could you leave some of these things in place, yes, but it's easier to do the work if you remove them and get them out of the way).
Clutch Cable Bracket Removed

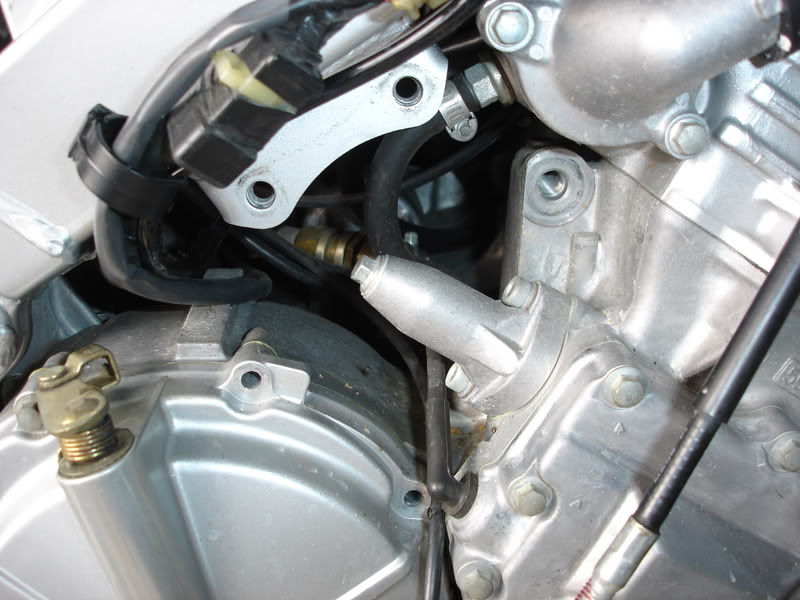
Right Engine Hanger Bracket Removed
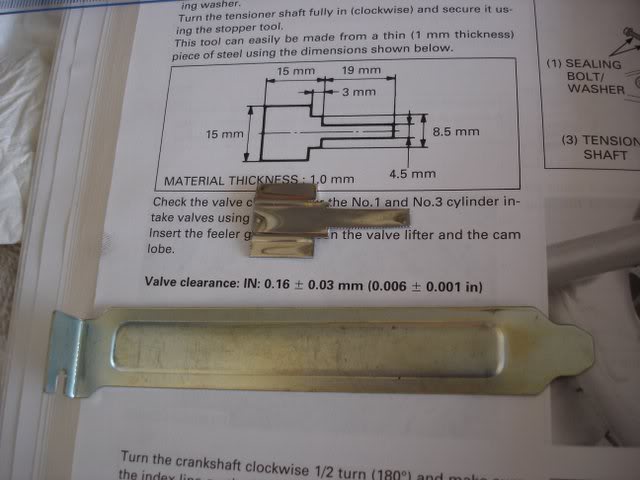
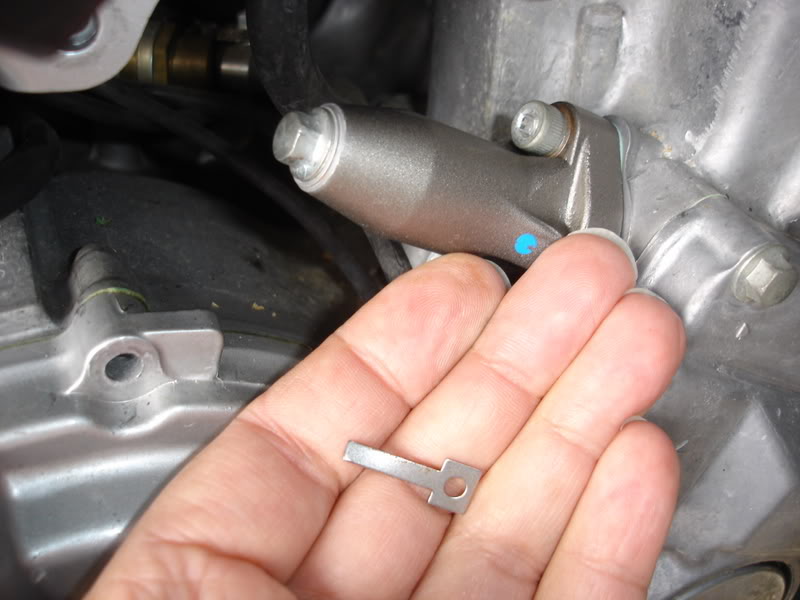
Now that those are out of the way, we need to wind up the spring inside the tensioner. We do this by removing the small 8mm bolt that is on the end of the tensioner and inserting a special little tool (the shop manual tells you how to make it from some scrap metal. I had one of those metal plates you find in the back of a PC), rotating it CW (clockwise), then having it engage with the shoulders of the tensioner. I've heard of people using a small flat screwdriver and then fashioning some way to hold it while it's wound up.
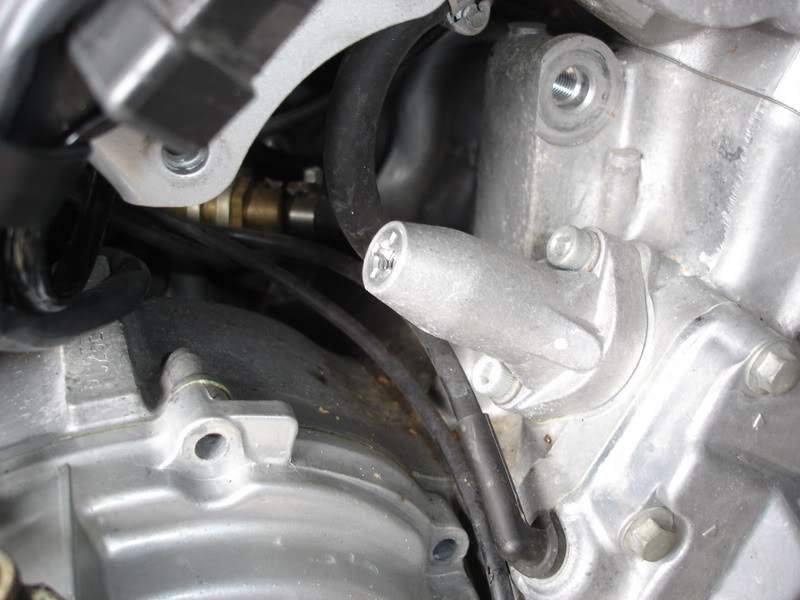
Bolt removed
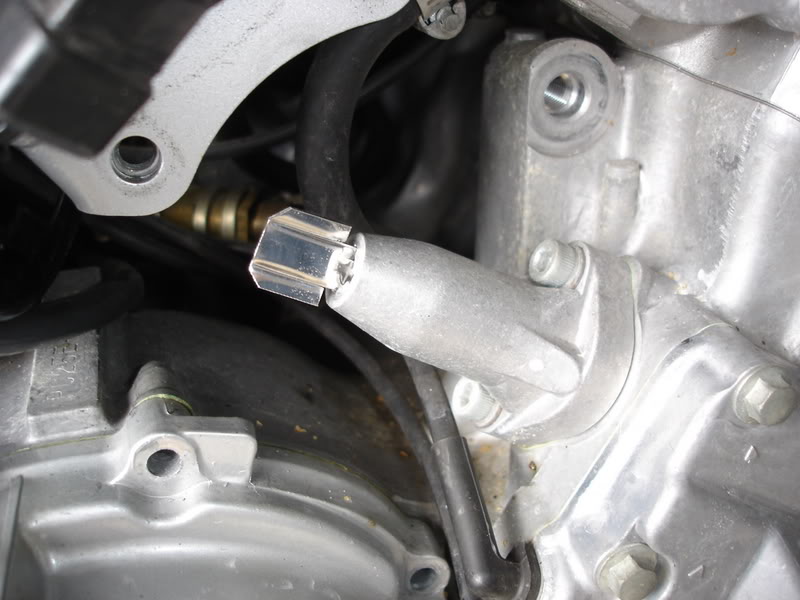
Tool inserted and wound up. You can see it's engaged with the little slots that are in the tensioner.
Now it's just a matter of removing the 2 5mm allen head bolts that hold the tensioner in place and removing the tensioner. There is a gasket under the tensioner that you should replace. It gets damaged when you remove the tensioner from the engine.
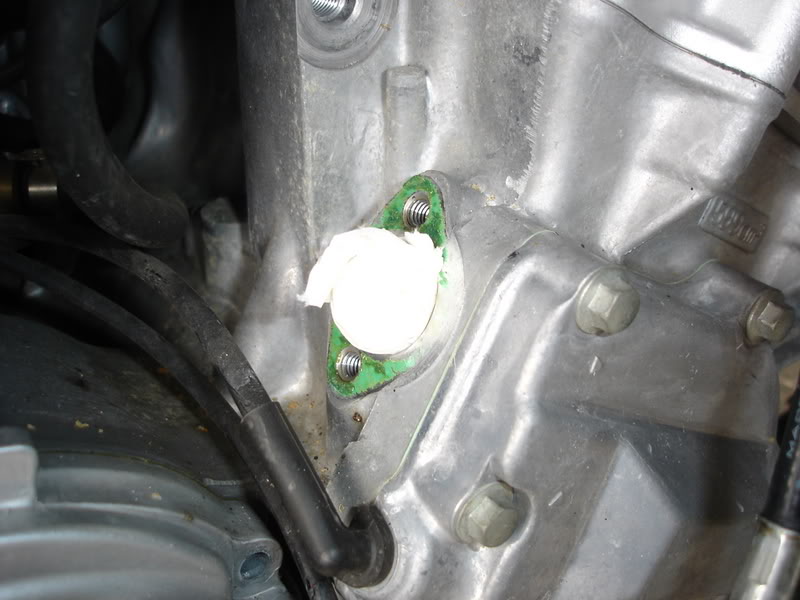
I've inserted a small wad of paper towel to plug the hole where the tensioner goes in order to prevent the old gasket material from falling inside the engine as I clean the old gasket off. I use a Scotch Brite pad to remove the old gasket material from around the opening.
You can see in the below pictures how much the plunger moves in and out as you wind up the spring inside the tensioner.
Fully retracted (wound up)
Fully extended
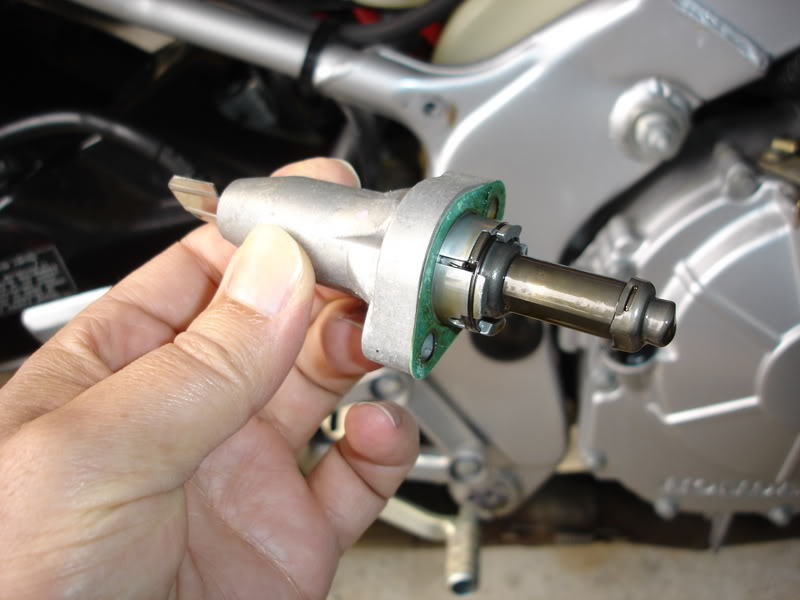
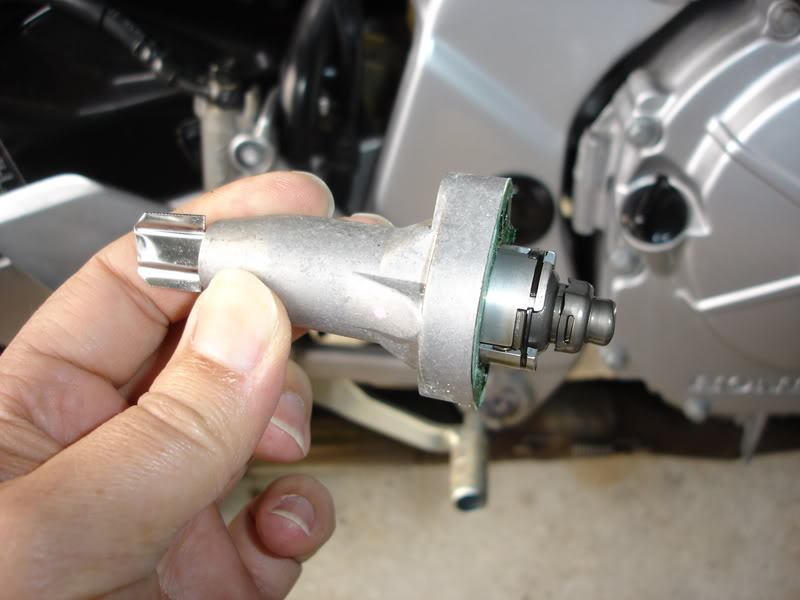
This is the new tensioner installed. The new tensioner had a small tool inserted into it to hold the plunger in a retracted position so that you can install it on the bike. If the plunger is not fully retracted you will not be able to install it on the bike.
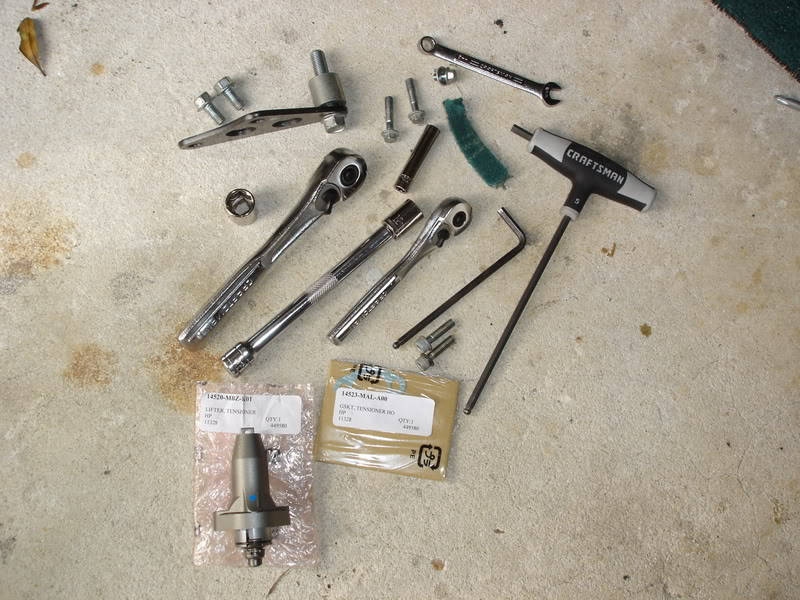
Here's a photo of everything used during the removal process.
Now it's a matter of putting the brackets back on and buttoning her back up. That's pretty much all that's involved in replacing the Automatic Cam Chain Tensioner.
Feel free to comment or offer suggestions or tips you may have.
The tensioner on the F3's is not one of the oil filed hydraulic type of tensioner's. It's a simple spring wound device that automatically increases the tension on your cam chain as it wears during it's life. Over time the springs inside don't have enough force to hold the plunger out as well as it used to. Remember that these devices have been in our bikes for at least 11 years. Time takes it's toll. Many people would have you put in a manual tensioner, but I like the set and forget type of install. I don't mind paying $45 for a new tensioner every 50K miles or 11 years, whichever comes first.
Symptoms:
Generally you're going to hear a rattling noise from the right side of your bike near the cylinders. You'll usually hear this when starting from a cold start and often times it will go away as the engine warms up, but not always. I guess that if you left it to making that noise for a long enough time (years maybe) you could run the risk of the chain coming off the sprockets, or jumping teeth, however I think that is way down there on the list of probabilities. Mostly you replace it because you're getting tired of hearing that noise when you start your engine and your friends are giving you that "look".
Time Involved: Less than 1 hour
Parts
14520-MBZ-K01 Lifter, Tensioner
14523-MAL-A00 Gasket, Tensioner Holder
Tools Needed
5mm Allen Wrench
8mm Socket Wrench
8mm Box End Wrench
12mm Socket Wrench
14mm Socket Wrench
Special Tool (home made for winding up the tensioner spring)
Scotch Brite Pad
Where to start
Start by removing the right service panel, the right rear cowl (below the seat), and the lower cowling. It goes from looking like this.
To looking like this.
After removing your lower cowling, you're going to want to remove the lower Clutch Cable bracket, and the Right Engine Hanger bracket. (could you leave some of these things in place, yes, but it's easier to do the work if you remove them and get them out of the way).
Clutch Cable Bracket Removed
Right Engine Hanger Bracket Removed
Now that those are out of the way, we need to wind up the spring inside the tensioner. We do this by removing the small 8mm bolt that is on the end of the tensioner and inserting a special little tool (the shop manual tells you how to make it from some scrap metal. I had one of those metal plates you find in the back of a PC), rotating it CW (clockwise), then having it engage with the shoulders of the tensioner. I've heard of people using a small flat screwdriver and then fashioning some way to hold it while it's wound up.
Bolt removed
Tool inserted and wound up. You can see it's engaged with the little slots that are in the tensioner.
Now it's just a matter of removing the 2 5mm allen head bolts that hold the tensioner in place and removing the tensioner. There is a gasket under the tensioner that you should replace. It gets damaged when you remove the tensioner from the engine.
I've inserted a small wad of paper towel to plug the hole where the tensioner goes in order to prevent the old gasket material from falling inside the engine as I clean the old gasket off. I use a Scotch Brite pad to remove the old gasket material from around the opening.
You can see in the below pictures how much the plunger moves in and out as you wind up the spring inside the tensioner.
Fully retracted (wound up)
Fully extended
This is the new tensioner installed. The new tensioner had a small tool inserted into it to hold the plunger in a retracted position so that you can install it on the bike. If the plunger is not fully retracted you will not be able to install it on the bike.
Here's a photo of everything used during the removal process.
Now it's a matter of putting the brackets back on and buttoning her back up. That's pretty much all that's involved in replacing the Automatic Cam Chain Tensioner.
Feel free to comment or offer suggestions or tips you may have.
Last edited by IDoDirt; 12-20-2009 at 10:24 PM. Reason: Formatting
#2
12-20-2009, 03:21 PM
Official Welcome Crew Spicy Cat
#3
12-20-2009, 04:46 PM
No APE for me. The OEM Honda worked for all these years and costs less. The adjustments on the APE are just to vague for me. I also don't believe the hype that is on the APE site.
But that's just me.
But that's just me.
#4
12-20-2009, 05:15 PM
Nice tutorial. I'm replacing mine when the weather is better but I am going with APE. Question: can the old one be removed without retracting the tensioner?
EDIT PS
Btw, even your tools are super shiny... By chance are you a surgeon or something? I'm betting my tools are newer than yours and have more scratches & scuffs than yours
EDIT PS
Btw, even your tools are super shiny... By chance are you a surgeon or something? I'm betting my tools are newer than yours and have more scratches & scuffs than yours
Last edited by Kuroshio; 12-20-2009 at 07:18 PM.
#5
12-20-2009, 06:34 PM
Yes it can. As you loosen the Allen head bolts, the pressure from the internal spring is going to push the tensioner away from the engine. The internal spring has about as much tortional force as you feel when you open a door **** with your hands. You will not be able to put the old tensioner back on though without retracting it first.
#6
12-20-2009, 06:58 PM
 I've had the APE tensioner for a bit now but noticed I needed a gasket and forgot to order it. Now my bike is surrounded by about a foot of snow
#7
12-20-2009, 07:06 PM
#8
12-20-2009, 08:43 PM
Official Welcome Crew Spicy Cat
mind = blown.
move south, that's where all the cool kids are
#9
12-20-2009, 10:21 PM
I'm not really sure if that makes sense.