
HOW TO: Clutch Replacement (PICTURE INTENSE) 56K, Don't even try.


Thread Starter
|
Senior Member
Joined: Mar 2006
Posts: 902
Likes: 0
From: Cape Cod, MA
This is a holder spot for a post I'm making for a step by step on a clutch replacement for a 93-96 CBR1000F. I will also do one on replacing the plastic speedo nut that wears out over time, but not until next week.
This is a step by step display of how to replace your clutch on a 93-96 CBR1000F. This is going to show as much as possible for those who don't know what they are doing. For those that do, skip down just a little.
Stuff you need:
1) Tools for removing you RIGHT SIDE fairing
2) 8mm socket for removing bolts on clutch cover
3) Big blade screwdriver for removing the clutch cover
4) New fiber plates and if your cautious, maybe a couple of steel plates
5) New clutch cover gasket
6) Long reach magnet
7) TORQUE WRENCH (unless you think your gifted and can tell when something is only at 9ft lbs and not 13 ft lbs.)
Stuff that you don't necessarily need but helps:
1) New clutch springs
2) New clutch spring bolts
Ok, now that that's out of the way, here we go.
First Step: Drain your oil (makes life easy)
Second Step: Soak New Clutch Fiber plates in clean oil
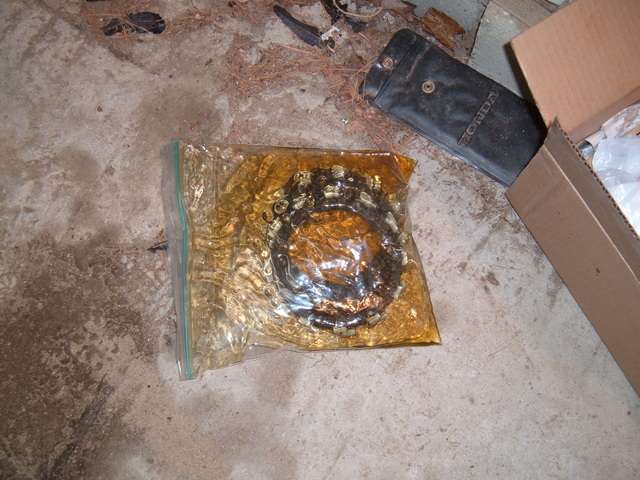
Some people will say just to throw them in dry, but I tend to sometimes follow the manufacturer's directions.
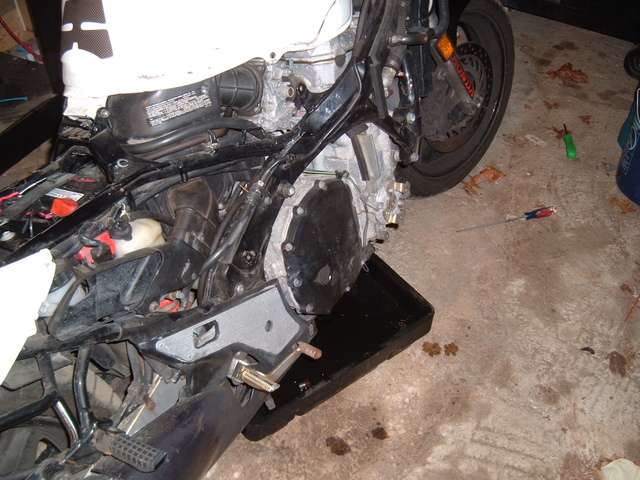
Third Step: Remove RIGHT SIDE FARING
From this...

To This:
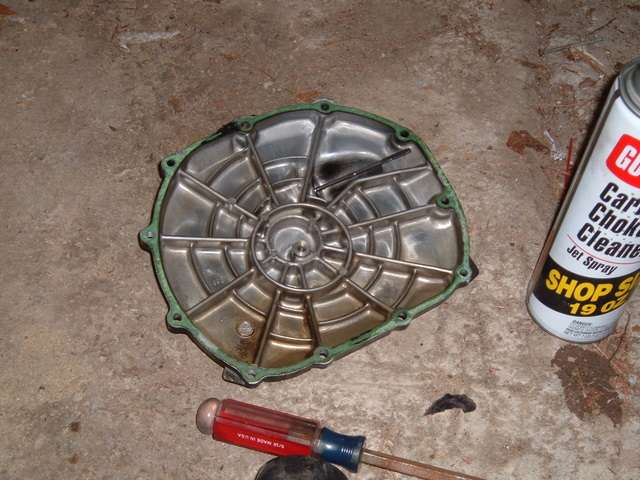
Fourth Step: Remove bolts on clutch cover and remove cover...
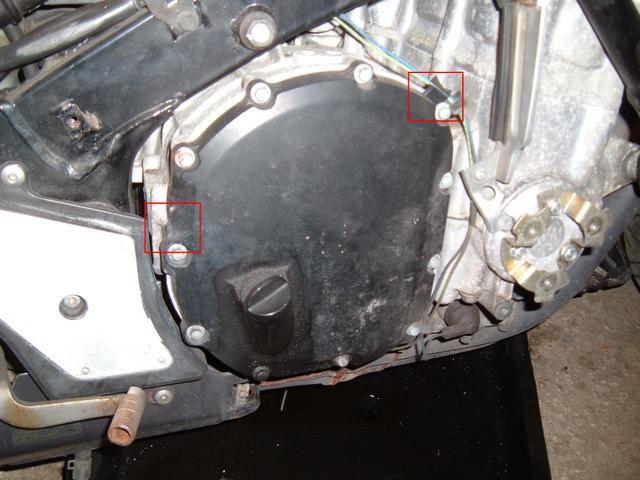
WARNING: When trying to remove the clutch cover, DO NOT use the dip stick hole as a leverage point. The threads cannot handle the weight and will quickly collapse (ask me how I know). There are two tabs on the cover that can be used as prying points. I highlighted them in red in the above picture. I used a large blade screwdriver and pried the cover off using the tab by the dipstick, using the rear brake pedal as a pivot point.
After the cover pops off comes...
STEP FIVE: Clean the old gasket off the cluch cover and the case
So that it looks like this:
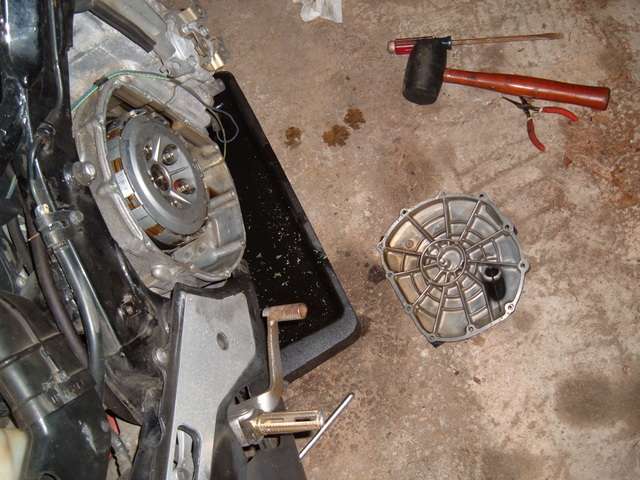
This step will probably take the longest to accomplish, especially, if the gasket is embedded on there good. Mine took almost an hour to completely clean, with the cover taking the longest. The case came off relatively easily.
Now that the cleaning is done..
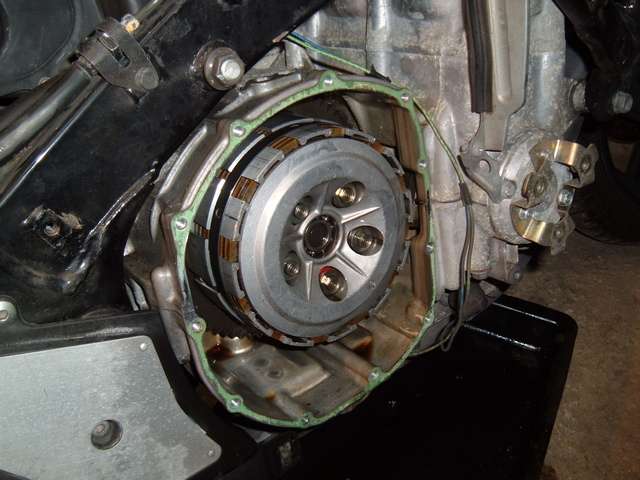
STEP SIX: Unbolt the clutch hub
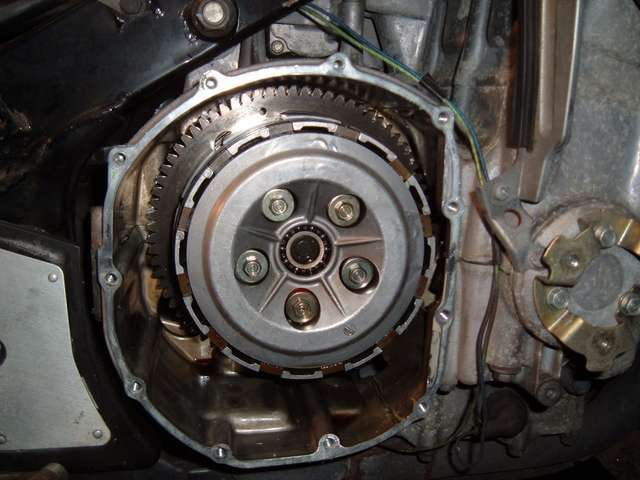
See those 5 bolts? They're 10mm heads. I unbolted them 1/2 turn at a time in a circular movement so as to not stress and one part of the clutch hub. After about 6 times around I could safely remove them one at a time.
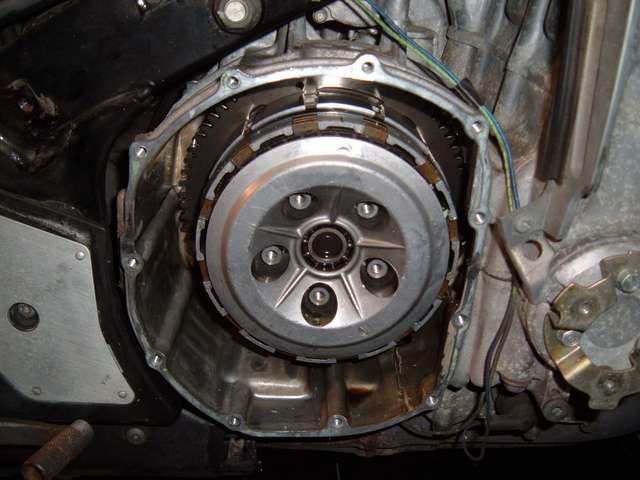
STEP SEVEN: Remove the clutch hub and begin to remove the fiber and steel plates
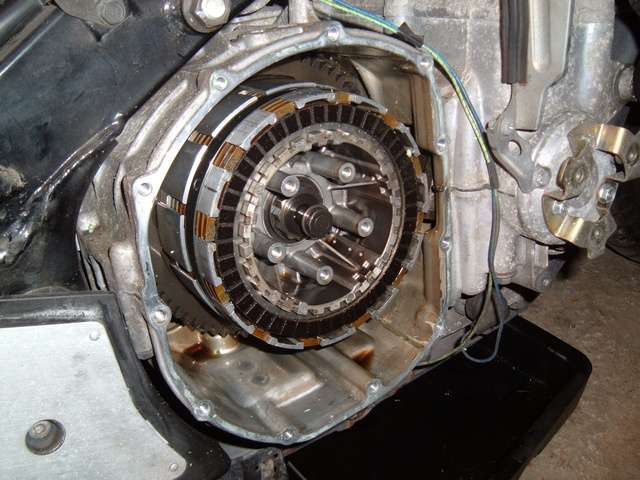
This is where the magnet comes in. The first couple of fiber plates will be easy as you can just grab the tabs and remove them. But as you work further in, it will become more difficult as there is a band that covers up the tabs (that dark silver ring on the outer clutch hub). I used a pair of blade screw drivers and slowly lifter the fiber plates out.
NOTE: There is a small spring with the last fiber plate that fits snuggly around the inner hub. If it comes out and you don't notice which way it was facing, the wider edge faces out.

Step EIGHT: Examine the steel plates
If all your doing is replacing the fiber plates, check out the steel plates to make sure they are not warped or burnt.
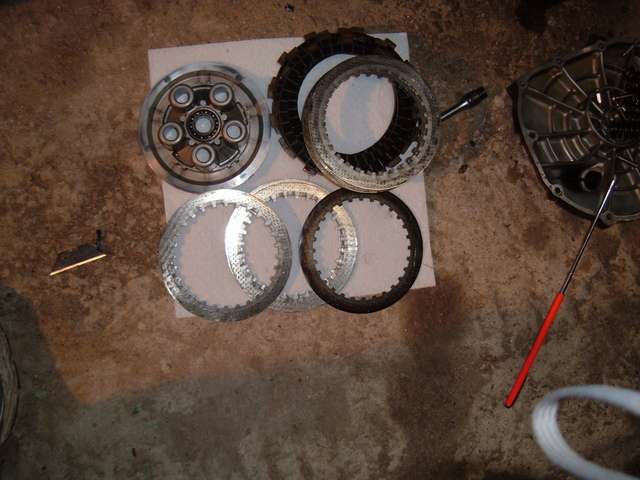
As you can see, the plate on the right is severely discolored (from doing full speed launches from my old job ) I ended up replaced 4 of the steel plates.
Step Nine: Install the new clutch (sorry, no pictures)
Take the fiber plates and lay them out. One of them is different than the rest. That one goes in first, then a steel plate, then a fiber. Rinse, repeat until you are out of steel plates and the last plate is a fiber plate.
Put the clutch inner cover on:
You are going to need to push the cover back on. Because there was no pressure on the clutch pushrod, the clutch fluid has pushed it out just enough so that the clutch bolts won't thread on. Once that's done, install the springs and clutch bolts. I hand tighten them at first (to avoid cross-threading), then tighten them to 9FT LBS. I tighten them in a star pattern (tighten one, then the one across, so on and so forth).
Step Ten: Install clutch cover and new gasket
What I did was put all the bolts in the clutch cover, then put the new gasket on the bolts. This made it easier when putting it on the engine (kept the gasket in place) Tighten bolts (no torque spec listed) the two wire clips go on the upper and lower bolts on the right side. Refill with oil (if drained), reinstall plastics and GO RIDE.
Things I found out after:
1) if you do this job with the bike on the side stand, you do not need to drain the oil.
2) there was more here, but a forum crash took out everything after step 6
3) I'm so glad I have a lift now so I don't have to do this kind of job on the floor
4) Ignore the extra apostrophes, the forum software is still effing everything up
This is a step by step display of how to replace your clutch on a 93-96 CBR1000F. This is going to show as much as possible for those who don't know what they are doing. For those that do, skip down just a little.
Stuff you need:
1) Tools for removing you RIGHT SIDE fairing
2) 8mm socket for removing bolts on clutch cover
3) Big blade screwdriver for removing the clutch cover
4) New fiber plates and if your cautious, maybe a couple of steel plates
5) New clutch cover gasket
6) Long reach magnet
7) TORQUE WRENCH (unless you think your gifted and can tell when something is only at 9ft lbs and not 13 ft lbs.)
Stuff that you don't necessarily need but helps:
1) New clutch springs
2) New clutch spring bolts
Ok, now that that's out of the way, here we go.
First Step: Drain your oil (makes life easy)
Second Step: Soak New Clutch Fiber plates in clean oil
Some people will say just to throw them in dry, but I tend to sometimes follow the manufacturer's directions.
Third Step: Remove RIGHT SIDE FARING
From this...
To This:
Fourth Step: Remove bolts on clutch cover and remove cover...
WARNING: When trying to remove the clutch cover, DO NOT use the dip stick hole as a leverage point. The threads cannot handle the weight and will quickly collapse (ask me how I know). There are two tabs on the cover that can be used as prying points. I highlighted them in red in the above picture. I used a large blade screwdriver and pried the cover off using the tab by the dipstick, using the rear brake pedal as a pivot point.
After the cover pops off comes...
STEP FIVE: Clean the old gasket off the cluch cover and the case
So that it looks like this:
This step will probably take the longest to accomplish, especially, if the gasket is embedded on there good. Mine took almost an hour to completely clean, with the cover taking the longest. The case came off relatively easily.
Now that the cleaning is done..
STEP SIX: Unbolt the clutch hub
See those 5 bolts? They're 10mm heads. I unbolted them 1/2 turn at a time in a circular movement so as to not stress and one part of the clutch hub. After about 6 times around I could safely remove them one at a time.
STEP SEVEN: Remove the clutch hub and begin to remove the fiber and steel plates
This is where the magnet comes in. The first couple of fiber plates will be easy as you can just grab the tabs and remove them. But as you work further in, it will become more difficult as there is a band that covers up the tabs (that dark silver ring on the outer clutch hub). I used a pair of blade screw drivers and slowly lifter the fiber plates out.
NOTE: There is a small spring with the last fiber plate that fits snuggly around the inner hub. If it comes out and you don't notice which way it was facing, the wider edge faces out.
Step EIGHT: Examine the steel plates
If all your doing is replacing the fiber plates, check out the steel plates to make sure they are not warped or burnt.
As you can see, the plate on the right is severely discolored (from doing full speed launches from my old job
) I ended up replaced 4 of the steel plates. Step Nine: Install the new clutch (sorry, no pictures)
Take the fiber plates and lay them out. One of them is different than the rest. That one goes in first, then a steel plate, then a fiber. Rinse, repeat until you are out of steel plates and the last plate is a fiber plate.
Put the clutch inner cover on:
You are going to need to push the cover back on. Because there was no pressure on the clutch pushrod, the clutch fluid has pushed it out just enough so that the clutch bolts won't thread on. Once that's done, install the springs and clutch bolts. I hand tighten them at first (to avoid cross-threading), then tighten them to 9FT LBS. I tighten them in a star pattern (tighten one, then the one across, so on and so forth).
Step Ten: Install clutch cover and new gasket
What I did was put all the bolts in the clutch cover, then put the new gasket on the bolts. This made it easier when putting it on the engine (kept the gasket in place) Tighten bolts (no torque spec listed) the two wire clips go on the upper and lower bolts on the right side. Refill with oil (if drained), reinstall plastics and GO RIDE.
Things I found out after:
1) if you do this job with the bike on the side stand, you do not need to drain the oil.
2) there was more here, but a forum crash took out everything after step 6
3) I'm so glad I have a lift now so I don't have to do this kind of job on the floor
4) Ignore the extra apostrophes, the forum software is still effing everything up
Last edited by malbojah; Mar 4, 2018 at 06:15 AM. Reason: fixed bad link


Super Moderator
Joined: Aug 2006
Posts: 5,304
Likes: 512
From: South Florida, USA
Great job !! With this tutorial, this job goes from a mystery and not sure if you'd want to tackle, to it looks like a cake job. Maybe that's exaggerating, but it's well within the realm of the do-it youselfer. Can't wait for Chapter II.

Joined: Sep 2006
Posts: 44
Likes: 0
From: Lisbon Portugal
Great ideea. From now on I will always take pictures of what services I'm doing on the bike, and if we all do that (the ones that take care of the bikes themselves) we wount need to go to a shop anymore. As I am a harley mechanick, I know how some people pay a lot of money to the shops to take care of simple stuff, stuff that they can do themselves easyly....
Keep up the good work
Keep up the good work
Thread Starter
|
Senior Member
Joined: Mar 2006
Posts: 902
Likes: 0
From: Cape Cod, MA
Sorry about the lack of an update. I was 'volunteered' to work yesterday. However, I did get to the dealer today, so the clutch as well as the speedo nut are in. Tooks some more pictures and hope to have an update after I get out of work tonight.

Senior Member
Joined: Jun 2006
Posts: 346
Likes: 0
From: Bramming, Denmark, Scandinavia
This is just awesome! If all of you skilled "do it you self" guy's took pictures like this, we could all become skilled at it.
Would someone please make a post on how to replace CCand CCT ;-) Kinda the biggest issue on the Cane
Would someone please make a post on how to replace CCand CCT ;-) Kinda the biggest issue on the Cane