The story of one neglected Triumph...
#221
 12-20-2014, 07:53 AM


#222
12-20-2014, 12:47 PM

Yeah, young family with 1,8yr old son and a trucking company to run through the slow economy situation so something like a motorbike is pretty far down the list... but hey at least I still have the bikes in the first place, and two good cars. And one winter banger. I've talked to several guys that have had to sell their good car and bike and buy a crappy banger to survive their loans and stuff so I'm actually in a pretty good situation here, just don't have much of that patience thing everyone keeps talking about... after all the bike has been standing for over a year and from january it will be increasingly hard to find time to sneak into the garage so gotta make decisions about where to take the project to get it even in some kind of running state.
The economy will eventually get better so that stresser will get better. But you are in it for the long haul with the kids. that will get better too. there will be a day soon when one of the little Mattison's will be handing you wrench in the garage. thats when the real fun begins.
#223
12-20-2014, 02:22 PM


there will be a day soon when one of the little Mattison's will be handing you wrench in the garage. thats when the real fun begins.
 Lil�Sam`s gonna have the coolest cafe moped in the whole town
If only I could get my hands on one of these in good enough shape to still rescue but bad enugh to not feel sorry to modify, and for less money than a new one! That Puch engine is virtually bombproof and parts are still being made.

A Solifer SM or Export would do fine too, only that motor is known to vibrate quite a lot.
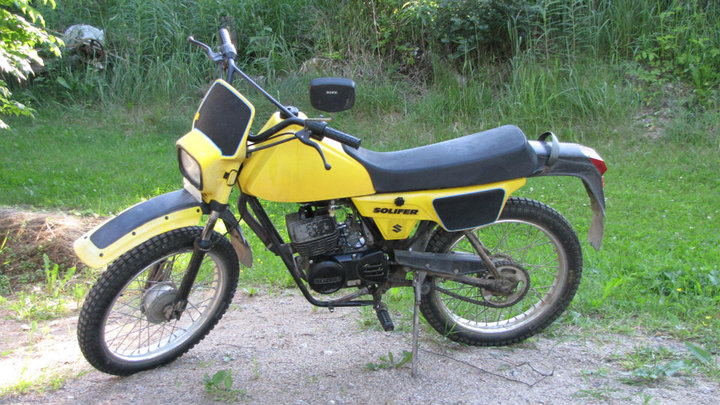
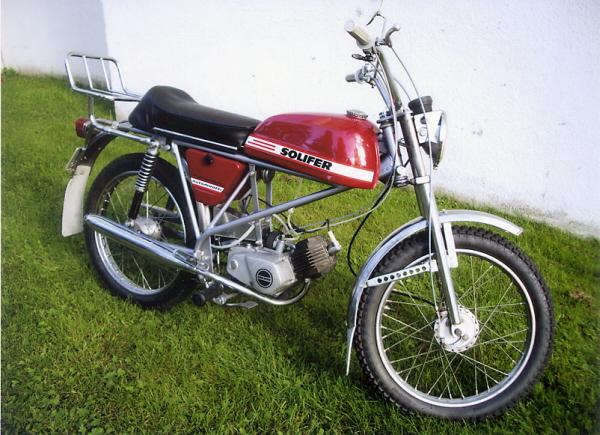
Now THIS picture birings back quite a lot of memories! In case you don`t know it`s a 50cc Suzuki Solifer S, nicknamed "the banana" for quite the obvious reasons. I had one just like that when I was 15, only it had black fender extender in the front. 80cc reed valve cylinder, 19mm dellorto, power exhaust from a Suzuki S1, loud as hell, went near 100km/h, guzzled gas but man did I fling some dirt in the back roads! Revved so much the coils changed like socks, the rear sprocket once came off the rim when the bolts came through the holes in a sandpit, pushed it home for 6km stopping every 100meters to untangle the chain from the wobbling sprocket, I could write a whole page about that thing.
Last edited by Mattson; 12-20-2014 at 02:31 PM.
#224
12-22-2014, 02:56 PM
has anyone got a hot tip to throw where I could get dirtbike style folding footpegs with 8mm bolt fitting?


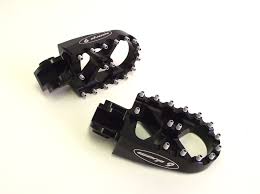
I`d want something in the lines of these. Has to have the hinge part that bolts to the rearset.
The best I can come up with is this:
CNC Universal Motorcycle Folding Foot Rest Pegs Footpeg Silver for Race Rearset | eBay
Pretty much what I got now but with a hinge, will order those if I absolutely cannot find anything else but don`t want them.
I have a pretty clear vision in my head about what kinds I want, they`re not 100% any of those but similar enough to give you the idea. Think I`ve seen them in an enduro/pitbike some time. The black middle one comes closest but preferrably with a rounded end. And a moderate pricetag, fearing the ones I want will be something like Rizoma, Driven or some other high-roller brand I can`t afford or at least am not willing to pay for.
For example could consider these:
http://www.ebay.com/itm/8mm-Motorcyc...item2edb275fdc
...but I`d need the mount parts and can`t figure out what they`re called as I can`t find any.
Last edited by Mattson; 12-22-2014 at 03:13 PM.
#225
12-23-2014, 10:44 AM
To answer myself: I`m a complete tool.

I suddenly realised today I already have the mounts, in the original rearsets! Only there`s the grease groove in the round part as it acts as the axel for the original brake pedal and the bolt is different size. The Danmoto bolt is 8mm where the original one is 10-12mm, but that can be bored in the bench drill easily. Both bolts were completely rounded off and super tight, I was able to get the right side open but the left one is completely seized so I sprayed it with wd-40 and left it to cure in the vice.

Hmm, this needs a little thinking... The peg pushes out pretty far and looks a bit weird, but I also cannot cut the round axel part off as then the hinge will hit the brake pedal... I can live with them pushing out as I actually prefer to have the ability to push my legs wide, often when I ride the cbr I put the tip of the peg just in front of my heel and let my shoe "hang" there. The axel could use either a cover (maybe a piece of pipe if I find the correct dia.) or machining to get it straight. The contact surface with the rearset is very small though so I`m concerned will they keep in place or will they loosen and start to rotate. Gotta take the right side rearset offf completely for further investigation. Would be nice to be able to re-use the original pegs and save the money for something more important.
I suddenly realised today I already have the mounts, in the original rearsets! Only there`s the grease groove in the round part as it acts as the axel for the original brake pedal and the bolt is different size. The Danmoto bolt is 8mm where the original one is 10-12mm, but that can be bored in the bench drill easily. Both bolts were completely rounded off and super tight, I was able to get the right side open but the left one is completely seized so I sprayed it with wd-40 and left it to cure in the vice.
Hmm, this needs a little thinking... The peg pushes out pretty far and looks a bit weird, but I also cannot cut the round axel part off as then the hinge will hit the brake pedal... I can live with them pushing out as I actually prefer to have the ability to push my legs wide, often when I ride the cbr I put the tip of the peg just in front of my heel and let my shoe "hang" there. The axel could use either a cover (maybe a piece of pipe if I find the correct dia.) or machining to get it straight. The contact surface with the rearset is very small though so I`m concerned will they keep in place or will they loosen and start to rotate. Gotta take the right side rearset offf completely for further investigation. Would be nice to be able to re-use the original pegs and save the money for something more important.
#226
12-26-2014, 03:59 PM
Well this is getting unnecessarily complex...

I finally got the seized bolt off the left side rearset, it was jammed in so good I had to drill the head off to get the bolt straight to the vice and to be able to turn the peg around it, took a good effort all the way up as it was so oxidized.

This is pretty much what the final assembly will hold, turned out there actually was a sleeve over the left side peg where on the right is the brake pedal. So I would now need to drill the hole in the brake pedal and the rearset frame from 8mm to 10mm to get the footpeg in place. Oh, but I can`t! Cause in the brake pedal there are two bearings! So the next idea would be to thread a helicoil insert into the footpeg mount to reduce the thread from 10mm to 8mm, but wait, there is a fine thread that has a tighter "rise" than a normal bolt! Aargh, why can`t these things never be simple! Probly best right now to wait till next week so all the bolt stores open so I can go there with the whole rearset to ask if they`d have the thread insert AND a bolt with the same pitch to replace the original...
I finally got the seized bolt off the left side rearset, it was jammed in so good I had to drill the head off to get the bolt straight to the vice and to be able to turn the peg around it, took a good effort all the way up as it was so oxidized.
This is pretty much what the final assembly will hold, turned out there actually was a sleeve over the left side peg where on the right is the brake pedal. So I would now need to drill the hole in the brake pedal and the rearset frame from 8mm to 10mm to get the footpeg in place. Oh, but I can`t! Cause in the brake pedal there are two bearings! So the next idea would be to thread a helicoil insert into the footpeg mount to reduce the thread from 10mm to 8mm, but wait, there is a fine thread that has a tighter "rise" than a normal bolt! Aargh, why can`t these things never be simple! Probly best right now to wait till next week so all the bolt stores open so I can go there with the whole rearset to ask if they`d have the thread insert AND a bolt with the same pitch to replace the original...
#227
12-28-2014, 08:47 AM

Christmas has finally gone so I wont upset the neighbours by going to the garage to fly some sparks again, so it was time to lift the crash cage to the table. The first thing was to mend that cracked seam on the rear mount, apparently dispite the fact that I beveled the pipe prior to welding I couldn`t get the washer to bond with the pipe completely.

So I took the Dremel and grinded a groove to the end...

...which I then filled using a bit more current than the last time, hoping it melted through this time.

I tried cleaning the cage up the best I could from spatter and other crap. I grinded the welds down from the lower link pipe but didn`t bother to clean it up too much as it will be so close to the exhaust manifold no powdercoat will ever hold there so I will be wrapping the curved part in black fiberflass tape once the cage comes back from the painter. I still have to level the ends of the big "motherpipes" in the front and wipe the whole thing with solvent before dropping it off to get coated.
It`s not completely straight or even, it`s not that pretty, some of the welds look pretty crappy especially on the rear mounts but hey it`s 100% my own design, apart from the bends in the pipes completely self made and the best my skills ATM can do so I`m pretty happy with it and that`s what counts right?
Still thinking should I cut the lower link pipe in half and slot a piece of pipe in there to hold the two pieces together, would make it a hundred times easier to get on and off...
Last edited by Mattson; 12-28-2014 at 08:54 AM. Reason: why do I always write teh instead of the...
#228
01-01-2015, 05:51 AM
Got the footpeg problem solved. Well, for the most part.

I visited a special tool and bolt shop with the rearset to ask if they had any ideas. Apparently I knew more of thread inserts than the clerks as they told me it is not possible to reduce a thread to a smaller diameter with an insert. I still insisted to get access to the warehouse side and hey presto found what I was looking for. As it so happens the fine threaded M10 bolt in the footpeg mount has the same thread pitch than a regular M8 so all I needed was a few inserts.
For those who have never used these before: neither have I. I knew of them but haven`t had the need to use them. There is a special tool that they sold to insert these but at least on a thread no deeper than this the tool is not necessary, a regular needle valve tool will work just as well. Quite amusingly the valve part of a needle valve is called the valve`s soul in Finnish so the name of the tool is the soul reaver!

There is a little notch in the insert just before the part that you thread it in from, more of it in a second.

All you need to do is thread the insert into the (possibly damaged) thread, and if you`re a less of a schmuck than me you will remember to apply the threadlock into the first one too... When the insert is being put in it will coil inwards and reduce it`s overall diameter but be aware that for the same reason it cannot ever be threaded out once it`s on deep enough as attempting to do this will expand it like the springs that holds your allen keys in the metal loop thus tightening against the walls.

Wind the insert as far as it will go. If you cannot find long enough inserts put two shorter ones back to back, take the tool and give the mount a sharp tap against the table with the tool...

...and the "handle" part will snap off from the notch mentioned earlier.

All done. Well, almost. I was meaning to drill a slot to the rearset for the footpeg to lay in but turns out I cannot as there already is one on the other side for the brake pedal bearing assembly so I`ll have to either shorten the threaded part of the mount or make longer sleeves for them. As the one I have is already too short because of the slot in the original rearset, and teh other part is missing it altogether I`ll try first to make the sleeves. The Danmoto footpegs do not have a slot to sit in so I`d suppose these ones will hold in place just as well with just the bolt keeping them.
Today going to finish the chrash cage as I will drop it off to the paint shop tomorrow on my way to a tool shop to buy a feeler gauge to do the valve clearances.
I visited a special tool and bolt shop with the rearset to ask if they had any ideas. Apparently I knew more of thread inserts than the clerks as they told me it is not possible to reduce a thread to a smaller diameter with an insert. I still insisted to get access to the warehouse side and hey presto found what I was looking for. As it so happens the fine threaded M10 bolt in the footpeg mount has the same thread pitch than a regular M8 so all I needed was a few inserts.
For those who have never used these before: neither have I. I knew of them but haven`t had the need to use them. There is a special tool that they sold to insert these but at least on a thread no deeper than this the tool is not necessary, a regular needle valve tool will work just as well. Quite amusingly the valve part of a needle valve is called the valve`s soul in Finnish so the name of the tool is the soul reaver!
There is a little notch in the insert just before the part that you thread it in from, more of it in a second.
All you need to do is thread the insert into the (possibly damaged) thread, and if you`re a less of a schmuck than me you will remember to apply the threadlock into the first one too... When the insert is being put in it will coil inwards and reduce it`s overall diameter but be aware that for the same reason it cannot ever be threaded out once it`s on deep enough as attempting to do this will expand it like the springs that holds your allen keys in the metal loop thus tightening against the walls.
Wind the insert as far as it will go. If you cannot find long enough inserts put two shorter ones back to back, take the tool and give the mount a sharp tap against the table with the tool...
...and the "handle" part will snap off from the notch mentioned earlier.
All done. Well, almost. I was meaning to drill a slot to the rearset for the footpeg to lay in but turns out I cannot as there already is one on the other side for the brake pedal bearing assembly so I`ll have to either shorten the threaded part of the mount or make longer sleeves for them. As the one I have is already too short because of the slot in the original rearset, and teh other part is missing it altogether I`ll try first to make the sleeves. The Danmoto footpegs do not have a slot to sit in so I`d suppose these ones will hold in place just as well with just the bolt keeping them.
Today going to finish the chrash cage as I will drop it off to the paint shop tomorrow on my way to a tool shop to buy a feeler gauge to do the valve clearances.
Last edited by Mattson; 01-01-2015 at 05:56 AM.
#229
01-01-2015, 08:38 AM
#230
01-01-2015, 09:10 AM
In a regular hardware store I`d even expect that the barely 18 year old zit faced fellow with the posture of a cooked spaghetti doesn`t differ a screwdriver from a spanner but in a specialized tool and bolt shop mostly dealing with companies and professionals the lack of knowledge the obviously new seller (never seen him before and I`m a semi regular there) had is unacceptable. Being it WAS one day to new year all the regulars were probably on well deserved holiday and the guy behind the till was either a temp or a newbie so I`ll let it slide this time...