How to: Install MPS quickshifter
#1
 03-04-2013, 02:15 PM


Join Date: Apr 2012
Location: Asheville,NC / Aiken,SC
Posts: 151
Likes: 0
Received 0 Likes
on
0 Posts
Here is a quick install summary for the MPS quick shifter. This is a universal kit for anyone wanting instant, clutchless up-shifts. If you’ve been debating on getting a similar system, this is a way to gauge how much work is involved before making a decision. There are several people who swear by their good ole’ fashioned reflexes to shift, but for us slow folks, please spare us the lecture 
KIT INCLUDES: Ignition Kill box, shifter switch, instructions and miscellaneous wiring bits. $149.99
OPTIONAL PART: Schnitz wiring harness, HIGHLY recommended! You’ll need the Suzuki harness to fit our Honda. $49.99
I will try to keep this as brief and tactical as I can. If anyone has any questions or further clarity just ask!
1: Break Down
 ;
;
- Remove seat
- Remove gas tank cover [I removed all my fairings before beginning, only because I have a custom set coming in…that’s another thread J]
- Remove gas tank [I opted to leave everything connected and simply worked around the tank.]
- Remove Air box and all its wonderful accessories (fuel rail, sensors, filters Etc.)
- Remove Flapper/Ram air assembly, directly exposing the coil plugs. (HINT: easier done by unbolting the radiator and sliding it down a bit) ALSO.. [Great time to do the flapper mod, I did]
The remainder of this install will be either extremely easy/fun OR a major pain in the ***. It all depends if you opted for the Schnitz Harness or not. I did, to make things easier, so here we go….
2: Harness Installation

- Unplug your 4 coils
- Plug in new harness to coils
- Connect coil plug-wires to new harness, in the corresponding coil order.
- Plug new harness to Kill box
3: Kill box wiring
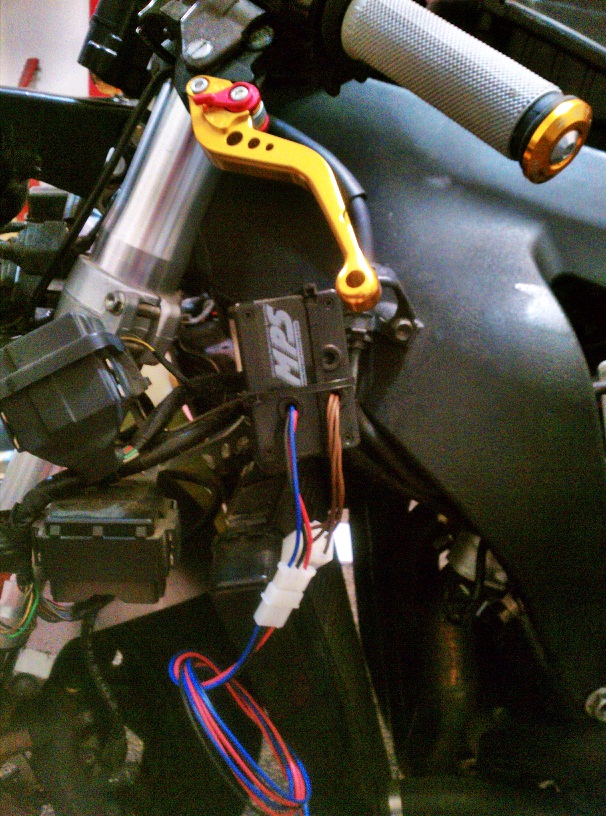 ;
;
- RED to a key activated, 12v power source. NOT THE BATTERY. [I used the day running headlight]
- BLUE to shifter switch [see below]
- BLACK to a good ground [I used negative post on battery]
Mount kill box anywhere you can find, I mounted mine where I removed the flapper canister and it fits perfect.
4: Shifter switch mount/wiring

The shifter switch is actually a common rear brake light switch, found on nearly every bike, designed to run in-line with your shifter rod. When an up shift is performed, the switch activates the kill box to momentarily cut ignition to the motor.
- Find a sturdy, in-line spot to mount the switch. [I used the little circular piece of metal near the kickstand]
- There are two wires on the switch red and blue. RED: connects to the blue activation wire on the kill box.
BLUE: connects to a good ground, I used the negative post on the battery.
Put everything back together and you're done!! Enjoy clutchless up-shifts above 3000 rpm. According to MPS Racing, WOT is not necessary to perform clutchless up-shifting with this system. It is recommended to shift above 3000rpm. I found this true, as it has operated flawlessly even in low rpm.
KIT INCLUDES: Ignition Kill box, shifter switch, instructions and miscellaneous wiring bits. $149.99
OPTIONAL PART: Schnitz wiring harness, HIGHLY recommended! You’ll need the Suzuki harness to fit our Honda. $49.99
I will try to keep this as brief and tactical as I can. If anyone has any questions or further clarity just ask!
1: Break Down
;- Remove seat
- Remove gas tank cover [I removed all my fairings before beginning, only because I have a custom set coming in…that’s another thread J]
- Remove gas tank [I opted to leave everything connected and simply worked around the tank.]
- Remove Air box and all its wonderful accessories (fuel rail, sensors, filters Etc.)
- Remove Flapper/Ram air assembly, directly exposing the coil plugs. (HINT: easier done by unbolting the radiator and sliding it down a bit) ALSO.. [Great time to do the flapper mod, I did]
The remainder of this install will be either extremely easy/fun OR a major pain in the ***. It all depends if you opted for the Schnitz Harness or not. I did, to make things easier, so here we go….
2: Harness Installation
- Unplug your 4 coils
- Plug in new harness to coils
- Connect coil plug-wires to new harness, in the corresponding coil order.
- Plug new harness to Kill box
3: Kill box wiring
;- RED to a key activated, 12v power source. NOT THE BATTERY. [I used the day running headlight]
- BLUE to shifter switch [see below]
- BLACK to a good ground [I used negative post on battery]
Mount kill box anywhere you can find, I mounted mine where I removed the flapper canister and it fits perfect.
4: Shifter switch mount/wiring
The shifter switch is actually a common rear brake light switch, found on nearly every bike, designed to run in-line with your shifter rod. When an up shift is performed, the switch activates the kill box to momentarily cut ignition to the motor.
- Find a sturdy, in-line spot to mount the switch. [I used the little circular piece of metal near the kickstand]
- There are two wires on the switch red and blue. RED: connects to the blue activation wire on the kill box.
BLUE: connects to a good ground, I used the negative post on the battery.
Put everything back together and you're done!! Enjoy clutchless up-shifts above 3000 rpm. According to MPS Racing, WOT is not necessary to perform clutchless up-shifting with this system. It is recommended to shift above 3000rpm. I found this true, as it has operated flawlessly even in low rpm.
Last edited by sickcbr1k; 03-05-2013 at 09:24 AM.


Thread
Thread Starter
Forum
Replies
Last Post