Everything you need to know about HID installs.
#1
 11-24-2012, 03:36 PM


What an arrogant title huh?
Just wanted to share my experience in installing a HID kit in the F1. The principles of this install apply to any application where you are replacing a dual filament halogen bulb with an HID kit. I'll start by making some basic points about what too look for/think about if you are going to make the switch to HID system.
1. What kit to get? - Doesn't REALLY matter where you but it from per se. What you are looking for is an H4/HB2/9003 (they are all the same) conversion kit. The F1 came with one of these bulbs installed from the factory. Basically they are a 2 filament bulb held in a single glass ampule. This gives you High and Lo. As for HID, I've seen the older design, where there is a HID low beam, and a halogen high beam. Now-a-days, you can get kits that have both an HID low and high. Its the same source of light, but the bulb changes its position to give the effect of a low and high. In other words, tradition H4 halogens will shine brighter on Hi than on Lo, HID is the same brightness, just a different beam pattern.
2. What power should I get? - The age old question when it comes to HIDs, the power of the kit. Most kits on the market now-a-days are either 35W or 55W (nevermind making a 45W and keeping everyone happy ). Wattage is the amount of power drawn by the ballast to power the bulbs. Some people swear by 55W kits, others by 35W kits. Its true that the 55W do produce more light than their 35W counterparts, but not as much as you might think. Take the example of traditional incandescent house light bulbs. Usually rated at 40W-80W. Its true the 80W will be brighter than a 40W (but not twice as bright). Compare these bulbs to a CFL (compact fluorescence). You will see this:

Light output, or brightness is measured in lumens (or candellas). So for a given lumen output (in this example, 800 lumens), look at the power consumption difference. 60W for a incandescent vs 14W for a CFL. So what happens to the extra power? Ever tried touching an incandescent bulb after its been on for 5 minutes? Ow. It's heat! A CFL will get hot too, but you can probably touch it and not get burned. The same logic applies to halogen bulbs vs. HID. Halogen bulbs are rated at usually 55W or 60W (sometimes higher), which is the power that is drawn from the bulb through the wiring etc. A true 55W HID kit will draw the same amount of power, but will produce higher lumen output. Ok, simple, get a 55W kit! Not so fast. Lets look at the difference between a 35W kit and a 55W kit. First off, light output is dependant on the bulb used. These range from 3000K-30000K. K is Kelvin, which is the standard (and scientifically relevant) temperature scale. Basically 0K = absolute zero, no molecular movement. 273.15K = 0C water freezing. Most common HID kits are usually around 4300K to 6000K. Given the same bulb, the 55W will be brighter, but not 57% brighter as the wattages suggest. Same as with a incandescent bulb... some power is lost as heat! I've read about people melting their reflective housings or lenses using 55W kits, so selecting a 35W kit with the proper bulb, the difference shouldn't be too great. Here is a comparision. I don't know the temp they used, but 55W on the left, 35W on the right...
3. Where should I look for a kit? Now-a-days, you can get them anywhere. 6 years ago they were very expensive, but now that the chinese have come out with their own kits, it has driven the price way down. I've read all over the internet that people get their kits from DDM tuning. They are a company based out of CA, BUT their kits are from overseas. Basically you place an other with them, and they order a kit to be delivered to you from China. I figured I'd skip the middleman and order direct. It was going to cost me ~$80 from DDM, shipped, while ebay had them for less than $40 shipped. Yes, DDM advertises a warranty on their products, but I've read some horror stories about dealing with them. Wherever you get one, just make sure its an H4 kit, with Hi/Lo. Here is the one I got: HID H4 35W 12V 6000K Bi-xenon Hi/Lo Bulb & DC Slim Ballast Kit for Motorcycle | eBay
Here is what you get...


Now that you have made a decision on what kit to get, and you have ordered it, and its sitting on your workshop benchtop, how do you get it in?
First, I'd park the bike about 10' from a wall and turn your lights on. I marked the location of the high beam cutoff with tape. If you don't move the bike during the process, you can angle your new lights based on the beam of the old ones.
Here is my old low beam:

Old high:

With the tape markings. The angle is due to the bike being on its side stand.

Next you want to DISCONNECT YOUR BATTERY! Safety first. Then remove your fairings. I already had mine off, minus the front cowl. When you remove the front cowl, you need to remove the turn signals from their housing and the headlight connector.
Here is what the back of the headlight housing will look like.

Remove the rubber boot and unclip and remove the bulb.
Now take you new HID bulb. On this model, the metal housing is removable. Careful not to touch the glass. Oils from your fingers may cause the bulb to shatter when it gets really hot! For this part, you don't want the bulb connected to the rest of the harness. Remove the 2 screws on the bulb cover.

Here was the hardest part of the job, getting the bulb into the rubber boot. I had to end up snipping the boot a bit to allow the bulb to fit . Make sure you seal it up though!

Reattach the bulb cover.

Place the bulb into the housing. The design of the H4 housing only allows it to go in one way. Replace the clip and seal the rubber boot.

Before you go and but the fairing back on, you should install the harness on the bike. This is the toughest part. There is not alot of places to mount the ballast or other pieces. To complicate matters, I have a LED kit installed, which runs wires up the front of the cowl. I mounted the ballast on the front center fairing stay.


The Hi/Lo switching unit was attached to the fuse box. Connect your stock headlight harness to the corresponding part on the HID harness. I ran these between the fuse box and the connector cluster (see bottom left side of picture, stock harness has the blue heat shrink). I would recommend taping the stock harness and HID harness together to ensure they don't jiggle loose.

Plug everything in. I found it easiest to do with the cowl sitting on my knees when I was straddling the front fender. This particular kit only allows for one way to connect it all together (polarity matters here).
Your basically done! Replace the front cowl and get it seated. You don't have to bolt it back up now, just make sure its sitting where it should be.
Hook your battery back up and turn the key on. HIDs take a minute or so to heat up to get maximum brightness. They will probably start off blue but turn more white when they heat up (depending on your kit). Check the operation of the Hi and Lo.
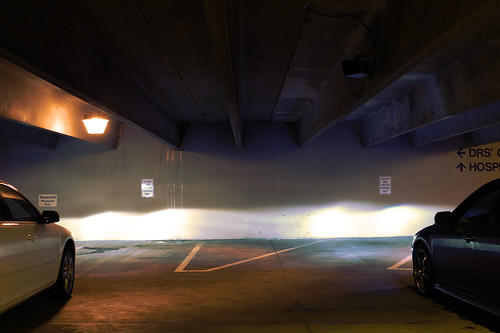
Here is the low:


And high:


Its hard to see a big difference between the 2 settings, but I'll attribute that to the fact its light out and I am parked so close to the wall.
Use the ***** on the back of the housing to aim it if needed. As you can see from the pictures, mine needs lowered a bit.
That's it!
If anyone has any questions or comments, please feel free to hit me up or post them here. If I got something wrong, please let me know and I will correct it.
Maybe I can shout out for a sticky for this, or maybe it would do better in a modification forum so not just the F1 people see it... mods? Ideas?
Just wanted to share my experience in installing a HID kit in the F1. The principles of this install apply to any application where you are replacing a dual filament halogen bulb with an HID kit. I'll start by making some basic points about what too look for/think about if you are going to make the switch to HID system.
1. What kit to get? - Doesn't REALLY matter where you but it from per se. What you are looking for is an H4/HB2/9003 (they are all the same) conversion kit. The F1 came with one of these bulbs installed from the factory. Basically they are a 2 filament bulb held in a single glass ampule. This gives you High and Lo. As for HID, I've seen the older design, where there is a HID low beam, and a halogen high beam. Now-a-days, you can get kits that have both an HID low and high. Its the same source of light, but the bulb changes its position to give the effect of a low and high. In other words, tradition H4 halogens will shine brighter on Hi than on Lo, HID is the same brightness, just a different beam pattern.
2. What power should I get? - The age old question when it comes to HIDs, the power of the kit. Most kits on the market now-a-days are either 35W or 55W (nevermind making a 45W and keeping everyone happy
). Wattage is the amount of power drawn by the ballast to power the bulbs. Some people swear by 55W kits, others by 35W kits. Its true that the 55W do produce more light than their 35W counterparts, but not as much as you might think. Take the example of traditional incandescent house light bulbs. Usually rated at 40W-80W. Its true the 80W will be brighter than a 40W (but not twice as bright). Compare these bulbs to a CFL (compact fluorescence). You will see this:Light output, or brightness is measured in lumens (or candellas). So for a given lumen output (in this example, 800 lumens), look at the power consumption difference. 60W for a incandescent vs 14W for a CFL. So what happens to the extra power? Ever tried touching an incandescent bulb after its been on for 5 minutes? Ow. It's heat! A CFL will get hot too, but you can probably touch it and not get burned. The same logic applies to halogen bulbs vs. HID. Halogen bulbs are rated at usually 55W or 60W (sometimes higher), which is the power that is drawn from the bulb through the wiring etc. A true 55W HID kit will draw the same amount of power, but will produce higher lumen output. Ok, simple, get a 55W kit! Not so fast. Lets look at the difference between a 35W kit and a 55W kit. First off, light output is dependant on the bulb used. These range from 3000K-30000K. K is Kelvin, which is the standard (and scientifically relevant) temperature scale. Basically 0K = absolute zero, no molecular movement. 273.15K = 0C water freezing. Most common HID kits are usually around 4300K to 6000K. Given the same bulb, the 55W will be brighter, but not 57% brighter as the wattages suggest. Same as with a incandescent bulb... some power is lost as heat! I've read about people melting their reflective housings or lenses using 55W kits, so selecting a 35W kit with the proper bulb, the difference shouldn't be too great. Here is a comparision. I don't know the temp they used, but 55W on the left, 35W on the right...
3. Where should I look for a kit? Now-a-days, you can get them anywhere. 6 years ago they were very expensive, but now that the chinese have come out with their own kits, it has driven the price way down. I've read all over the internet that people get their kits from DDM tuning. They are a company based out of CA, BUT their kits are from overseas. Basically you place an other with them, and they order a kit to be delivered to you from China. I figured I'd skip the middleman and order direct. It was going to cost me ~$80 from DDM, shipped, while ebay had them for less than $40 shipped. Yes, DDM advertises a warranty on their products, but I've read some horror stories about dealing with them. Wherever you get one, just make sure its an H4 kit, with Hi/Lo. Here is the one I got: HID H4 35W 12V 6000K Bi-xenon Hi/Lo Bulb & DC Slim Ballast Kit for Motorcycle | eBay
Here is what you get...
Now that you have made a decision on what kit to get, and you have ordered it, and its sitting on your workshop benchtop, how do you get it in?
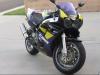
First, I'd park the bike about 10' from a wall and turn your lights on. I marked the location of the high beam cutoff with tape. If you don't move the bike during the process, you can angle your new lights based on the beam of the old ones.
Here is my old low beam:
Old high:
With the tape markings. The angle is due to the bike being on its side stand.
Next you want to DISCONNECT YOUR BATTERY! Safety first. Then remove your fairings. I already had mine off, minus the front cowl. When you remove the front cowl, you need to remove the turn signals from their housing and the headlight connector.
Here is what the back of the headlight housing will look like.
Remove the rubber boot and unclip and remove the bulb.
Now take you new HID bulb. On this model, the metal housing is removable. Careful not to touch the glass. Oils from your fingers may cause the bulb to shatter when it gets really hot! For this part, you don't want the bulb connected to the rest of the harness. Remove the 2 screws on the bulb cover.
Here was the hardest part of the job, getting the bulb into the rubber boot. I had to end up snipping the boot a bit to allow the bulb to fit
. Make sure you seal it up though!Reattach the bulb cover.
Place the bulb into the housing. The design of the H4 housing only allows it to go in one way. Replace the clip and seal the rubber boot.
Before you go and but the fairing back on, you should install the harness on the bike. This is the toughest part. There is not alot of places to mount the ballast or other pieces. To complicate matters, I have a LED kit installed, which runs wires up the front of the cowl. I mounted the ballast on the front center fairing stay.
The Hi/Lo switching unit was attached to the fuse box. Connect your stock headlight harness to the corresponding part on the HID harness. I ran these between the fuse box and the connector cluster (see bottom left side of picture, stock harness has the blue heat shrink). I would recommend taping the stock harness and HID harness together to ensure they don't jiggle loose.
Plug everything in. I found it easiest to do with the cowl sitting on my knees when I was straddling the front fender. This particular kit only allows for one way to connect it all together (polarity matters here).
Your basically done! Replace the front cowl and get it seated. You don't have to bolt it back up now, just make sure its sitting where it should be.
Hook your battery back up and turn the key on. HIDs take a minute or so to heat up to get maximum brightness. They will probably start off blue but turn more white when they heat up (depending on your kit). Check the operation of the Hi and Lo.
Here is the low:
And high:
Its hard to see a big difference between the 2 settings, but I'll attribute that to the fact its light out and I am parked so close to the wall.
Use the ***** on the back of the housing to aim it if needed. As you can see from the pictures, mine needs lowered a bit.
That's it!
If anyone has any questions or comments, please feel free to hit me up or post them here. If I got something wrong, please let me know and I will correct it.
Maybe I can shout out for a sticky for this, or maybe it would do better in a modification forum so not just the F1 people see it... mods? Ideas?
#2
11-24-2012, 04:17 PM

...If anyone has any questions or comments, please feel free to hit me up or post them here. If I got something wrong, please let me know and I will correct it.
Maybe I can shout out for a sticky for this, or maybe it would do better in a modification forum so not just the F1 people see it... mods? Ideas?
Maybe I can shout out for a sticky for this, or maybe it would do better in a modification forum so not just the F1 people see it... mods? Ideas?
Going to move this to How-To: Mechanical for the greater general audience to find & view. :-)
#3
11-24-2012, 05:08 PM
#4
11-27-2012, 03:18 PM

Party Animal, ROTM June 2014
Join Date: Oct 2008
Posts: 671
Likes: 0
Received 0 Likes
on
0 Posts
Is it just me, or are your pics not automatically resizing?
I have a few thoughts on your install...please don't take this the wrong way.
I think you did an excellent job with the write up and I really like how you took the time to explain the differences between wattage and lumens, as well as the kelvin scale for color.
However, I can't say as I much care for HID bulbs in reflector housings designed for halogen bulbs. Have you ever met these headlights on the road at night? They are retarded bright to oncoming traffic. Usually the reason is because the reflector was designed for the shorter halogen bulb and it just scatters the light when you use the longer HID bulb.
My personal opinion is if someone wants to increase their light output and do it safely, the only option is to upgrade to a projector system specifically designed for HID applications. I have done this with two motorcycles and my 4runner. It is more expensive, but the beam pattern is much better than the reflector setup. I am also guilty of doing the HID bulb in the reflector, and it is something I am going to change when I get back to this particular bike (it is in storage at a friends business). I have heard and read on the web (that makes it true, right? ) that using the HID bulb in the Halogen reflector actually reduces your ability to see objects at night. Yes the light is brighter, but more scattered.
I have a few web pages I made with the upgrades to my bikes...
CBR900RR HID Projector project (look at that nice clean cutoff, where your setup is blurry and scattered)
HID Install OK, so I used the same beam cutoff on this site too...but look at the before and after. You can see where I used a HID bulb in the stock projector...a projector designed for Halogen. It sucked. Once I used a HID projector, I once again had a nice clean beam pattern with a razor sharp cutoff.
There, my rant is over, just my
I am sure there are reasons why people only swap the bulbs like cost, mechanical ability (or lack thereof), and a non-suitable headlight bucket (frosted lens), but I think there are better reasons to spend the extra time and money and upgrade to projectors as well.
Once again, nice writeup.
I have a few thoughts on your install...please don't take this the wrong way.
I think you did an excellent job with the write up and I really like how you took the time to explain the differences between wattage and lumens, as well as the kelvin scale for color.
However, I can't say as I much care for HID bulbs in reflector housings designed for halogen bulbs. Have you ever met these headlights on the road at night? They are retarded bright to oncoming traffic. Usually the reason is because the reflector was designed for the shorter halogen bulb and it just scatters the light when you use the longer HID bulb.
My personal opinion is if someone wants to increase their light output and do it safely, the only option is to upgrade to a projector system specifically designed for HID applications. I have done this with two motorcycles and my 4runner. It is more expensive, but the beam pattern is much better than the reflector setup. I am also guilty of doing the HID bulb in the reflector, and it is something I am going to change when I get back to this particular bike (it is in storage at a friends business). I have heard and read on the web (that makes it true, right?
I have a few web pages I made with the upgrades to my bikes...
CBR900RR HID Projector project (look at that nice clean cutoff, where your setup is blurry and scattered)
HID Install OK, so I used the same beam cutoff on this site too...but look at the before and after. You can see where I used a HID bulb in the stock projector...a projector designed for Halogen. It sucked. Once I used a HID projector, I once again had a nice clean beam pattern with a razor sharp cutoff.
There, my rant is over, just my
I am sure there are reasons why people only swap the bulbs like cost, mechanical ability (or lack thereof), and a non-suitable headlight bucket (frosted lens), but I think there are better reasons to spend the extra time and money and upgrade to projectors as well.
Once again, nice writeup.
#5
11-27-2012, 05:03 PM
No worries vfr. I wouldn't stand in the kitchen if I couldn't take the heat.
I like the look of your lights, but I don't know if it's just me, but the HID install link seems to be incomplete. If I could find a way to mount similar projectors into this housing, without butchering it too bad, I'll look into that. I just wish they made projector housing like for my car :S
I do know the feeling of looking at HIDs in oncoming traffic. I've had times where I couldn't see and other times it was fine. In the past couple years, its been getting better IYAM. About 6-7 years ago when HID kits were all in the few 100's of dollars, I remember looking for one for my rav4 and seeing that all the bulbs you could get were simple a HID bulb, and thats it. No cutoff. No high/low. This newer kits have build in cutoffs that block out a good portion of the light above a certain point. As you pointed out, it is still a bit blurry. More than likely I will have to re-address the aim after I reinsure the bike - when I can take it out at night in a larger area than my tiny garage. It is important to aim your lights after doing a conversion. As you said vfr, the focal point changes, so the aiming needs adjusted too. I don't think a lot of people (eh hem 20 something year old guys) who put them in their civics bother.
Definately good to hear from someone who has had success retrofitting their bike. I am not the type of person who like to **** off other people on the road, so I will try and make these as driver friendly as possible.
#7
01-04-2013, 02:49 PM
Another issue that should be addressed, or at least considered, when installing HIDs is the fact that many bikes have the lights come on as soon as the key is turned. Many bikes have switch gear that allows the headlight to be OFF, even when the bike is running. This mod will not apply to them. On my bike (Canadian import), and many other out there, the switchgear only allows you to switch from Lo to Hi, the light is ALWAYS on. The problem with this is when you go to start your bike, you turn the key on (the HID lights up), and you press the starter button (this kills the headlight), and the bike starts (you then release the starter button, turning the light back on. This cycling is of no real consequence for halogen lightbulbs, but can drastically shorten the lifespan of the ballast.
There has been a couple solutions to this I have discovered:
1) Shorting the starter switch so that it doesn't turn the light off when starting (not advised, your starter needs all the amps it can get)
2) Installing a toggle switch to allow manual override of the headlight ON/OFF function. This way, your light won't come on until you flick a manual switch you install on the bike somewhere.
I was going to do option 2, but I don't like the idea of having to remember to switch the light on and off all the time.
After some thought I came up with this:

For those who don't read circuit diagrams, it is basically uses your oil pressure circuit to turn off the lo beam of your headlight. The theory is when you turn on your ignition, the oil pressure is 0 (bike isn't running). You will notice that the red oil pressure light is on. When you start the bike, the pressure builds and the light turns off. Using an NC (Normally Closed) Relay, you can have it where the headlight is off (switch is open, signal circuit is complete (oil pressure switch is closed)), or headlight on (switch is closed, signal circuit is broken (oil pressure switch is open)). An added benefit to the way this is designed is that if you want your headlight on, but the bike off (e.g. parked on the shoulder), you can use the high beam.
Ideas, opinions, comments all welcome. I plan to do this in the coming weeks, so I'll post a detailed How-to if there is any interest.
There has been a couple solutions to this I have discovered:
1) Shorting the starter switch so that it doesn't turn the light off when starting (not advised, your starter needs all the amps it can get)
2) Installing a toggle switch to allow manual override of the headlight ON/OFF function. This way, your light won't come on until you flick a manual switch you install on the bike somewhere.
I was going to do option 2, but I don't like the idea of having to remember to switch the light on and off all the time.
After some thought I came up with this:
For those who don't read circuit diagrams, it is basically uses your oil pressure circuit to turn off the lo beam of your headlight. The theory is when you turn on your ignition, the oil pressure is 0 (bike isn't running). You will notice that the red oil pressure light is on. When you start the bike, the pressure builds and the light turns off. Using an NC (Normally Closed) Relay, you can have it where the headlight is off (switch is open, signal circuit is complete (oil pressure switch is closed)), or headlight on (switch is closed, signal circuit is broken (oil pressure switch is open)). An added benefit to the way this is designed is that if you want your headlight on, but the bike off (e.g. parked on the shoulder), you can use the high beam.
Ideas, opinions, comments all welcome. I plan to do this in the coming weeks, so I'll post a detailed How-to if there is any interest.
#8
01-04-2013, 03:54 PM
Party Animal, ROTM June 2014
Join Date: Oct 2008
Posts: 671
Likes: 0
Received 0 Likes
on
0 Posts
#9
01-04-2013, 04:02 PM
Definitely a good way to go, though.
Thanks!
#10
01-04-2013, 04:41 PM
February 2012 ROTM
Thanks for the info...honestly, FWIW, these HID kit, replacements parts etc. are getting cheaper and cheaper....a few years later, there may be some newer technology IDK? For FWIW, replacement parts is fairly cheap....I wouldn't go thru the trouble to override the bike electrical just to extend lifespan of the ballast...if it blows, get a replacement off eBay or what not...that's just me though....I don't like cutting into Factory wires to add a switch.
Great post BTW...
Great post BTW...