Change your own tires write up
#1
 03-31-2012, 07:44 PM


Join Date: Feb 2012
Location: Beachwood, New Jersey
Posts: 118
Likes: 0
Received 0 Likes
on
0 Posts
Maybe I'm just a cheap SOB or maybe I am just stubborn about doing my own maintenance if I can. To that end, I started changing my own tires a few years ago. I've already saved enough money on shop charges to pay for all the tools I've used. Now the savings are starting to add up to a set of tires paid for by the savings. (New Jersey shop fees for tires are $45.00 a tire). If it is much cheaper where you live you might want to save your knuckles and have the shop do it.
Here are the tools that I bought for this chore.
1. air compressor (comes in very handy even if you don't change tires)
2. bead breaker
3. tire irons. (I use two large 24" automotive type and one small oddly shaped one that comes in very handy)
4. rim savers ( I have aluminum rims; if you have really expensive rims you might want to bring them to a shop. I always end up with some minor scratches even with the savers.
5. motorcycle tire balancer
6. 1/4 oz. tire weights (buy a bunch of them)
Things you will need that you probably have lying around.
1. soapy water. (dish detergent and some water)
2. valve core remover
3. tire guage
4. 2 2x4 that are long enough to support your rims above the ground to protect rotors from damage.
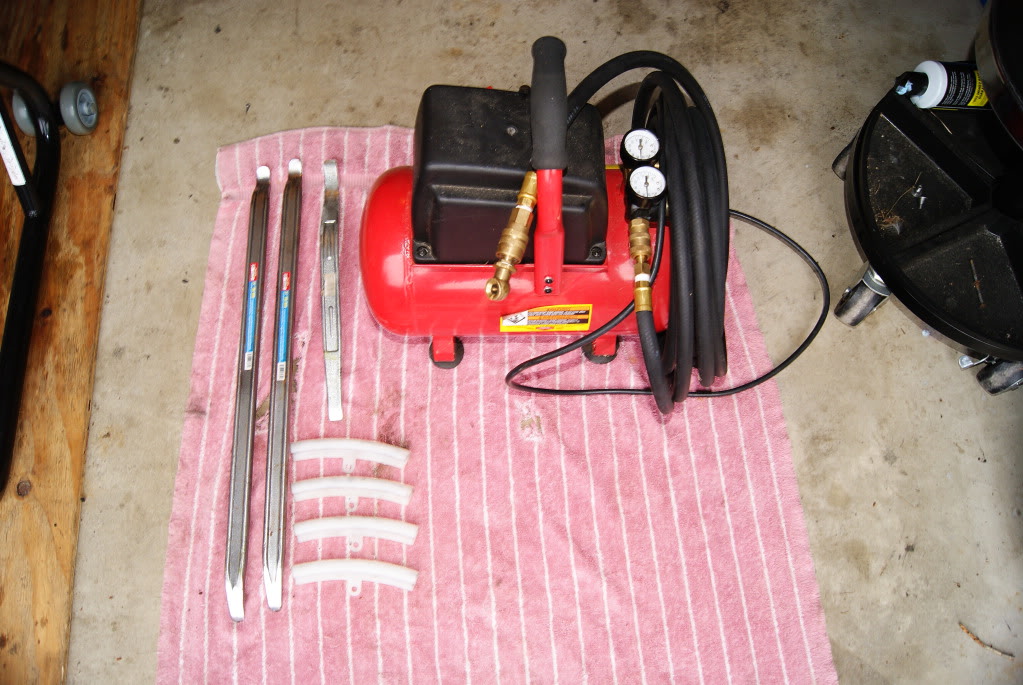
These are things that I bought at Harbor Freight. (not advertising, just for information).
This is the stuff you probably have lying around. boards, soap, tire guage, valve core remover. Boards are essential to put under the rim when breaking the bead and prying tires so that no pressure is put on brake rotors.
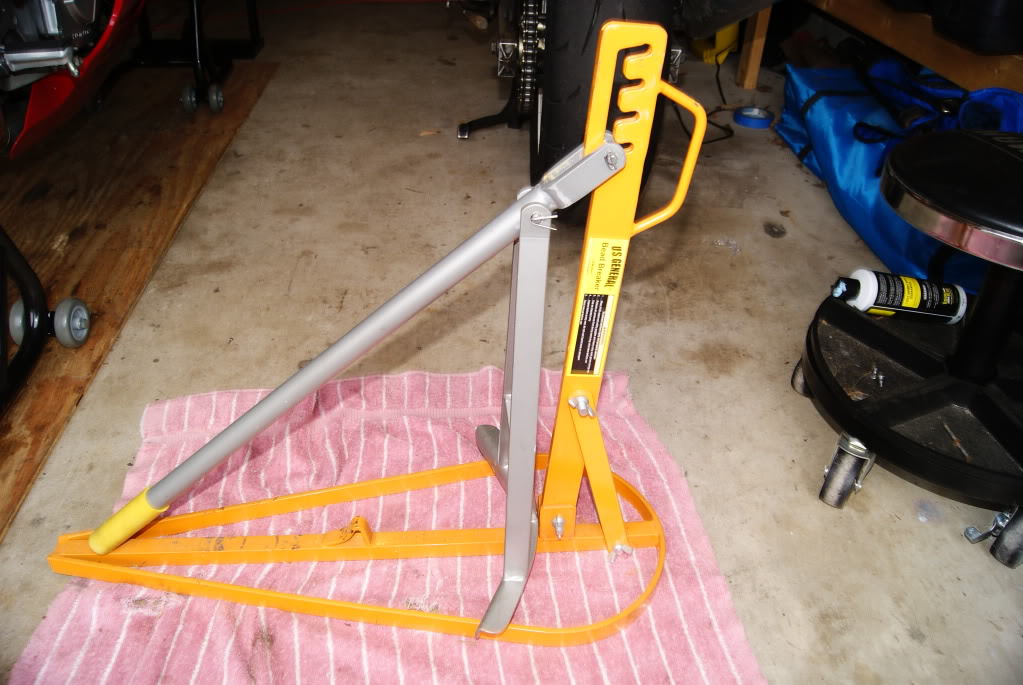
This is my bead breaker. It is supposed to be strong enough for SUV tires. I've not tried it with car tires. Oh, yeah, and I never will
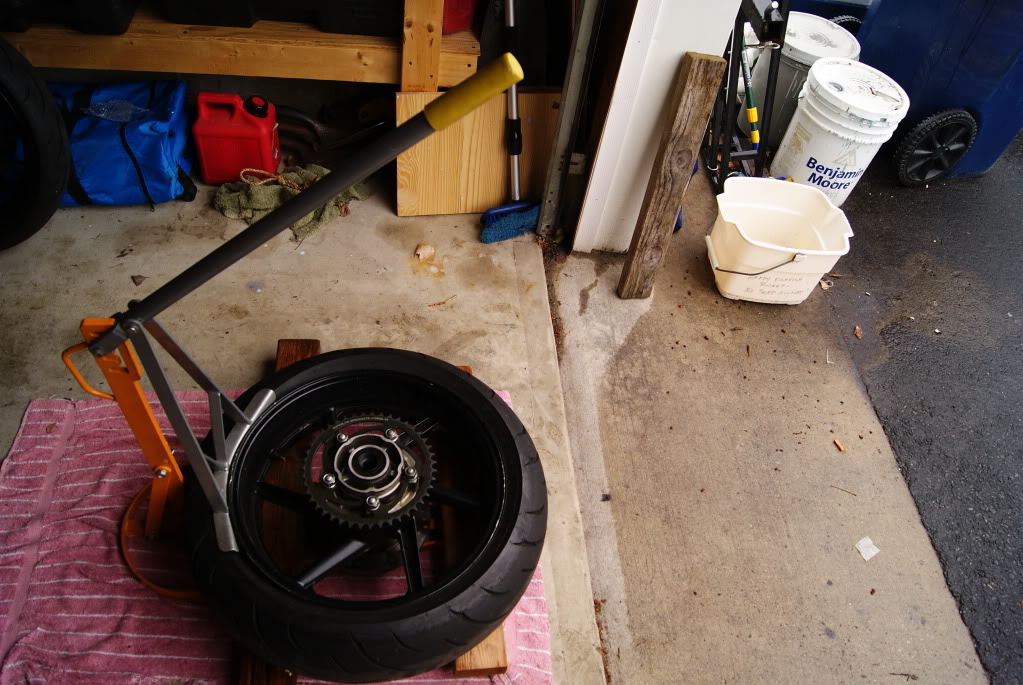
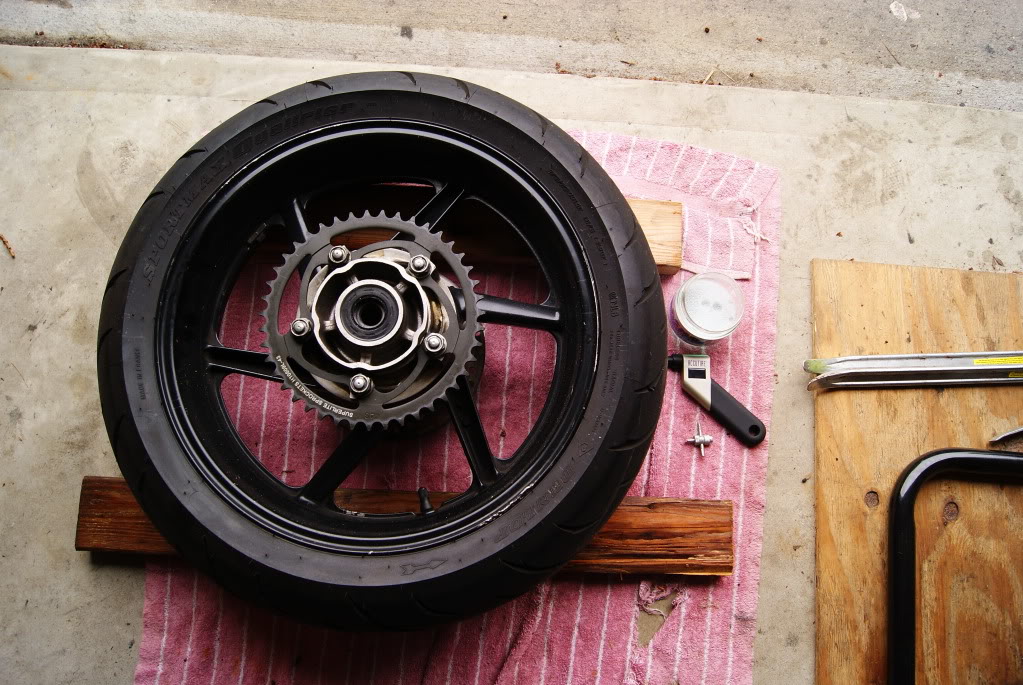
You need to be very careful here! Rim savers cannot be installed before the bead is broken. If you go real slow and take your time you can keep the arm away from the rims and prevent scratches. This is usually where the swearing begins.
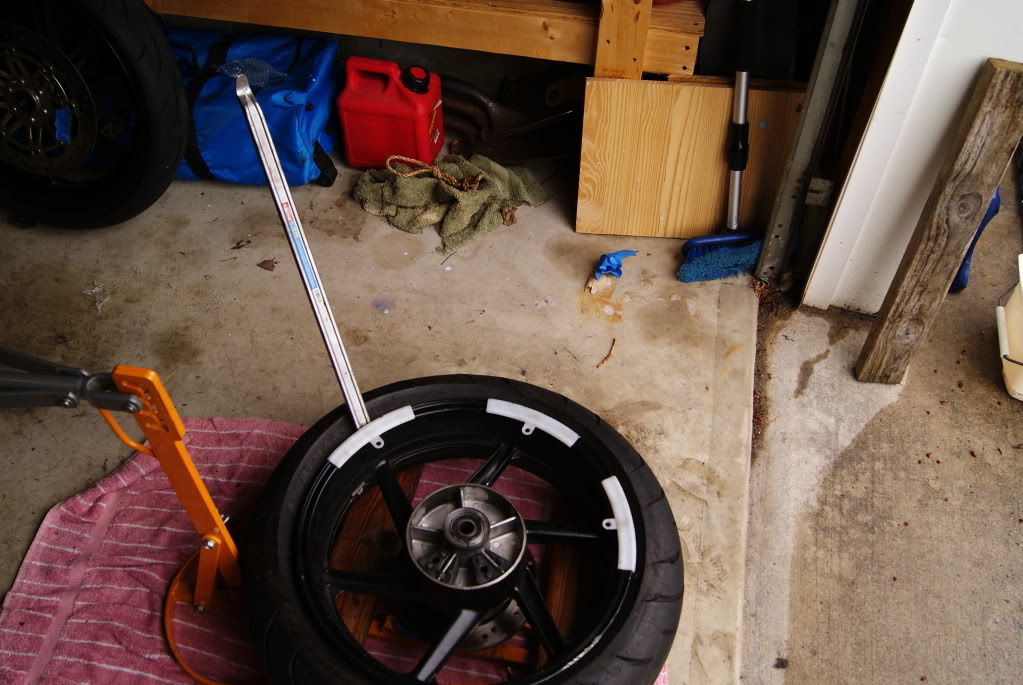
Once the bead is broken on both sides all the way around the tire, you can install rim savers and then start prying the tire off the rim. Both beads come off the rim in the same direction. I don't have a picture; but I usually stand the tire up when removing the second bead from the rim. Once you have a gap between the tire and the rim, you can usually push straight down on the tire and it will come off. Sorry to say; but trial and error works in this stage. I don't think I've ever done it exactly the same way twice.
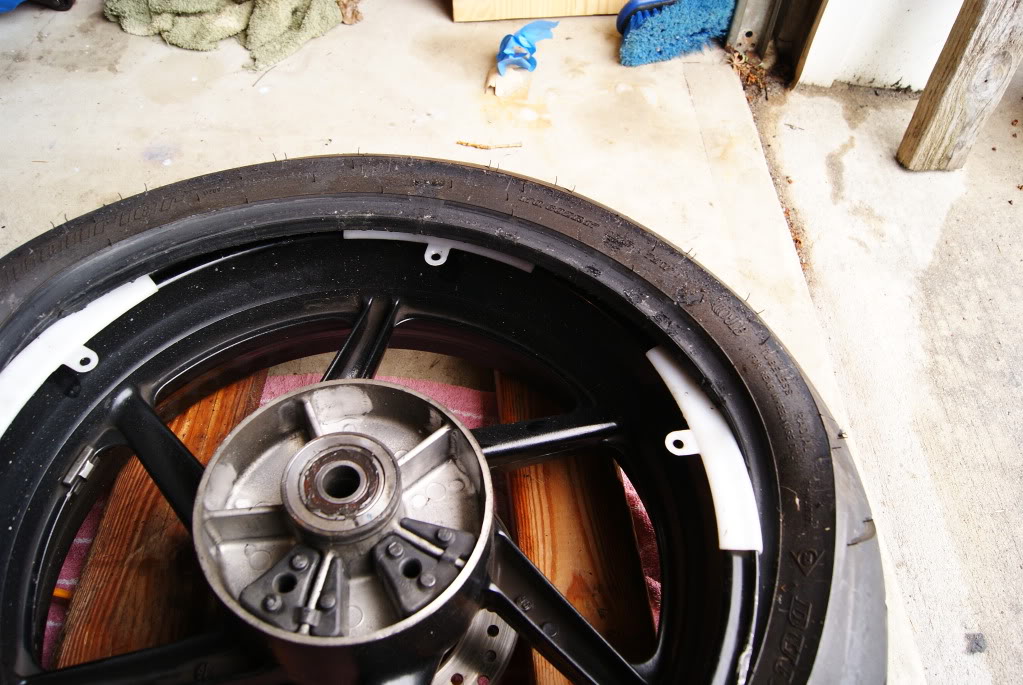
You can see that I almost have bead number one off the rim here. Then I stood the tire up and pried the second bead off in the same direction. Note the use of rim protectors. They really work.
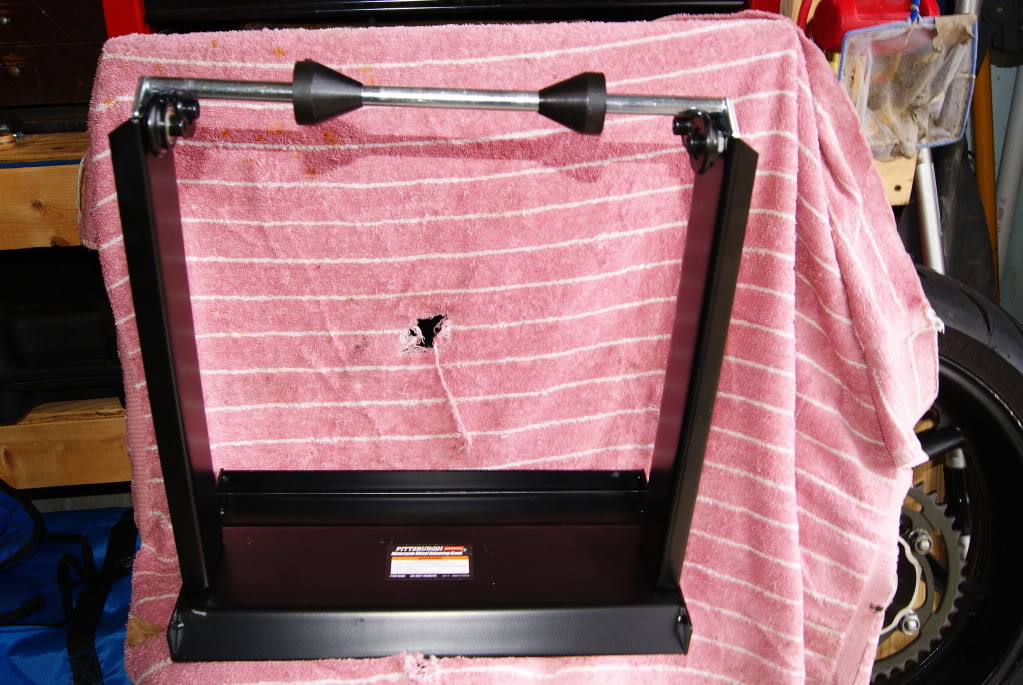
This is my motorcycle tire balancer. Also purchased from Harbor Freight.
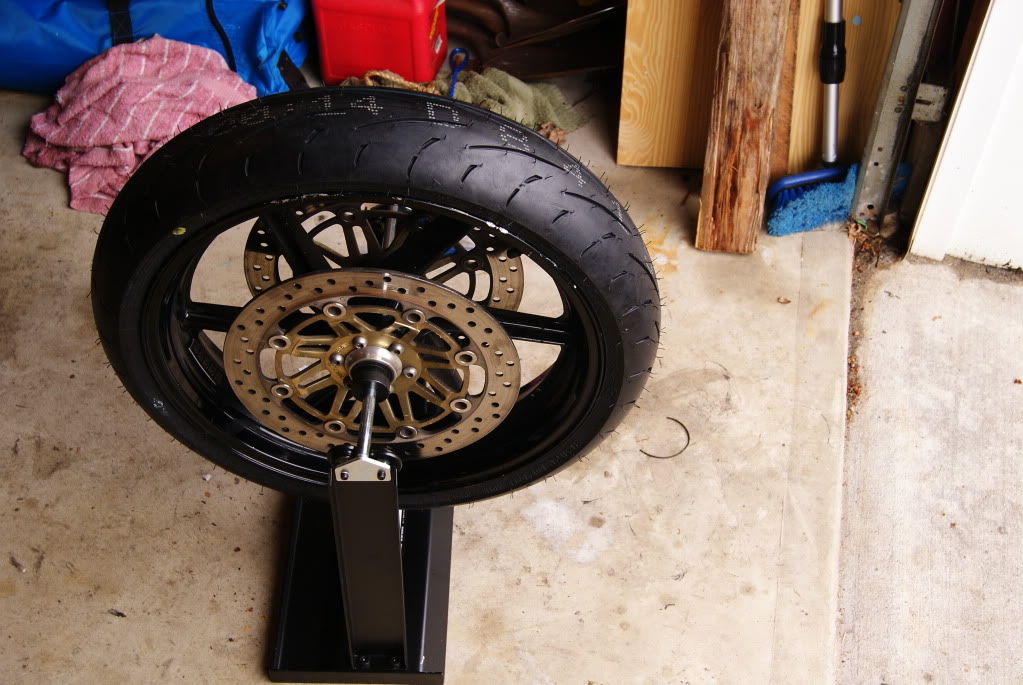
To balance the tires I make sure that the rims are clean and dry. Then I move the tire about a quarter turn and see where the heavy point is. Heavy point will settle at the bottom of the rim when it is on the balancer. Once I have determined which part of the rim is heaviest, I place weights one quarter once at a time on the opposite side (now the top) of the rim. When the tire stops and does not seem to have a heavy spot (in other words no part of the rim settles at the bottom) you have a balanced rim.
a word of caution when using tire irons to pry a tire off its rim. These items will be under great pressure and act like a spring if you let them go. They can swing up and smack you causing significant injury. Be very careful with the tire irons.
Additionally, this should be a two person job. I've done it by myself; but the risk of injury is greater and the entire job is much harder when you do it yourself. If you have a friend with a sport bike, then the two of you can assist each other when changing tires. You can also share the expense of the tools. It is a good system. Hope this write up is somewhat useful.
It bear mentioning as a final note that you will need a way to keep your bike off the ground while the wheels are off. If you don't have a stand, you should probably go to a shop. Milk crates make very poor bike stands. Trust me, I know.
Good Luck
Erich
Here are the tools that I bought for this chore.
1. air compressor (comes in very handy even if you don't change tires)
2. bead breaker
3. tire irons. (I use two large 24" automotive type and one small oddly shaped one that comes in very handy)
4. rim savers ( I have aluminum rims; if you have really expensive rims you might want to bring them to a shop. I always end up with some minor scratches even with the savers.
5. motorcycle tire balancer
6. 1/4 oz. tire weights (buy a bunch of them)
Things you will need that you probably have lying around.
1. soapy water. (dish detergent and some water)
2. valve core remover
3. tire guage
4. 2 2x4 that are long enough to support your rims above the ground to protect rotors from damage.
These are things that I bought at Harbor Freight. (not advertising, just for information).
This is the stuff you probably have lying around. boards, soap, tire guage, valve core remover. Boards are essential to put under the rim when breaking the bead and prying tires so that no pressure is put on brake rotors.
This is my bead breaker. It is supposed to be strong enough for SUV tires. I've not tried it with car tires. Oh, yeah, and I never will
You need to be very careful here! Rim savers cannot be installed before the bead is broken. If you go real slow and take your time you can keep the arm away from the rims and prevent scratches. This is usually where the swearing begins.
Once the bead is broken on both sides all the way around the tire, you can install rim savers and then start prying the tire off the rim. Both beads come off the rim in the same direction. I don't have a picture; but I usually stand the tire up when removing the second bead from the rim. Once you have a gap between the tire and the rim, you can usually push straight down on the tire and it will come off. Sorry to say; but trial and error works in this stage. I don't think I've ever done it exactly the same way twice.
You can see that I almost have bead number one off the rim here. Then I stood the tire up and pried the second bead off in the same direction. Note the use of rim protectors. They really work.
This is my motorcycle tire balancer. Also purchased from Harbor Freight.
To balance the tires I make sure that the rims are clean and dry. Then I move the tire about a quarter turn and see where the heavy point is. Heavy point will settle at the bottom of the rim when it is on the balancer. Once I have determined which part of the rim is heaviest, I place weights one quarter once at a time on the opposite side (now the top) of the rim. When the tire stops and does not seem to have a heavy spot (in other words no part of the rim settles at the bottom) you have a balanced rim.
a word of caution when using tire irons to pry a tire off its rim. These items will be under great pressure and act like a spring if you let them go. They can swing up and smack you causing significant injury. Be very careful with the tire irons.
Additionally, this should be a two person job. I've done it by myself; but the risk of injury is greater and the entire job is much harder when you do it yourself. If you have a friend with a sport bike, then the two of you can assist each other when changing tires. You can also share the expense of the tools. It is a good system. Hope this write up is somewhat useful.
It bear mentioning as a final note that you will need a way to keep your bike off the ground while the wheels are off. If you don't have a stand, you should probably go to a shop. Milk crates make very poor bike stands. Trust me, I know.
Good Luck
Erich
#2
03-31-2012, 08:25 PM
Join Date: Feb 2012
Location: Beachwood, New Jersey
Posts: 118
Likes: 0
Received 0 Likes
on
0 Posts
Sorry guys, I forgot to mention something that could be imortant. When you are filling your newly installed tire with air, you have to fill it until you hear a pretty loud POP! from both sides of the tire. This is the bead setting itself and it is very important that you do not ride on a tire that has not had the bead set properly.
Erich
Erich
#3
03-31-2012, 08:46 PM

Senior Member
Join Date: Oct 2011
Location: Monticello, Indiana
Posts: 777
Likes: 0
Received 0 Likes
on
0 Posts
very nice write up.
id just like to add one thing thats pretty important.
once you have the tire completely mounted and filled with air, look for a line towards the bead, make sure that its equal distance from the rim all the way around, if not, it will cause a slight wobble/vibration when you get over ~40 mph.
id just like to add one thing thats pretty important.
once you have the tire completely mounted and filled with air, look for a line towards the bead, make sure that its equal distance from the rim all the way around, if not, it will cause a slight wobble/vibration when you get over ~40 mph.
#5
03-31-2012, 09:39 PM

Retired Super Moderator - At large E=MC2
I've also seen a tip where the guy broke the bead, then used big zip-ties around the tire
at about 5-6 spots. You can get them at Home Depot for heat-air duct work.
He used them to start the tire over the rim and off, same thing for pulling it back on.
Nice write-up, by the way. Always hip to see folks contributing to the knowledge base.
Thanks, Ern
at about 5-6 spots. You can get them at Home Depot for heat-air duct work.
He used them to start the tire over the rim and off, same thing for pulling it back on.
Nice write-up, by the way. Always hip to see folks contributing to the knowledge base.
Thanks, Ern
#6
05-26-2012, 01:07 PM

Senior Member
Those big tyre levers are FAR too long. Makes it too easy to put too much force into the tyre, either damaging the bead (like you did on your old tyre - see below) or damaging the rim. A 12" lever is the biggest you really want, any bigger is unnecessary and liable to cause damage.
If you lever it on a small amount at a time it really doesn't need much force and those big levers make it too easy to get pissed off and break something. If the levers are under so much force that they can flick up and hurt you, you are prying on/off too much tyre at once.

The rest of the write up is good. Although it can be done quite simply on a much smaller budget. I bought/made all of the kit I use to change tyres for less than �15 - i.e....
For the bead breaker - I use a 5 foot length of 4x4 timber and a short wedge of 2X4. Cut the 2x4 into a wedge and place the pointed part against the tyre bead. You then need something to lever the 4x4 against, it can be pretty much anything strong and anchored to the floor or just really heavy (i.e. under a car sill, a bolted down workbench etc etc). Takes moments and costs nothing to break the bead that way.
As tyre lube, pick a cheap shampoo/soap without salt in it (Sodium Chloride on the ingredients list).
For the balancer, I made my own using a pair of axle stands, few chunks of scrap box section steel and 4 small bearings. Bolt the box section to the top of the axle stands, bolt the bearings to the box section so that it works like yours does. Then use the bike axle as the balancer shaft, it spins VERY freely on the bearings.
I also don't use/have a compressor - it is very easy to seat the bead using a footpump. Line the tyre up on the rim, bounce it a little and it holds enough air to build up pressure, after a few quick pumps it should stop leaking, keep bouncing it if it doesn't and it will seal eventually. This also means that I can eat a pie to make up for the exercise.
If you lever it on a small amount at a time it really doesn't need much force and those big levers make it too easy to get pissed off and break something. If the levers are under so much force that they can flick up and hurt you, you are prying on/off too much tyre at once.
The rest of the write up is good. Although it can be done quite simply on a much smaller budget. I bought/made all of the kit I use to change tyres for less than �15 - i.e....
For the bead breaker - I use a 5 foot length of 4x4 timber and a short wedge of 2X4. Cut the 2x4 into a wedge and place the pointed part against the tyre bead. You then need something to lever the 4x4 against, it can be pretty much anything strong and anchored to the floor or just really heavy (i.e. under a car sill, a bolted down workbench etc etc). Takes moments and costs nothing to break the bead that way.
As tyre lube, pick a cheap shampoo/soap without salt in it (Sodium Chloride on the ingredients list).
For the balancer, I made my own using a pair of axle stands, few chunks of scrap box section steel and 4 small bearings. Bolt the box section to the top of the axle stands, bolt the bearings to the box section so that it works like yours does. Then use the bike axle as the balancer shaft, it spins VERY freely on the bearings.
I also don't use/have a compressor - it is very easy to seat the bead using a footpump. Line the tyre up on the rim, bounce it a little and it holds enough air to build up pressure, after a few quick pumps it should stop leaking, keep bouncing it if it doesn't and it will seal eventually. This also means that I can eat a pie to make up for the exercise.
Last edited by DonnyBrago; 05-26-2012 at 01:10 PM.
#7
05-26-2012, 05:03 PM

Senior Member
I also mount my own tires. I also use the 2X4 beader breaker but I mounted a 8 inch chunk of 2X4 to my garage door frame as my leverage point. My wheel balancer is....mount the wheel back on the bike with no calipers or spacers and make sure the axle is level. I also got the tire spoons and rim protectors. Either way its still a work out. Alway lots of curseing.
#8
07-08-2012, 04:17 AM

Senior Member
Join Date: Apr 2012
Location: Cincinatti Ohio
Posts: 134
Likes: 0
Received 0 Likes
on
0 Posts
Nice write up! Wish I would've seen this before I did my own. It was my first time ( changing any type of tire), and I thought it wouldn't be so hard... I did not have the right tools. I cut up a milk jug for rim savers, used screw drivers as tire irons, and a 2x4 propped under my truck to break the bead. it was a frustrating 4 hours but I got the satisfaction of doing my own work and saving a few bucks.
Btw: I bought " Ride on" which is a tire sealer and balancer. I did not balance the tire on my own I only put this stuff inside and let it work, is this ok? Havnt had any problems 2k miles later and I've been up to speeds around 140 mph.
Btw: I bought " Ride on" which is a tire sealer and balancer. I did not balance the tire on my own I only put this stuff inside and let it work, is this ok? Havnt had any problems 2k miles later and I've been up to speeds around 140 mph.
#9
07-09-2012, 07:50 AM

Member
Join Date: Jun 2012
Location: Conroe,TX
Posts: 91
Likes: 0
Received 0 Likes
on
0 Posts
If I can add something here when mounting and taking the tire off it helps to make sure the opposite side is down in the valley of the rim meaning the center of the rim this allows some room on the other side to lever off the rim. I have done many tires including the darkside on my Cruiser.
I have a Harbor Freight changer now makes it so much easier but think everyone should know how to change a tire just in case the phone is dead and you cannot call roadside LOL.
I have a Harbor Freight changer now makes it so much easier but think everyone should know how to change a tire just in case the phone is dead and you cannot call roadside LOL.
#10
07-09-2012, 06:22 PM

Member
Join Date: Mar 2011
Location: norther IL
Posts: 91
Likes: 0
Received 0 Likes
on
0 Posts

