How To: Replace your Fuel Pressure Regulator
#1
 11-15-2008, 06:50 PM


Join Date: Jul 2007
Location: Columbus, OH
Posts: 2,246
Likes: 0
Received 0 Likes
on
0 Posts
Disclaimer: If you are unfamiliar or uncomfortable with performing maintenance on your bike, I would suggest you take your bike to the dealership and have them replace the FPR for you. Damage to fairings, gas tank, or critical internal parts may occur if you are careless. In addition, the risk for fire in the following procedure is very high as fuel may be spilled on your bike and on yourself. Please perform the FPR swap with a cold engine to lessen risk of fire.
Admins: If you feel the need to move this into the 'How To' section, please feel free to do so. This procedure is specifically tailored to the F4i.
Without further Adu, Let's get started.
What is the Fuel Pressure Regulator?
This guy:
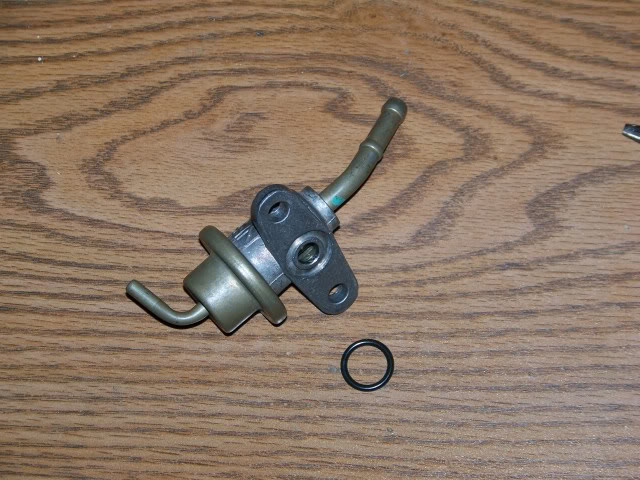
Part Number 16740-MBW-J32. Roughly $65 at your local dealership.
What does the Fuel Pressure Regulator Do?
It does what it says: Regulates your fuel pressure going to your injectors.
Imagine this. Your house sits right next to a water tower. The water tower supplies your house with water. Well, say the towers 'Water Pressure Regulator' took a dump. You now have hundreds of tons of water concentrating all its pressure on your kitchen sink. As soon as you turn on the faucet, your house explodes.
The FPR is similar. Most modern fuel injected bikes run a fuel pump in the tank and run much more fuel than is needed to the fuel rail. Gravity Aides the fuel pump, as the gas tank sits above the engine. A regulator keeps a certain amount of fuel pressure in the rail and then sends the rest back to the tank. The fuel pump aides the FPR to keep the pressure at a constant 50psi (per service manual). It does this with a spring-loaded diaphragm that controls a valve. The valve, when opened by excessive pressure in the fuel lines, uncovers a fuel line that returns excess fuel to the fuel tank (the big nozzle). The vacuum connection (the small nozzle) is there to help reduce emissions during deceleration. During deceleration, the vacuum connection serves to open the fuel return valve wider, which reduces pressure in the system and prevents excess hydrocarbon emissions due to less fuel being injected as a result of the lower pressure in the system.
What happens when the Fuel Pressure Regulator starts to Fail?
The most common issue is the spring-loaded diaphragm in the FPR. When it begins to fail, the excess fuel (being supplied by gravity and the fuel pump) are not returned to the tank.
The result? Your fuel Mixture becomes incredibly rich. Symptoms include:
-Poor MPG (15-30MPG)
-Poor Performance
-Fouled Spark Plugs
-Strong Fuel Odor when bike is running
-Bogging down
-Stalling
-MAP Sensor Error (2 Flashes)
-Exhaust 'Popping'
-Non-standard and erratic engine temperatures
-Cool Exhaust Gas Temperatures
-Gas in Oil
-Difficult to start
-Low/Erratic idle speed.
How do I replace it?
As I mentioned with the disclaimer, the best way to replace it (if you are unsure if yourself) is to take it to the dealership. They may charge you $200+ for this procedure. It takes about an hour or so to do. If you don't wanna go that route, then let's get on with it with a step by step guide.
Tools:
QTY 1: Fuel Pressure Regulator: Part 16740-MBW-J32 (Not, Repeat, Not 16740-MBW-J31. J31 was supersceaded by J32)
QTY 1: O-Ring/Gasket. Part Number 16741-PG7-005 (Note. Sometimes the gasket is included. Check with your dealer)
QTY 1: 5mm Allen Screw - To Remove Fairings
QTY 1: 6mm Allen Screw - To Remove Gas Tank
QTY 1: Phillips Head Screwdriver - To Remove Air Cleaner/Box (Optional, but reccomended)
QTY 1: Ratchet Wrench
QTY 1: 8mm Socket - To Remove upper fuel tank and the FPR itself
QTY 1: 10mm Socket - To remove the Seat
QTY 1: 17mm Socket - To drain Fuel Tank (Optional)
QTY 1: Golf Tee - To plug the Fuel Return Hose
QTY 1: Gas Can - To Drain tank - Optional
QTY 2: Bungee cords - To hold your gas tank (You do not need to remove the tank)
Last but not least
QTY Lots: Old Bath Towels
Another easy way to do this is to make sure your tank is near empty before doing this. A full tank is heavy, and is a pain in the ***.
The Easy Part
Step 1: Remove Fairings.
Step 2: Remove the seat
Step 3: Remove ECU (Optional, But highly recommended!)
Step 4: Prop up the tank with your bungee cord
Step 5: Remove Airbox (Optional, but you'll get a ton more room to work with)
Your bike should look something like this:
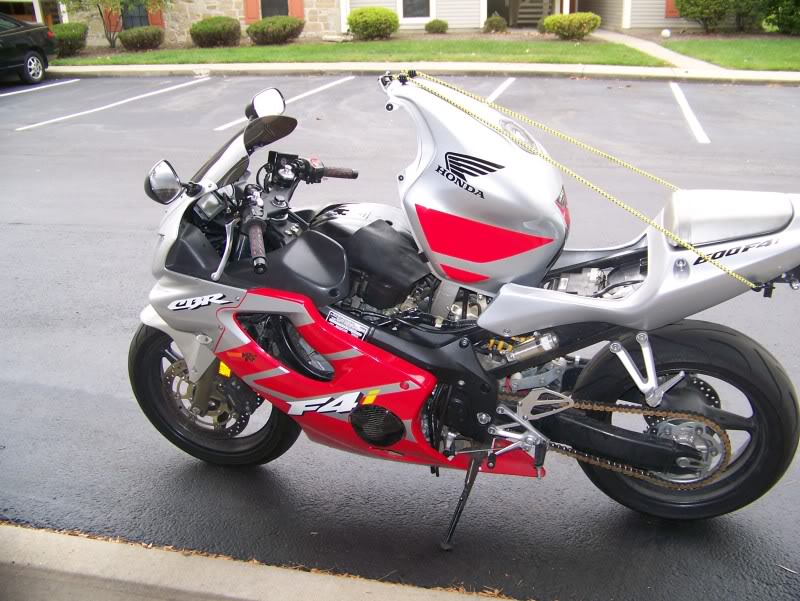
Damn my bike is sexxxy.
The Hard Part
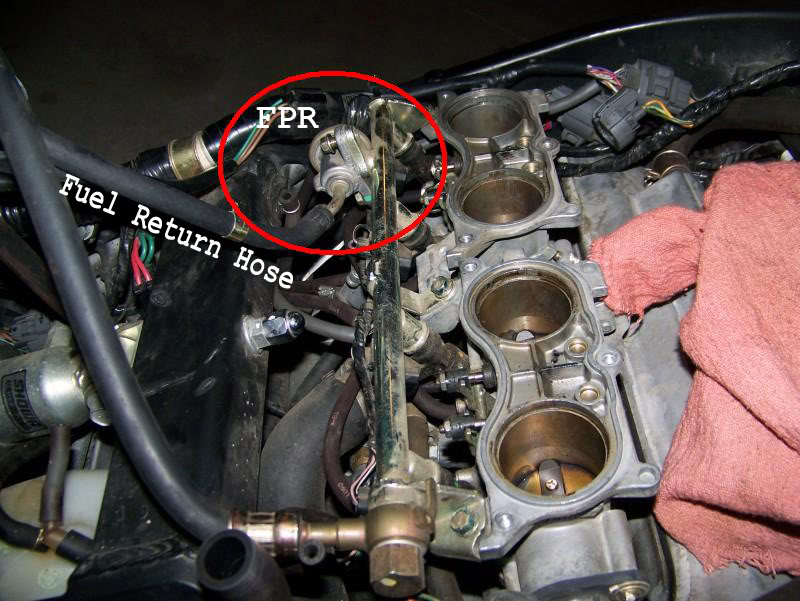
Locate the Fuel Pressure Regulator and the hoses. They are on the clutch side. If you have a small enough ratchet wrench, No need taking off the throttle bodies.
Step 6: Place your towels under your bike. The best location for them to go is just in front of your kickstand. Again I stress, Make sure your engine is cold!
Step 7: Remove the Fuel Return Hose and quickly stick your golf tee in there. Fuel will pour out when you disconnect it.
Step 8: Remove the vacuum hose (if you can reach it. If not, Do it once the old FPR is off)
The Messy Part
Have your New FPR close to you. You don't want to be searching all over the garage for it after you remove your old FPR
Step 9: Remove the FPR with your 8mm Ratchet.
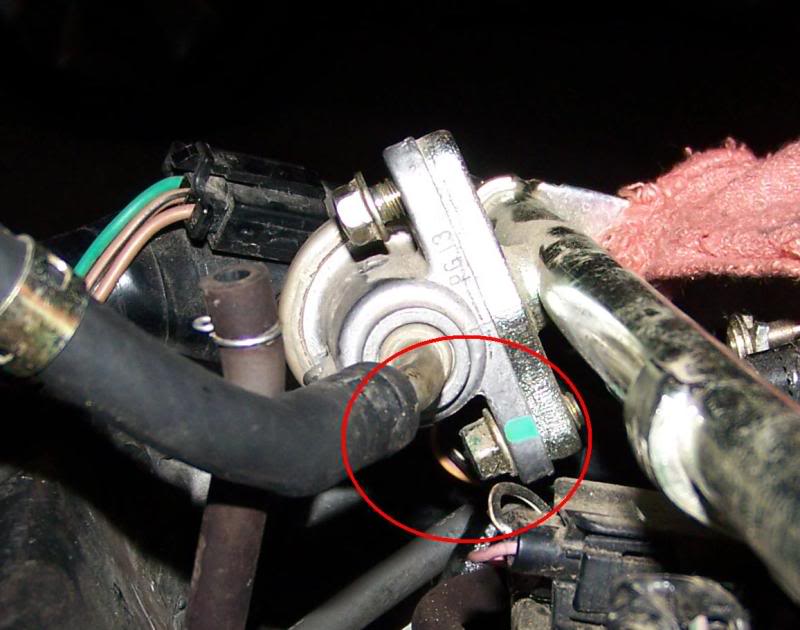
Notice how the FPR sits flush against the fuel rail. As soon as you start unscrewing it, fuel will start dripping out. Work quickly! It's just going to dribble out, it's not going to get crazy or anything.
Step 10: Replace your FPR and torque to 7ft-lbs. Do not reuse your o-ring.
If step 10 takes a long time to complete, don't fret. The fuel will stop dribbling out once the fuel is exhausted in the fuel rail. Mine did anyway.
Reassemble your bike in reverse order.
The Fun Part
You should immediately notice a difference once you start her back up and take her for her first ride. Note that it may take longer than normal to start since the fuel in the rail was depleted.
Rock on
FLY Out...
Admins: If you feel the need to move this into the 'How To' section, please feel free to do so. This procedure is specifically tailored to the F4i.
Without further Adu, Let's get started.
What is the Fuel Pressure Regulator?
This guy:
Part Number 16740-MBW-J32. Roughly $65 at your local dealership.
What does the Fuel Pressure Regulator Do?
It does what it says: Regulates your fuel pressure going to your injectors.
Imagine this. Your house sits right next to a water tower. The water tower supplies your house with water. Well, say the towers 'Water Pressure Regulator' took a dump. You now have hundreds of tons of water concentrating all its pressure on your kitchen sink. As soon as you turn on the faucet, your house explodes.
The FPR is similar. Most modern fuel injected bikes run a fuel pump in the tank and run much more fuel than is needed to the fuel rail. Gravity Aides the fuel pump, as the gas tank sits above the engine. A regulator keeps a certain amount of fuel pressure in the rail and then sends the rest back to the tank. The fuel pump aides the FPR to keep the pressure at a constant 50psi (per service manual). It does this with a spring-loaded diaphragm that controls a valve. The valve, when opened by excessive pressure in the fuel lines, uncovers a fuel line that returns excess fuel to the fuel tank (the big nozzle). The vacuum connection (the small nozzle) is there to help reduce emissions during deceleration. During deceleration, the vacuum connection serves to open the fuel return valve wider, which reduces pressure in the system and prevents excess hydrocarbon emissions due to less fuel being injected as a result of the lower pressure in the system.
What happens when the Fuel Pressure Regulator starts to Fail?
The most common issue is the spring-loaded diaphragm in the FPR. When it begins to fail, the excess fuel (being supplied by gravity and the fuel pump) are not returned to the tank.
The result? Your fuel Mixture becomes incredibly rich. Symptoms include:
-Poor MPG (15-30MPG)
-Poor Performance
-Fouled Spark Plugs
-Strong Fuel Odor when bike is running
-Bogging down
-Stalling
-MAP Sensor Error (2 Flashes)
-Exhaust 'Popping'
-Non-standard and erratic engine temperatures
-Cool Exhaust Gas Temperatures
-Gas in Oil
-Difficult to start
-Low/Erratic idle speed.
How do I replace it?
As I mentioned with the disclaimer, the best way to replace it (if you are unsure if yourself) is to take it to the dealership. They may charge you $200+ for this procedure. It takes about an hour or so to do. If you don't wanna go that route, then let's get on with it with a step by step guide.
Tools:
QTY 1: Fuel Pressure Regulator: Part 16740-MBW-J32 (Not, Repeat, Not 16740-MBW-J31. J31 was supersceaded by J32)
QTY 1: O-Ring/Gasket. Part Number 16741-PG7-005 (Note. Sometimes the gasket is included. Check with your dealer)
QTY 1: 5mm Allen Screw - To Remove Fairings
QTY 1: 6mm Allen Screw - To Remove Gas Tank
QTY 1: Phillips Head Screwdriver - To Remove Air Cleaner/Box (Optional, but reccomended)
QTY 1: Ratchet Wrench
QTY 1: 8mm Socket - To Remove upper fuel tank and the FPR itself
QTY 1: 10mm Socket - To remove the Seat
QTY 1: 17mm Socket - To drain Fuel Tank (Optional)
QTY 1: Golf Tee - To plug the Fuel Return Hose
QTY 1: Gas Can - To Drain tank - Optional
QTY 2: Bungee cords - To hold your gas tank (You do not need to remove the tank)
Last but not least
QTY Lots: Old Bath Towels
Another easy way to do this is to make sure your tank is near empty before doing this. A full tank is heavy, and is a pain in the ***.
The Easy Part
Step 1: Remove Fairings.
Step 2: Remove the seat
Step 3: Remove ECU (Optional, But highly recommended!)
Step 4: Prop up the tank with your bungee cord
Step 5: Remove Airbox (Optional, but you'll get a ton more room to work with)
Your bike should look something like this:
Damn my bike is sexxxy.
The Hard Part
Locate the Fuel Pressure Regulator and the hoses. They are on the clutch side. If you have a small enough ratchet wrench, No need taking off the throttle bodies.
Step 6: Place your towels under your bike. The best location for them to go is just in front of your kickstand. Again I stress, Make sure your engine is cold!
Step 7: Remove the Fuel Return Hose and quickly stick your golf tee in there. Fuel will pour out when you disconnect it.
Step 8: Remove the vacuum hose (if you can reach it. If not, Do it once the old FPR is off)
The Messy Part
Have your New FPR close to you. You don't want to be searching all over the garage for it after you remove your old FPR
Step 9: Remove the FPR with your 8mm Ratchet.
Notice how the FPR sits flush against the fuel rail. As soon as you start unscrewing it, fuel will start dripping out. Work quickly! It's just going to dribble out, it's not going to get crazy or anything.
Step 10: Replace your FPR and torque to 7ft-lbs. Do not reuse your o-ring.
If step 10 takes a long time to complete, don't fret. The fuel will stop dribbling out once the fuel is exhausted in the fuel rail. Mine did anyway.
Reassemble your bike in reverse order.
The Fun Part
You should immediately notice a difference once you start her back up and take her for her first ride. Note that it may take longer than normal to start since the fuel in the rail was depleted.
Rock on
FLY Out...
#2
11-15-2008, 07:17 PM


#3
11-15-2008, 07:23 PM
Join Date: Jul 2007
Location: Columbus, OH
Posts: 2,246
Likes: 0
Received 0 Likes
on
0 Posts
#4
11-15-2008, 07:25 PM

#5
11-15-2008, 09:21 PM
Senior Member
Join Date: Feb 2006
Location: Kearney, Nebraska
Posts: 1,640
Likes: 0
Received 0 Likes
on
0 Posts
Two thumbs up to you Flyou!!! Outstanding job on the write up and excellent job with the photos. I noticed that we have the same paint scheme on our bikes. Although you don't have a chain guard on yours. Are those Michellins on your bike too? I used a piece of wood to support my tank instead of the bungee cord. Both works.
#6
11-16-2008, 11:54 AM
Join Date: Jul 2007
Location: Columbus, OH
Posts: 2,246
Likes: 0
Received 0 Likes
on
0 Posts
yep! I've got the pilot powers. I dunno where the chain guard went. The guy that owned it before me didn't like it i guess.
But yeah, A piece of wood to support the tank works too. With a heavy, full gas tank, sometimes bungee cord won't cut it and you need something stronger.
But yeah, A piece of wood to support the tank works too. With a heavy, full gas tank, sometimes bungee cord won't cut it and you need something stronger.
#7
11-16-2008, 04:14 PM

#9
11-16-2008, 04:59 PM
#10
11-16-2008, 05:03 PM
Join Date: Jul 2007
Location: Columbus, OH
Posts: 2,246
Likes: 0
Received 0 Likes
on
0 Posts
if you're on the track, i'd say about 110
If you're riding hard in the city, i'd say about 120-130
If you're riding like an old lady, about 150-170.
I've gotten as far as 171 without the bars lighting up. Most of the time I get about 130-145. We can beat this one to death, but we should save that for one of the other countless forums on that debate.