Brake bleeding and fluid change on 600RR models.
#1
 05-05-2010, 09:07 AM


Manufacturers recommend changing this every one to two years and with good reason, brake fluid is hygroscopic
and absorbs moisture from the air ... this will affect braking performance and the water content will corrode master
and slave cylinders internally over time.
Changing the brake fluid is the same procedure as bleeding the brakes only more of it.
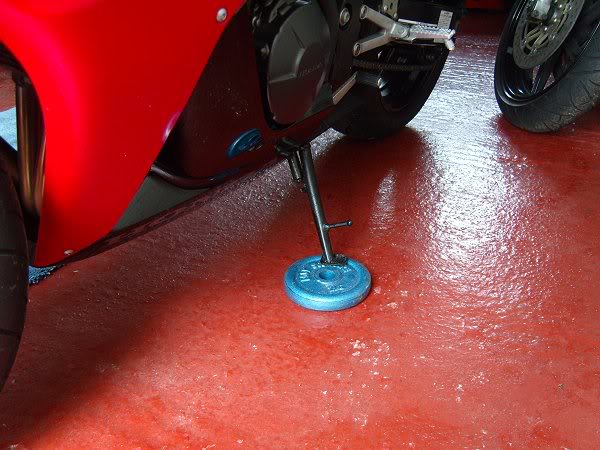
First you need to get the bike parked up with the master cylinder reservoir roughly level.
I found with the 600RR that you need to have the bars turned to the right so you can crack off the screw
holding the reservoir cap bracket in place.

I also found by using an old dumb bell weight on the side stand as shown and keeping the bars on full right lock
it put the reservoir just about level.
Once you have undone and removed the cap bracket you can then unscrew the plastic cap off the reservoir,
always grip the reservoir when doing this so as not to stress it's mounting ... you will see a plastic diaphragm cover,
remove this and the rubber diaphram beneath it.

Get several old rags or towels and cover your handlebars, instrument cluster, and wheels. Brake fluid is very caustic,
and will quickly ruin paint and crack plastic if it’s spilled.
If you do spill some, even a small amount, immediately flush with copious amounts of soapy water.
Use a NEW bottle of DOT 4 brake fluid as shown, I got mine from my local Halfords store ... DOT 3, 4 and 5.1 are compatible,
5.0 is silicone based and not compatible.
Keep it simple and use the recommended DOT 4.
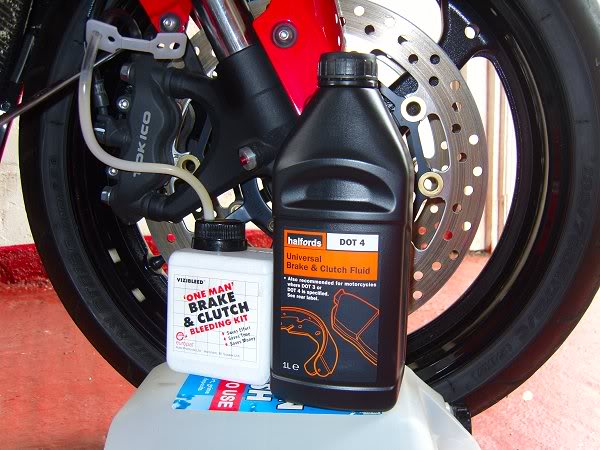
Remove the rubber cap on the bleeder nipple, located on the caliper. Attach a piece of clear tubing to the bleeder nipple on the caliper,
and place the other end in a waste container. An old bottle will do. Or use a one man brake bleeder kit as I have done as shown,
the tube has a simple one way valve at the end that goes in the bottle so air cannot be drawn back in.


You need to place a spanner 8mm. over the bleed nipple first and seat it over the hex part of the nipple
then attach the rubber bleeding hose.
Open the bleeder nipple about � turn.
Squeeze the brake lever all the way in. DO NOT release it yet.
Close the bleeder nipple. Then release the brake lever.
Repeat these steps enough times to replace the volume of fluid in the reservoir about two or three times.
Once you have opened the nipple if you are changing fluid as opposed to just bleeding out some air then
you can leave it open and just pump the brake lever in and out repeatedly until all fluid is nearly expelled
but not dropped below the level of the hole in the bottom of the reservoir.
Keep a close eye on the level in the reservoir, so that it doesn’t run dry!!
If it does, it won’t hurt anything, but you’ll have introduced air into the system that you’ll need to bleed out.
Like moisture, air in the lines will decrease the braking power. Add fluid to the reservoir as necessary.
As shown in the picture below if you don't let the level drop below the hole in the bottom of the reservoir
you will not introduce air into the system, when it gets this low simply fill the reservoir back up with new fluid
and flush through again.

While bleeding, observe the fluid coming out of the clear tubing. At first, you will probably see air bubbles coming out.
Keep bleeding until bubble-free fluid is coming out.
A point to note is that you often get air introduced between the bleed tube and nipple union so air bubbles
coming out are not from the system itself, be aware of this.
When there is no more air in the tubing, and you have clear new fluid coming through hold the lever back
against the bar and snugly close the bleeder nipple and carefully remove the tubing, and replace the rubber cap.
Repeat the above procedure for the left hand side caliper.
Finally, top off the reservoir to the correct level and replace the cap.
Pump the brake lever until it is firm.
It is exactly the same procedure for the rear brake and as shown in the pics you can see the position of the rear brake reservoir
and the nipple and tube in place ready for bleeding. Obviously this time you are pumping up and down on the rear brake pedal to
expel the old fluid and air. Keep pumping on the pedal by hand until it is nearly empty but not below the level of the hole in the
bottom of the reservoir. Once you have flushed through two or three times I did three then top up and tighten the bleed nipple with
the pedal in a down position. This is so you do not pull air back in by releasing the pedal before you tighten the nipple.
Top up the fluid to the line and pump the pedal to get it hard again.

Note also the rubber diaphragm once you remove the cap. The rear reservoir has two screws this time holding the cap in place.
Always grip the reservoir when undoung the caps on these so as not to unduly stress their mount points.

Another thing to mention is cleanliness here. It was a bit breezy outside so I did this in my garage, you do not want bits
and particles blowing into your reservoir when you have the cap off it, keep the area clean and before you remove the cap
wipe around the reservoir to remove any dust, dirt or grime.
Also do not use old bottles of opened brake fluid you may have had lying around a while since brake fluid is hygroscopic and
absorbs moisture from the air. Buy a new bottle and use it up, I did both my bikes.
Well, hope that helps and encourages some of you to check the condition of this vital fluid!!
Jules
and absorbs moisture from the air ... this will affect braking performance and the water content will corrode master
and slave cylinders internally over time.
Changing the brake fluid is the same procedure as bleeding the brakes only more of it.
First you need to get the bike parked up with the master cylinder reservoir roughly level.
I found with the 600RR that you need to have the bars turned to the right so you can crack off the screw
holding the reservoir cap bracket in place.
I also found by using an old dumb bell weight on the side stand as shown and keeping the bars on full right lock
it put the reservoir just about level.
Once you have undone and removed the cap bracket you can then unscrew the plastic cap off the reservoir,
always grip the reservoir when doing this so as not to stress it's mounting ... you will see a plastic diaphragm cover,
remove this and the rubber diaphram beneath it.
Get several old rags or towels and cover your handlebars, instrument cluster, and wheels. Brake fluid is very caustic,
and will quickly ruin paint and crack plastic if it’s spilled.
If you do spill some, even a small amount, immediately flush with copious amounts of soapy water.
Use a NEW bottle of DOT 4 brake fluid as shown, I got mine from my local Halfords store ... DOT 3, 4 and 5.1 are compatible,
5.0 is silicone based and not compatible.
Keep it simple and use the recommended DOT 4.
Remove the rubber cap on the bleeder nipple, located on the caliper. Attach a piece of clear tubing to the bleeder nipple on the caliper,
and place the other end in a waste container. An old bottle will do. Or use a one man brake bleeder kit as I have done as shown,
the tube has a simple one way valve at the end that goes in the bottle so air cannot be drawn back in.
You need to place a spanner 8mm. over the bleed nipple first and seat it over the hex part of the nipple
then attach the rubber bleeding hose.
Open the bleeder nipple about � turn.
Squeeze the brake lever all the way in. DO NOT release it yet.
Close the bleeder nipple. Then release the brake lever.
Repeat these steps enough times to replace the volume of fluid in the reservoir about two or three times.
Once you have opened the nipple if you are changing fluid as opposed to just bleeding out some air then
you can leave it open and just pump the brake lever in and out repeatedly until all fluid is nearly expelled
but not dropped below the level of the hole in the bottom of the reservoir.
Keep a close eye on the level in the reservoir, so that it doesn’t run dry!!
If it does, it won’t hurt anything, but you’ll have introduced air into the system that you’ll need to bleed out.
Like moisture, air in the lines will decrease the braking power. Add fluid to the reservoir as necessary.
As shown in the picture below if you don't let the level drop below the hole in the bottom of the reservoir
you will not introduce air into the system, when it gets this low simply fill the reservoir back up with new fluid
and flush through again.
While bleeding, observe the fluid coming out of the clear tubing. At first, you will probably see air bubbles coming out.
Keep bleeding until bubble-free fluid is coming out.
A point to note is that you often get air introduced between the bleed tube and nipple union so air bubbles
coming out are not from the system itself, be aware of this.
When there is no more air in the tubing, and you have clear new fluid coming through hold the lever back
against the bar and snugly close the bleeder nipple and carefully remove the tubing, and replace the rubber cap.
Repeat the above procedure for the left hand side caliper.
Finally, top off the reservoir to the correct level and replace the cap.
Pump the brake lever until it is firm.
It is exactly the same procedure for the rear brake and as shown in the pics you can see the position of the rear brake reservoir
and the nipple and tube in place ready for bleeding. Obviously this time you are pumping up and down on the rear brake pedal to
expel the old fluid and air. Keep pumping on the pedal by hand until it is nearly empty but not below the level of the hole in the
bottom of the reservoir. Once you have flushed through two or three times I did three then top up and tighten the bleed nipple with
the pedal in a down position. This is so you do not pull air back in by releasing the pedal before you tighten the nipple.
Top up the fluid to the line and pump the pedal to get it hard again.
Note also the rubber diaphragm once you remove the cap. The rear reservoir has two screws this time holding the cap in place.
Always grip the reservoir when undoung the caps on these so as not to unduly stress their mount points.
Another thing to mention is cleanliness here. It was a bit breezy outside so I did this in my garage, you do not want bits
and particles blowing into your reservoir when you have the cap off it, keep the area clean and before you remove the cap
wipe around the reservoir to remove any dust, dirt or grime.
Also do not use old bottles of opened brake fluid you may have had lying around a while since brake fluid is hygroscopic and
absorbs moisture from the air. Buy a new bottle and use it up, I did both my bikes.
Well, hope that helps and encourages some of you to check the condition of this vital fluid!!
Jules
#2
05-07-2010, 01:06 PM

Senior Member
#3
11-05-2010, 03:08 PM

Senior Member
Join Date: Jun 2009
Location: Washington DC area
Posts: 2,419
Likes: 0
Received 0 Likes
on
0 Posts
#4
11-05-2010, 04:53 PM
Senior Member

#6
02-03-2011, 03:09 PM

Member
Join Date: Feb 2011
Location: Colorado
Posts: 50
Likes: 0
Received 0 Likes
on
0 Posts
I like to use a bungee cord after I'm done bleeding it. Once I think I've bled it enough, I fill the reservoir up all the way, leave the cap off of the reservoir and wrap a bungee cord around the grip and lever fairly tight and leave it that way over night. It squeezes out any remaining bubbles in your master cylinder and line and I've never had 1 issue... granted I bleed my lines exactly how the OP said.

#8
04-27-2011, 11:17 AM

I like to use a bungee cord after I'm done bleeding it. Once I think I've bled it enough, I fill the reservoir up all the way, leave the cap off of the reservoir and wrap a bungee cord around the grip and lever fairly tight and leave it that way over night. It squeezes out any remaining bubbles in your master cylinder and line and I've never had 1 issue... granted I bleed my lines exactly how the OP said.
Either way, tying the brake lever overnight has a noticeable effect on the stiffness of the brakes. I highly recommend doing this.


